A single-page, plain reference. For search and section navigation, use the interactive manual.
Getting around
Getting Started
Welcome to Limner, a Windows-native raster and vector painting app. This page walks you from the installer to your first finished PNG: installing and updating, creating and opening documents, saving your work, and a quick five-minute drawing exercise.
Limner ships as a signed Windows installer. Download it from the releases page, then run it. The installed program is Limner.exe.
The SmartScreen note
Limner's installer and executable are code-signed by a verified publisher, Parker Vincent (the developer behind Limner). Because Limner is still a new app, Windows SmartScreen may show a blue "Windows protected your PC" screen the first time you run the installer. That is normal for a newly released app, not a sign that anything is wrong, and it fades as more people install. If you see it, click More info, confirm the publisher reads Parker Vincent, then choose Run anyway. This is the same signature Limner verifies before installing any future update.
Screenshot
the Windows SmartScreen / UAC dialog showing the verified publisher name.
First launch
The app starts blank, with no canvas open. What happens next depends on your last session:
Crash recovery. If Limner did not close cleanly last time, it finds the automatic backups it saved and shows a "Recover unsaved work?" prompt. This takes priority over everything else (recovering unsaved work comes first). See Crash recovery below.
Open your last project. If there is no recovery to do but you have a recent file, Limner shows a "Welcome back" prompt offering to reopen your most recent project. Choose Open to reopen it, or Start blank to begin with an empty app.
Nothing pending. With neither of the above, the app simply waits for you to choose File ▸ New or File ▸ Open.
Double-clicking a .limner file in Windows Explorer launches Limner and opens that document directly.
Keeping Limner up to date
Limner has a built-in updater. It only ever contacts the network to fetch a small version manifest and, if you choose to update, to download the new signed installer. No identifiers are sent, and you can turn the whole feature off.
Check for updates
Manual check. Help ▸ Check for updates... checks immediately and tells you whether you are up to date or shows an available update.
Automatic daily check. Edit ▸ Preferences ▸ Check for updates automatically is a checkbox (hover text: "Once a day on launch. No data is sent beyond the version check."). When it is on, Limner checks at most once every 24 hours on launch.
Version readout. Help ▸ "Limner {version}" shows the version you are running.
The update flow
When an update is found, a status bar badge ("Update available") and a dialog appear. The dialog shows the new version, what you have now, and the release notes. From there you can:
Download and install the update. Limner downloads the new installer, verifies its SHA-256 hash and its Authenticode signature (the signer must match the verified publisher), and then offers Install now. Installing closes Limner so the installer can replace the running program, then reopens it.
Skip this version to silence the automatic check for that release (a manual check still surfaces it).
Later to dismiss the prompt for now.
The auto-updater is Windows-only. For the full update workflow, see Updating.
Screenshot
the "Update available" dialog with version, current version, and the release notes scroll.
Creating a document
Choose File ▸ New... to open the New Project dialog.
Screenshot
the New Project dialog showing Preset, Width, Height, Orientation, Units, Resolution, the resolved pixel size, and the Background row.
New Project dialog
Control
Range
Default
What it does
Preset
Custom, plus 6 size presets (see below)
Custom
Fills Width, Height, and Resolution from a ready-made size. The fields stay editable afterward.
Width
0.1 to 100000 (in the chosen unit)
2048 px
Canvas width. Resolved to pixels, clamped, and rounded to an even number.
Height
0.1 to 100000 (in the chosen unit)
2048 px
Canvas height. Resolved to pixels, clamped, and rounded to an even number.
Orientation
Swap W / H button
(no default)
Swaps width and height to flip between portrait and landscape.
Units
px, inch, cm
px
The unit for Width and Height. Switching converts the numbers so the physical size is preserved.
Resolution
72, 96, 150, 300, 600 DPI
96 DPI
Print resolution. It is written into exported PNG and PSD headers but does not change the pixel dimensions.
Background
any sRGB color, or Transparent
white (255, 255, 255), not transparent
The starting paper color. Check Transparent for a transparent background layer (the color picker is disabled while transparent is on).
Below the fields, the dialog shows the resolved size as "Canvas: W x H px".
Size and resolution limits. The final pixel dimensions are clamped to a minimum of 16 px and a maximum of 8192 px per side, and forced to an even number (H.264 timelapse requires even width and height, and even dimensions tile cleanly). DPI is forced to at least 1.
Size presets. Selecting a preset fills the fields with these pixel sizes and DPI:
Preset
Size
DPI
1920 x 1080 (Full HD)
1920 x 1080
72
3840 x 2160 (4K UHD)
3840 x 2160
72
2048 x 2048 (Square)
2048 x 2048
72
4096 x 4096 (Square)
4096 x 4096
72
A4 (300 DPI)
2480 x 3508
300
US Letter (300 DPI)
2550 x 3300
300
Click Create to make the document, or Cancel (or press Esc, or click outside) to dismiss the dialog.
Opening a document
File menu
File ▸ Open... opens a .limner document. The legacy .artpaint extension is also accepted, so older files keep loading. If a file is already open, Limner switches to its tab instead of opening a second copy.
File ▸ Import PSD... imports a Photoshop .psd file as a new document, with each PSD layer becoming a Limner layer. The import canvas limit is 8192 x 8192 px.
File ▸ Import Image as Layer... brings a PNG, JPG, or JPEG into the current document as a new layer, centered at its native scale. This item is enabled only when a document is open.
If a document cannot be opened, Limner shows a "Could not open file" dialog with the reason.
Drag and drop
Drag a file onto the Limner window to open it. The action depends on the file type:
File type
What happens
.limner, .artpaint
Opens as a document
.psd
Imports as a new document
.abr
Imports as new brush tips
.png, .jpg, .jpeg, .webp, .bmp, .gif, .tif, .tiff
Added as a new layer if a document is open, otherwise opened as a new document
anything else
Shows an "Unsupported file" message listing the accepted types
Dropping several files opens or imports each one in turn. Note the drag-and-drop image list is wider than the File ▸ Import Image dialog filter, which accepts PNG, JPG, and JPEG only.
For the full details of every format Limner reads and writes, see File Formats.
Saving
File ▸ Save writes the document to its current file. If the document has never been saved, Save behaves like Save As. If nothing has changed since the last save, Save does nothing.
File ▸ Save As... writes to a new file. The default name is untitled.limner (or the existing file's name). The native extension is .limner; the legacy .artpaint extension is still offered so existing files can re-save in place.
When you save, Limner shows a brief "Saving…" indicator in the status bar. Writes are atomic, so the previous file is never left truncated, even when you save over the file you have open.
Note
the first time you save, Limner shows a one-time notice that the document format is experimental.
The modified dot
A document with unsaved changes shows a dot marker:
In the document tab strip, the tab label gains a "•" suffix while it has unsaved changes (hover text: "Unsaved changes: click to switch").
While you work, Limner periodically writes a background backup of each modified document (by default about every two minutes, in between strokes). These backups are never "the" save: an autosave does not clear the modified dot or change which file Save targets, so you still need to save your work normally.
If Limner does not close cleanly, those backups remain on disk. The next launch detects them and shows the Recover unsaved work? prompt:
Restore (or Restore all) reopens each backed-up document, pointed back at its original file so Save goes to the right place.
Discard backup (or Discard backups) throws the backups away.
This quick walkthrough gets you from a blank canvas to an exported PNG.
Create a canvas. File ▸ New..., leave the defaults (2048 x 2048 px, 96 DPI, white background), and click Create.
Choose a brush. Click the Brush tool in the left tool strip (default shortcut: B). Open the Brush panel and pick a preset. For everything the Brush tool can do, see the Brush tool.
Pick a color. Open the Color panel and choose a color. The current color also shows as a "#RRGGBB" swatch at the right end of the status bar. Tip: hold Alt anywhere on the canvas to pick up a color from the artwork (the eyedropper).
Draw a stroke. Drag on the canvas to paint. Press [ and ] to shrink and grow the brush, even mid-stroke. Made a mistake? Press Ctrl+Z to undo.
Add a layer. Press N (or Layer ▸ Add Layer) to add a new layer above the current one, then draw on it without touching your first stroke. Layers stack from bottom to top. See Layers to learn about blend modes, opacity, masks, and reordering.
Export a PNG. In the File menu, under the Export section, choose PNG... (default shortcut: Ctrl+E), pick a location, and save. The PNG keeps transparency and records your document's DPI. To save the editable project itself (with all layers intact), use File ▸ Save and keep the .limner file.
Screenshot
a finished two-layer sketch with the Brush, Color, and Layers panels visible.
That is the whole loop: new document, brush, color, stroke, layer, export. From here, explore The Interface to learn the workspace zones, dig into the tools, or read up on File Formats.
Limner Plus
Limner has a free core for everyday raster art, and a Plus tier that adds the vector, animation, comic, and pro-production tools. During the open beta, Plus is free: request a key, paste it in, and everything unlocks. Plus will become a paid upgrade once the beta ends.
For installing and updating the app itself, see Getting Started.
Free and Plus
Everything in the core painting studio is free, and the core stays free. Plus unlocks the larger design, animation, and production workspaces.
Limner Free includes:
Raster painting with the full brush engine, layers, blend modes, masks, and selections.
Filters and adjustments: HSL, Levels, Curves, Blur, and the rest.
Opening and saving .limner, and importing and exporting PNG, JPEG, and PSD.
The auto-updater, autosave and crash recovery, rulers, symmetry, and the rest of the core workspace.
Limner Plus adds:
Vector design workspace and editable vector layers, plus SVG export.
Brush Studio: build your own brushes, with .abr import and export.
Animation studio: the cel timeline, a keyframed 2D camera, layer motion and opacity keyframes, composited onion skin, and GIF, MP4, and PNG export (with GIF and image-sequence import).
Comic and manga studio (Book projects).
Advanced timelapse: batch, social presets, and end cards.
Pro export: batch, multi-resolution, and watermarking.
Every future Limner Plus feature.
On Limner Free, the Plus tools are simply hidden until you unlock them. The Vector, Animation, and Book workspace tabs stay visible with a ✦ mark; choosing one opens the unlock window instead of switching workspaces.
Getting a key
During the open beta, keys are free. Request one from the Limner website: enter your name and email on the signup form, and a key is emailed to you. There is one key per email address, so asking again just re-sends the same key.
Plus is free while Limner is in beta. It will become a paid upgrade after the beta.
Activating Plus
Open Help ▸ Enter Limner Plus key..., paste your key into the field, and click Activate. The first time you launch Limner, a welcome window also offers to paste a key or to continue on Limner Free.
Activation happens online and ties the key to the computer you activate on (one device per beta key). As soon as it succeeds, the Plus tools appear, and the status line at the bottom of the Help menu changes from "Limner Free" to "Limner Plus".
Staying activated and privacy
Limner re-checks your key quietly on its once-a-day update check, so you do not have to do anything to stay activated. Plus keeps working offline for a grace period of about three weeks before it needs to reconnect.
A beta key is tied to one computer. If you need to move to a new machine, contact limnersupport@limnerart.com.
Limner reaches the network for only three things: the once-a-day version check, downloading an update you choose to install, and activating or renewing your key. It never sends your artwork, and it sends no personal identifiers beyond what activation needs.
If a feature is locked
A workspace tab or menu item marked with ✦, or a panel that reads "... is a Limner Plus feature", is part of Plus. Click Get Limner Plus on that panel, or open Help ▸ Enter Limner Plus key..., to unlock it with a key. If you do not have one yet, request a free beta key from the website.
If a key will not activate, check that you are online (activation needs a connection), that you pasted the whole key, and that the key is not already active on another computer.
The Interface
Limner keeps every painting control inside one window, arranged so the canvas stays front and centre and the tools sit close to your hand. This page walks through each zone of the window from top to bottom, then covers the things you will touch most: the tool strip, the status bar, the document tabs, and how to rearrange the panels into a workspace that suits you.
Screenshot
the full Limner window with the mode switcher, menu bar, tool options bar, document tabs, left tool strip, docked panels, canvas, and status bar all visible and labelled.
This release files the interface the way Photoshop and Clip Studio Paint do, and adds a round of desktop comforts:
Menus, refiled the standard way. Colour and tone adjustments now live under Image ▸ Adjustments, selection edits and Free Transform under Edit, Expand / Contract / Border / Feather under Select ▸ Modify, and app settings under Edit ▸ Preferences. Every action itself is unchanged. See Menus Reference.
Brush families. Pen, Pencil, and Airbrush sit on the tool strip as their own keys beside Brush; each drives the full brush engine and remembers the last brush you picked in it, across restarts.
Tool groups select first. Clicking a grouped tool key selects the tool shown on it; a second click (or a double-click) opens the flyout.
Borderless fullscreen. F11 (or View ▸ Fullscreen) gives the canvas the whole screen; F11 again brings the window back.
Fit and 100% zoom. Two view buttons snap the canvas to fit-the-window or to true pixel-for-pixel, and Ctrl+1 jumps to 100% from the keyboard.
Pick your status readout. The status bar’s info slot can show canvas dimensions, the active layer’s name, or nothing; the choice is remembered.
Layers panel upgrades. The active layer’s lock / transparency lock / clip / reference toggles live in the always-visible strip at the top of the panel, and a mask button on the action bar adds or manages layer masks. See Layers.
The window at a glance
Limner stacks a series of bars across the top and bottom of the window, puts the tool strip and dockable panels along the sides, and gives whatever space is left to the canvas. Top to bottom, left to right:
Zone
What it is
Workspace mode switcher
A slim strip that switches the document between Illustration, Vector, and Animation.
Menu bar
The nine menus (File, Edit, Image, Layer, Select, Filter, View, Window, Help) plus the Limner wordmark.
Tool options bar
A contextual bar whose controls change to match the active tool.
Document tab strip
One tab per open document; appears only when at least one document is open.
Left tool strip
The vertical strip of tool keys.
Dockable panel areas
A panel area on the left (hidden while empty) and one on the right.
Status bar
The bottom row: active tool, canvas size, zoom, layer info, color swatch, and the canvas rotation controls.
Canvas
Everything that remains in the middle. The artwork lives here.
The flat ink-black theme with a single bright cyan accent is intentional: the chrome stays dark and quiet so the one hot color, cyan, always means "this is active or actionable". See Theme below.
Workspace mode switcher
The thin strip above the menu bar is the workspace switcher. It shows a weak "Workspace" label followed by one button per mode. The active mode is highlighted; clicking a different one switches the current document into it.
Mode
Tooltip
Notes
Illustration
"Raster painting: brushes, selections, filters"
The raster painting workspace.
Vector
"Vector art: editable paths with fill and stroke"
The editable-path workspace.
Animation
"Frame by frame animation: draw cels on a timeline"
Mode is per document. Two open documents can sit in different modes at the
same time.
Switching never converts your layers. The mode is a lens on the same
document. Switching reconfigures the tool strip and the panels, but the layer stack is left exactly as it was. (Entering Animation mode does add an opaque white paper under your art the first time, so frames are not see-through; see Animation Mode.)
Switching on a document that already has artwork asks first. Rather than
switching silently, Limner opens a dialog with three choices: New starts a fresh document in the chosen mode, Convert reinterprets the current document in that mode, and Cancel leaves the document where it is.
The Ctrl+Shift+M hotkey toggles Illustration and Vector only. Animation is
reached by clicking its switcher segment; pressing the hotkey while in Animation returns you to Illustration.
A document opens in the workspace that suits its contents: an animation opens
in Animation mode, a document with vector artwork in Vector mode, and everything else in Illustration.
Books
A Book is a multi-page comic or manga project. It is not a fourth workspace: the switcher still offers only Illustration, Vector, and Animation. A Book is a separate axis that wraps a sequence of pages, and each page is its own document that you still paint in one of the three modes.
A Book lives in the File menu rather than the workspace switcher:
File ▸ New Book starts a fresh book.
File ▸ Open Book opens an existing one.
File ▸ Open Recent Book lists books you opened lately.
A Book saves to a single .limnerbook file that holds all of its pages. While a Book is open you get a page list (to add, reorder, and page through the pages) and a comic Panel tool in the tool strip, which lays down panel frames that clip their artwork so nothing spills into the gutters. For the full page and panel workflow see Books.
Menu bar
The menu bar holds nine menus, left to right: File, Edit, Image, Layer, Select, Filter, View, Window, Help. A "Limner" wordmark with a palette icon sits at the right end. Every command and its shortcut is documented in Menus.
Tool options bar
The bar directly below the menus is contextual: its contents change with the active tool. Pick a selection tool and you get the selection mode and feather; pick the Fill and you get tolerance, and so on. Each tool's options are documented on that tool's page under Tools.
Three things hold their place no matter which tool is active:
Undo and redo sit in the exact centre of the bar, as a pair of small arrow
buttons (hover "Undo (Ctrl+Z)" and "Redo (Ctrl+Shift+Z)"). They are pinned to the bar's true centre, so they stay put however many controls the active tool shows.
The active tool's name and icon lead the bar on the left, in bold.
A "Snap" checkbox appears from any tool while a ruler or guides are in use,
so you can turn snapping off without leaving the brush.
The sliders are responsive: their track width scales with the window, growing on a wide screen and shrinking on a narrow one, so a busy bar stays clear of the centred undo and redo.
The bar holds a constant height no matter which tool is active, so the canvas no longer shifts up or down when you switch tools.
The Brush bar
With the Brush active, the bar is trimmed to the four controls you touch constantly, each with its caption on the left:
Control
What it does
Size
The brush diameter.
Hardness
The edge falloff, from soft to hard.
Opacity
The maximum coverage of the stroke.
Flow
How fast paint builds up within a stroke.
A live thumbnail of the active brush sits at the far left (click it to open the Brush picker). Pinned to the right edge, clear of the centred undo and redo, are the colour swatch, an Erase toggle (paint transparently with the current brush), and a Brush Settings button that opens the deeper Brush Settings panel where the blend mode, stabilizer, pressure curves, tip shape, scatter, and texture live. The full set of brush controls is on the Brush page.
Document tab strip
When you have one or more documents open, a tab strip appears showing one tab per document.
Element
Behavior
Tab label
The document title. A bullet ( • ) is appended when the document has unsaved changes.
Switch
Click a tab to bring that document to the front.
Close
The small X next to each tab closes that document. If it has unsaved changes, Limner asks before closing.
Hovering a tab shows "Unsaved changes: click to switch" when it has unsaved work, or "Click to switch" otherwise.
Left tool strip
The vertical strip on the far left holds the tools as a column of icon keys. The active tool's key is lit in cyan.
The strip is resizable. Drag its right edge wider and the keys reflow into more columns, the way Photoshop and Clip Studio Paint let you widen a compact tool column. Each key is 40 by 36 pixels.
Tool groups and flyouts
Related tools are bundled into a group that shares one key. A grouped key shows a small corner triangle to signal "more tools live here". The key displays the active tool when one of its members is selected, otherwise the group's first tool.
Tap a single-tool key to select that tool.
Tap a grouped key to select the tool shown on it; tap again (or double-click) to open the flyout and pick another member.
Each flyout row also has a small "out" button whose hover reads "Move this tool
to its own slot", which pops that tool out onto its own key.
In Illustration mode the strip starts with these ten groups (flyout order shown):
Group
Tools
Brush
Brush
Eraser
Eraser
Selection
Rect Select, Ellipse Select, Lasso, Polygon Select, Magic Wand
Eyedropper
Eyedropper
Fill
Fill Bucket, Gradient
Shape
Rectangle, Ellipse, Line
Ruler
Linear Ruler, Parallel Ruler, Radial Ruler, Concentric Ruler, Symmetry, Perspective
Vector
Object, Line Edit
Text
Text
Move
Layer Move, Mesh Warp, Liquefy
In Vector mode the strip is a fixed set built for path work: Selection, Direct Select, Pen, Pencil, a Shapes group (Rectangle, Ellipse, Line, Polygon, Star), Gradient, and a Scissors / Join group. The Vector strip is not customizable.
Animation mode uses the Illustration paint strip, unchanged, since you draw each frame with the same raster tools. See Animation Mode.
Screenshot
the Illustration tool strip with a multi-tool group flyout open, showing the corner triangle marker and the per-tool "out" button.
Rearranging the strip (Illustration)
In Illustration mode you can reorder and regroup the keys:
Long-press a tool key (hold for about half a second).
A drag arms, and a ghost of the tool follows the pointer.
Drop it onto another tool to group the two together, or drop it into the empty
strip area to give it its own key. An insertion line or a ring shows where the drop will land.
To undo your changes, choose Window ▸ Reset tool strip layout, which restores the default tool order.
Cursors
Over the canvas, Limner shows a Photoshop and Clip Studio-style cursor that matches the active tool, so the pointer tells you what it will do.
Brush, Eraser, Liquefy, and the blend brushes show a ring sized to the
brush, optionally with a centre crosshair. Toggle the ring with View ▸ Brush-size cursor and the centre crosshair with View ▸ Crosshair in brush tip.
Caps Lock switches the brush tools to a precise mode: the ring is replaced
by a fine crosshair, the way Photoshop's Caps Lock works. Press it again to go back to the ring. This affects only the brush-style tools.
Eyedropper shows a crosshair; the Text tool shows an I-beam.
Transform, Layer Move, the Object tool, and the Vector-mode Selection tool
show contextual handle cursors: a four-way move inside the box, a directional resize arrow over a corner, and a grab over the rotation handle. Mesh Warp shows a grab over a grid point and a move elsewhere. (The Direct Select and Line Edit point editors keep the plain arrow.)
The draw, select, shape, ruler, and pen tools show a precise crosshair.
View gestures override the tool cursor: holding Space shows an open hand,
dragging to pan shows a closed hand, and a Space+Ctrl scrubby zoom shows a magnifier.
Status bar
The bar across the bottom of the window is a single glanceable row. Left to right:
Element
Shows
Active tool
The tool icon and name.
Canvas size
The canvas dimensions, for example "1920 × 1080".
Zoom
The current zoom as a percentage.
Layer info
The layer count and the active layer name, for example "3 layers (active: Background)". A long name is shortened, with the full name on hover.
Saving / Exporting
A cyan "Saving…" or "Exporting…" indicator, shown only while a background save or export is running.
Update badge
A cyan pill that appears only when an update is available or ready (see below).
At the right end of the bar:
Element
What it does
Color readout
The current paint color as a #RRGGBB hex string with a matching color drop.
Rotate counter-clockwise
Rotates the canvas view 15 degrees counter-clockwise.
Rotation slider
Sets the canvas view rotation directly.
Rotate clockwise
Rotates the canvas view 15 degrees clockwise.
Reset rotation
Returns the canvas view to 0 degrees.
Control
Range
Default
What it does
Rotation slider
-180.0 to 180.0 degrees
0
Rotates the canvas view. The value is clamped to the range and the buttons step it in 15 degree increments.
Canvas rotation is a view-only transform: it turns how you see the canvas, it does not rotate the artwork itself.
Update badge
The badge only appears when there is news to act on:
Update available: a cyan pill reading "Update available". Click it to see
details. Hover reads "A newer version of Limner is available. Click for details."
Update ready: a cyan pill reading "Update ready" once the update is
downloaded and verified. Click it to install. Hover reads "The update is downloaded and verified. Click to install."
Updating: a plain "Updating…" label while a check, download, or
verification is in progress.
When Limner is up to date there is no badge. For more on updating see Updating.
Dockable panels
Limner has two panel areas: one on the left, beside the tool strip, and one on the right. The left area stays hidden until you put a panel in it. The right area collapses to a fixed 14 pixel rail when empty, which doubles as a drop target so you can drag a panel back into it.
Each panel rides in a tab you can move freely. The panels themselves are documented in the Panels overview; the Layers panel is covered in Layers.
Moving, floating, and docking a tab
Reorder: drag a tab sideways within its dock to reorder it.
Float: drag a tab out of the dock to open it as a floating window.
Dock: drop a tab on a window edge to dock it there.
Close: click the X on a tab to close it. Reopen it later from the
Window menu.
Right-click a tab to split
Right-clicking a panel tab opens a "Move panel" menu with four placements:
New column left puts the panel in a new column to the left.
New column right puts it in a new column to the right.
Stack above stacks it above the current panel.
Stack below stacks it below.
Reopening and resetting
Every panel has a checkbox in the Window menu. A check means the panel is
open, docked or floating. Toggle it to show or hide the panel. The menu lists the panels for the current mode.
Window ▸ Reset Workspace Layout restores the default arrangement: it
reopens every closed panel and re-docks every floating window.
Screenshot
a panel tab being dragged out of the right dock into a floating window, with the edge drop highlight visible.
Theme: dark, light, and Customize
Limner ships with a flat ink-black dark theme accented by a single bright cyan ( #2de2ff ). The dark chrome keeps attention on the artwork, and the cyan marks exactly one thing: what is active, focused, or actionable (the lit tool key, the active tab, the slider fill, the update badge).
A light "paper" theme is available, and you can build a custom theme from a base and an accent color. All three are reached from the View menu:
Light theme / Dark theme toggles between the two built-in skins.
Customize Theme opens an editor seeded from the current theme.
This page lists every item in Limner's nine menus: File, Edit, Image, Layer, Select, Filter, View, Window, and Help. For each item you get the exact on-screen label, what it does, the named shortcut where one exists, and when the item is greyed out (disabled).
A few things worth knowing up front:
The menus appear left to right along the top menu bar, with the "Limner" wordmark pinned to the far right.
Menu items do not carry their own visible accelerator keys. The shortcuts named below are the real global key handlers. The named commands (the ones that appear in the Keyboard Shortcuts dialog) are rebindable in Edit ▸ Preferences ▸ Keyboard Shortcuts; see Preferences and Shortcuts for the full list. A few behaviours are fixed modifiers rather than rebindable commands: the Alt-hold eyedropper, Space-drag pan, Space+Ctrl-drag zoom, the wheel zoom, and the Shift / Alt / Ctrl selection modifiers cannot be reassigned.
The View and Window menus stay open when you click an item, so you can toggle several settings in one visit. The other menus close after each click.
"Active layer" means the layer currently selected in the Layers panel. "Selection" means an active marquee made with a selection tool (see Selections).
File
Create, open, import, save, and export documents.
Item
What it does
Shortcut
Disabled when
New...
Opens the New Project dialog to create a blank document.
Never
Open...
Opens a Limner document (.limner, and legacy .artpaint).
Never
Open Recent (submenu)
Lists your recently opened or saved documents, most recent first. See below.
The recent list is empty
Close
Closes the current document (its tab), asking about unsaved changes first.
No document open
New Book...
Starts a multi-page comic / manga / book project. See File formats.
Never
Open Book...
Opens an existing Book project (.limnerbook).
Never
Open Recent Book (submenu)
Lists your recently opened or saved Books, most recent first. Each entry shows the Book's file name, with the full path on hover.
The recent Books list is empty
Import PSD...
Opens a Photoshop .psd file as a new document. See File formats.
Never
Import Image as Layer...
Brings a PNG or JPEG into the current document as a new layer.
No document open
Save
Saves the current document, prompting for a location the first time.
Never
Save As...
Saves the current document under a new name or location.
Never
Exit
Quits Limner, running the same unsaved-changes prompts as closing the window.
Never
Open Recent
File ▸ Open Recent is a submenu of your recently opened or saved Limner documents, most recent first (the last 8, with duplicates removed). The submenu is greyed out when the list is empty. Each entry shows the file name, with the full path on hover; click one to open it. A separator and a Clear Recent item at the bottom empty the list. Limner also remembers the folder you last opened a document from, so the Open dialog starts there next time.
Export
The Export section sits below a separator under a weak "Export" heading. See File formats for what each exporter writes.
Note
this section exports the current canvas as a still image (PNG, JPEG, PSD, or SVG). Exporting an animation to GIF, MP4, or a PNG sequence is done from the Export button on the Animation Timeline. While the Animation workspace is active, the same GIF / MP4 video / PNG sequence exporters also appear at the bottom of this Export section.
Item
What it does
Disabled when
Crop to: (submenu)
Sets the centre-crop aspect for PNG and JPEG exports. Choices are Native, Portrait, Square, and Landscape. The current choice is shown in the menu label. PSD always exports the full canvas, ignoring this.
Never
Add watermark (checkbox)
Stamps a watermark on PNG and JPEG exports. Turning this on with no image configured also opens the watermark settings window.
Never
Watermark settings...
Opens the watermark settings window (choose the image, position, and size).
Never
PNG...
Exports the canvas to a PNG file.
Never
JPEG...
Exports the canvas to a JPEG file.
Never
PSD...
Exports a layered Photoshop .psd file (full canvas).
Never
SVG (vector)...
Exports vector artwork to an SVG file. See Vector mode.
Never
GIF...
Exports the animation as a looping GIF.
Not in the Animation workspace
MP4 video...
Exports the animation as an MP4 video.
Not in the Animation workspace
PNG sequence...
Exports the animation as one numbered PNG per frame.
Not in the Animation workspace
Screenshot
the File menu open, showing the New / Open / Close / Import / Save group, the Export group below the separator, and Exit at the bottom.
Edit
Undo and redo, the clipboard, selection edits, Free Transform, and the Preferences submenu.
Item
What it does
Shortcut
Disabled when
Undo
Steps back one action.
Ctrl+Z
Never
Redo
Steps forward one undone action.
Ctrl+Shift+Z
Never
Copy
Copies the selection to the clipboard.
Ctrl+C
No active selection
Cut
Cuts the selection to the clipboard.
Ctrl+X
No active selection
Paste
Pastes onto the active layer.
Ctrl+Shift+V
Never
Paste as new layer
Pastes onto a new layer above the active one.
Ctrl+V
Never
Delete Inside
Clears pixels inside the selection.
No active selection
Delete Outside
Clears pixels outside the selection.
No active selection
Free Transform
Begins a free transform of the selected pixels. The Ctrl+T tool shortcut selects the Transform tool for the same job. See Transform and Move.
No active selection
Preferences (submenu)
App settings in one place: pen calibration, keyboard shortcuts, theming, and the automatic update check. See below.
Never
Preferences
Edit ▸ Preferences gathers the app settings that used to sit in Edit, View, and Help. Each entry keeps its original behavior. See Preferences and Shortcuts for details.
Item
What it does
Pen Pressure...
Opens pen-pressure calibration: scribble naturally and the response curve adjusts so your typical press maps to a medium stroke.
Keyboard Shortcuts...
Opens the dialog to view and customize keyboard shortcuts.
Light theme / Dark theme (button)
Switches between the dark skin and the light skin. The label and icon show what you will switch to, based on the live theme.
Customize Theme...
Opens the theme editor to build your own skin from two colours, a chrome base and an accent. Everything else derives from them.
Reset Theme
Drops any custom theme and returns to the Dark or Light preset.
Image
Pixel adjustments and document-wide canvas operations.
Item
What it does
Shortcut
Disabled when
Adjustments (submenu)
Colour and tone adjustments for the active layer. See below.
No document open
Canvas Size...
Resizes or crops the canvas. Layer content is preserved.
No document open
Crop to Selection
Crops the canvas to the active selection’s bounds.
No active selection
Adjustments
Image ▸ Adjustments holds the colour and tone dialogs (they lived in the Filter menu before 0.8.3). Each one acts on the active layer’s pixels, clipped to the selection if one is active, and every item is disabled when no document is open. See Filters and Adjustments for the controls inside each dialog.
Item
What it does
Brightness / Contrast...
Opens the Brightness and Contrast dialog.
Levels...
Opens the Levels dialog (input/output level remap with a histogram).
Curves...
Opens the Curves dialog (per-channel tone curve).
Repeat Last Filter
Runs the most recent filter or adjustment again with the same settings (Ctrl+F).
Nothing has run yet this session
Gaussian Blur...
Opens the Gaussian Blur dialog. The radius starts at 4.0.
No document open
Sharpen...
Opens the Sharpen dialog.
No document open
Screenshot
the Filter menu open, showing Repeat Last Filter, Gaussian Blur, and Sharpen above the weak footer note.
View
Display and canvas-view settings, fullscreen, zoom, and view rotation. The View menu stays open while you click items, so you can toggle several at once. Theming moved to Edit ▸ Preferences in 0.8.3.
Display toggles
Control
Range
Default
What it does
Grid (checkbox)
on / off
reflects current state
Shows or hides the on-canvas grid.
Grid spacing (px) (slider)
8 to 512
reflects current state
Sets the grid cell size in pixels.
Smart Guides (checkbox)
on / off
reflects current state
In Vector mode, shows alignment guides and snapping while you move or draw objects (Ctrl+U). See Vector editing.
Brush-size cursor (checkbox)
on / off
reflects current state
Shows a ring at the cursor sized to the active brush. See Interface ▸ Cursors.
Crosshair in brush tip (checkbox)
on / off
reflects current state
Adds a small centre crosshair inside the brush-size ring.
Canvas scrollbars (checkbox)
on / off
reflects current state
Shows horizontal and vertical scrollbars around the canvas.
Show frame time (checkbox)
on / off
reflects current state
Overlays the recent average and worst frame time, for performance reports.
Show vector paths (checkbox)
on / off
reflects current state
Shows the active vector layer's centerlines with any tool. They always show for the Object and Line Edit tools. See Vector editing.
Flip the view
A separator divides the display toggles from the flip controls. Both flips are non-destructive: they mirror only the view, the artwork is unchanged.
Control
Range
Default
What it does
Flip Canvas Horizontally (checkbox)
on / off
reflects current state
Mirrors the view left to right.
Flip Canvas Vertically (checkbox)
on / off
reflects current state
Mirrors the view top to bottom.
Fullscreen
Fullscreen (F11) switches the window to borderless fullscreen so the canvas gets the whole screen; press F11 (or click the item) again to come back. The shortcut is rebindable like any other.
Zoom
A separator precedes a weak "Zoom" label and a row of buttons, followed by a live zoom readout.
Control
What it does
Shortcut
Minus button
Zooms out one step.
Plus button
Zooms in one step.
Fit (Ctrl+0)
Fits the canvas to the view.
Ctrl+0
100% (Ctrl+1)
Zooms to 100%: one document pixel per screen pixel.
Ctrl+1
Zoom: {n}% (label)
Shows the current zoom percentage (display only).
Rotate view
A Rotate view row turns the view in 15 degree steps: Left, Right, and a Reset that returns to upright. Rotation is non-destructive (the artwork is unchanged) and can also be set from the status bar. See Interface.
The theme controls (Light / Dark, Customize Theme, Reset Theme) moved to Edit ▸ Preferences in 0.8.3; see Preferences and Shortcuts.
Screenshot
the View menu open, showing the display toggles, the flip group, Fullscreen, the Zoom row, and the Rotate view row.
Window
Panel visibility and workspace arrangement. Like the View menu, this menu stays open while you click items. See Interface for how docking works.
The menu opens with a weak "Panels" heading. Its hover explains: a checked panel is open (docked or floating); drag a panel's tab to rearrange it, drag it out of the dock to float it, drop it on a window edge to dock it there, or close it with its X and reopen it here.
Panels
There is one checkbox per panel available in the current workspace mode, labelled with the panel's icon and name. Toggling a checkbox opens or closes that panel. The list changes with the active mode: Illustration and Animation show the raster panels, Vector shows the vector panels.
Session statistics (not in the default layout). See Stats panel.
Animation mode shows the same panel list as Illustration (the raster panels above). The full-width Animation Timeline is a fixed bottom panel in that mode, not a Window-menu checkbox. By default Animation docks Layers and Color on the right and the Brush picker and Brush Settings on the left, with the rest reachable from this menu.
The reference board (shared with Illustration mode). See Reference panel.
Workspace
A separator divides the panel checkboxes from the layout resets.
Item
What it does
Reset tool strip layout
Restores the default tool order in the left strip. To rearrange tools yourself, long-press a tool (about half a second), then drag it onto another tool to group them, or into the empty strip area for its own slot.
Reset Workspace Layout
Restores the default panel arrangement. Reopens every closed panel and re-docks every floating window.
Screenshot
the Window menu open, showing the panel checkboxes for the current mode and the two reset items.
Help
The update check, version, and the built-in shortcut reference. The automatic-update checkbox lives in Edit ▸ Preferences since 0.8.3.
Item
What it does
Check for updates...
Checks for a newer version of Limner. See Updating.
Check for updates automatically (checkbox)
Checks once a day on launch. No data is sent beyond the version check.
Limner {version} (label)
Shows the running version number.
Shortcuts (reference block)
A read-only list of the built-in keyboard shortcuts (see below).
Built-in shortcuts shown in Help
The Help menu shows this reference verbatim. The full, editable list is in Edit ▸ Preferences ▸ Keyboard Shortcuts (see Preferences and Shortcuts).
Keys
Action
Ctrl+Z / Ctrl+Shift+Z
Undo / redo
Ctrl+C
Copy selection to clipboard
Ctrl+X
Cut selection to clipboard
Ctrl+E
Export PNG
Ctrl+0
Fit canvas to view
[ / ]
Brush size down / up (live, mid-stroke)
Alt (hold)
Pick colour (eyedropper)
N
New layer
B
Brush tool
Shift+B
Cycle blend mode
- / =
Opacity
H
Hide active layer
Note: this reference block is shown verbatim from the app. Plain B selects the Brush tool and Shift+B cycles the blend mode. For the full, rebindable defaults see Preferences and Shortcuts.
The Help block also notes these view and tool behaviours:
View: Space-drag pans, Space+Ctrl-drag zooms, the wheel zooms.
Selection: Shift adds, Alt or Ctrl subtracts.
The fill bucket fills the active layer, or every selected layer.
Other chords named in menu hovers: Ctrl+J (Duplicate Layer), Ctrl+Shift+V (Paste onto active layer), Ctrl+V (Paste as new layer), and Ctrl+U (Smart Guides, Vector mode).
Screenshot
the Help menu open, showing the update check, the version label, and the shortcuts reference block.
Filters for the controls inside each Filter dialog.
Layers and Selections for the workflows behind the Layer and Select menus.
File formats for what each import and export item reads and writes.
Interface for the menu bar's place in the overall layout.
Tools
Tools Reference
Limner's tools live on the left tool strip. Click a tool to select it, or press its keyboard shortcut. Many tools share a group with a flyout (a small popup): the first click selects the tool shown on the key, a second click (or a double-click) opens the flyout. Since 0.8.3, Pen, Pencil, and Airbrush sit on the strip as brush families; each drives the full brush engine and remembers the last brush you picked in it. Every shortcut shown here is the default and can be changed in Edit ▸ Preferences ▸ Keyboard Shortcuts.
The contextual options bar at the top of the window changes to match the active tool. Each tool page below lists its options with exact ranges and defaults.
The ruler, symmetry, and perspective tools snap your strokes. They are documented together on Construction Aids: Linear Ruler, Parallel Ruler, Radial Ruler, Concentric Ruler, Symmetry, and Perspective.
Vector tools
The vector tools appear on the tool strip in Vector mode. See Vector Mode and Tools: Selection (Object), Direct Select, Pen, Pencil, the live shapes (Rectangle, Ellipse, Line, Polygon, Star), Scissors, Join, Gradient, and the line-edit tools.
Brush Tool
The Brush is Limner's main painting tool. It lays down colour with the active brush, dab by dab, along the path you draw. Strokes are stamped on a background worker thread, so the canvas stays responsive even with a large brush on a big document: you draw, the worker stamps, and the live preview appears as it catches up.
The Brush always paints with whatever brush is currently selected in the picker, so its feel ranges from a hard inking pen to a soft airbrush to a wet oil smear depending on the preset. To change the brush itself (tip, dynamics, texture, and the rest) see Brushes and the Brush Settings panel.
Screenshot
the Brush tool selected in the tool strip with the brush options bar showing across the top.
Shortcut
The default key is B. Like every shortcut in Limner, it is rebindable from Edit ▸ Preferences ▸ Keyboard Shortcuts.
Options bar
When the Brush is active, the contextual options bar shows the controls below. The slider values are not fixed defaults: they mirror the parameters stored on the active brush, so each preset starts the sliders where its own design puts them. (For reference, the brush engine's base values are size 24.0, hardness 0.85, opacity 1.0, flow 1.0, and stabilization 0.35; the brush selected at first launch is Pencil (HB), which starts at size 8.0, hardness 0.9, opacity 0.85, flow 0.9, stabilizer 0.3.)
Control
Range
Default
What it does
Size
1.0 to 2000.0 (logarithmic)
Active brush value
Brush diameter in canvas pixels.
Hard
0.0 to 1.0
Active brush value
Hardness: the opaque inner fraction of the dab before the edge softens. Lower is a softer rim. Greyed out for any brush that uses a sampled tip (see below), since that brush takes its edge from the tip image.
Opacity
0.0 to 1.0
Active brush value
The per-stroke ceiling. Overlapping dabs build up only to this level and then stop.
Flow
0.0 to 1.0
Active brush value
The per-dab deposit. Lower flow lays paint down more gradually within a single stroke.
Blend
BlendMode list (18 modes)
Active brush value (Normal)
How the stroke combines with the colours already on the layer (Normal, Multiply, Screen, and so on). Same as the Blending mode on the Brush Settings Ink page. Shown only for paint brushes.
Stabilizer
0.0 to 0.95
Active brush value
Smooths the path as you draw. Higher is steadier but adds a little lag.
Colour
RGB
Current brush colour
The paint colour, also editable from the Color panel.
Erase
On / off
Off
Transparent paint: when on, the brush erases instead of painting (like CSP's transparent colour). Click again to paint.
Brush Settings
(button)
n/a
Opens the Brush Settings panel, where pressure curve, taper, jitter, tip shape, scatter, and texture live.
Flow and Opacity are separate controls. Flow is the per-dab deposit: how much paint each stamp lays down, so overlapping passes within one stroke build up gradually toward full strength. Opacity is a ceiling on how solid the whole stroke can become; once a stroke reaches it, crossing your own stroke never pushes past it. A low Flow with a high Opacity gives an airbrush that builds slowly but can still reach full strength on repeated passes; a high Flow with a low Opacity lays paint instantly but caps the stroke at a fixed translucency.
Hardness greys out for sampled-tip brushes. The Hard slider only shapes the soft-to-hard edge of the built-in round tip. A brush whose tip comes from a sampled image takes its edge from that image, so the slider would do nothing and is disabled. Hovering the disabled slider explains this: "Hardness shapes the round tip's edge. This brush uses a sampled tip, so its edge comes from the tip image." Round-tip brushes keep Hardness live.
The far left of the bar shows a small live thumbnail of the active brush. Click it to open the brush picker.
The deeper brush parameters (taper, pressure curve, jitter, tip shape, scatter, texture, and more) are not on the bar; they live in the Brush Settings panel. The bar keeps only the controls you reach for constantly.
Screenshot
the brush options bar with the Size, Hard, Opacity, Flow, Blend, and Stabilizer controls labelled.
Blend modes
The Blend control offers the full set of modes, in this order: Normal, Multiply, Screen, Overlay, Darken, Lighten, Color Dodge, Color Burn, Linear Dodge (Add), Linear Burn, Hard Light, Soft Light, Difference, Exclusion, Hue, Saturation, Color, Luminosity. The blend mode is applied once when the stroke commits. It is hidden for smudge and blur brushes, since those deposit no colour of their own.
Live size change
Press [ to shrink the brush and ] to grow it. Each press steps the diameter by about 10 percent (with a 1 pixel floor), clamped to the same range as the Size slider. These keys work mid-stroke: the new size takes effect on the next dab, so you can taper a stroke by hand as you draw. The Size slider follows along automatically. Both keys are rebindable in Edit ▸ Preferences ▸ Keyboard Shortcuts.
Modifier keys
Key
Effect
Alt (hold)
Temporary eyedropper. Press and drag to scrub-sample a colour from the composite; release Alt to return to painting. The choice is locked at pointer-down, so toggling Alt mid-stroke cannot hijack a stroke already in progress.
For the dedicated colour picker, see the Eyedropper.
Smart Shape snap
The Brush can clean up a freehand shape for you. Draw a rough circle, rectangle, or other recognizable shape, then hold the pointer still at the end of the stroke. After about 800 milliseconds of dwelling in place (within roughly 6 screen pixels, so the feel is the same at any zoom), Limner recognizes the shape and snaps the stroke to a clean version, dropping you into an on-canvas re-edit with handles. Strokes smaller than about 48 pixels on screen never snap, so hatching and small detail work stays freehand, and the gesture can be turned off entirely with the Smart Shape checkbox on the Brush options bar. The snap can fire two ways:
Mid-stroke, while you keep holding (a stationary tablet pen keeps emitting samples, so it triggers as you hold).
On release, as a fallback, if you held at the end (a mouse held still emits no samples, so this catches that case).
If the path is not a clean shape, the stroke commits as normal freehand paint. Smart Shape applies only to the Brush tool, not the Eraser, and never fires for a transparent-paint (Erase) stroke. Holding Shift while a recognized shape is active constrains it (for example, a circle locks to a perfect circle and a line locks to 15 degree increments). See Shapes for more on the shape re-edit handles.
Notes and special cases
Blend-folder brushes reroute the tool. Selecting a brush from the "Blend" folder (or any brush that carries the smudge or blur flag, including the wet-mixing oils in the Painting folder) keeps the Brush tool selected but smears (smudge) or softens (blur) instead of depositing colour. The Erase toggle wins over this rerouting: with Erase on, any brush erases, Blend brushes included. See Smudge and Blur for that behaviour.
The Eraser shares this path. The Eraser is the Brush in erase mode on raster layers. You can also make any brush erase by turning on the Erase toggle in the options bar.
Locked layers. Painting on a locked layer is a no-op. See Layers.
Text layers. Trying to paint on a text layer prompts you to rasterize it first; the triggering stroke is dropped, and you paint after confirming.
Vector layers. On a vector layer, a Brush stroke is captured as an editable vector line at pen-up. See Vector mode and Vector editing.
Construction aids. When a ruler, guide, grid, or perspective snap is active, strokes rail onto it. See Construction aids. Symmetry repeats the stroke across the symmetry images; the symmetry controls live on the Symmetry tool's options bar (see Construction aids).
The Eraser clears pixels back to transparency. It shares the same stroke engine as the Brush, so it feels identical to paint: same size ring, same pressure response, same stabilizer. The only difference is that instead of laying down colour, it removes it.
Default shortcut: E. All shortcuts are rebindable in Edit ▸ Preferences ▸ Keyboard Shortcuts.
Screenshot
the Eraser selected in the tool strip with its options bar showing Size, Hard, Strength, and Stabilizer.
What it does
On a normal raster layer, the Eraser removes paint under the brush dab, leaving transparency behind. Strength controls how completely it clears, so a soft, low-Strength eraser fades pixels rather than wiping them out.
On a layer mask, the Eraser behaves like a normal raster erase, editing the mask itself.
On a vector layer, the Eraser switches to the geometric vector eraser, which cuts the vector lines themselves instead of clearing pixels. The exact behaviour depends on the active erase mode. See Vector layer erasing below.
The Brush tool can also erase. Turn on the Erase toggle on the Brush options bar (CSP-style transparent colour) and the active brush erases instead of painting. This lets any custom brush, with all its dynamics and texture, act as an eraser. See the Brush page and the brush library.
Eraser brush defaults
The Eraser carries its own brush parameter set, separate from the Brush tool, so changing the eraser does not disturb your painting brush.
Setting
Value
Name
"Eraser"
Size
40.0
Hardness
0.85
Other engine parameters fall back to the brush engine base (flow 1.0, stabilization 0.35).
Options bar
These controls appear on the contextual options bar while the Eraser is active.
Control
Range
Default
What it does
Size
1.0 to 2000.0 (logarithmic)
40.0
Eraser diameter in pixels.
Hard
0.0 to 1.0
0.85
Edge hardness. Lower values give a softer, feathered edge.
Strength
0.0 to 1.0
1.0
How fully each dab clears. This is the eraser's opacity: below 1.0 it only partially erases, so repeated passes fade pixels gradually.
Stabilizer
0.0 to 0.95
0.35
Smooths the stroke path to steady shaky lines. Higher is smoother.
Screenshot
the Eraser options bar on a raster layer.
Modifiers
Alt: hold to temporarily switch to the Eyedropper and sample a colour, then release to return to erasing. (Useful when you want to check or pick up a colour mid-edit.)
Vector layer erasing
When the active layer is a vector layer (and you are not editing a mask), the Eraser becomes a geometric vector eraser. Instead of clearing pixels, it operates on the vector lines themselves. Three mode buttons appear on the options bar, and your choice is remembered.
Mode button
What it does
Erase touched areas
Erases only where the eraser passes, splitting the line at that span.
Erase up to intersection
Erases the touched part outward to the nearest crossing lines. Ideal for cleaning up overshot ink.
Erase whole line
One touch deletes the entire line.
The default mode is Erase touched areas. The buttons appear in that order on the options bar, and your choice is remembered for the next vector erase.
Screenshot
the Eraser options bar on a vector layer, showing the three vector erase mode buttons.
For more on vector layers and how their lines are drawn and edited, see Vector mode.
Tips
Because the Eraser and Brush share one engine, you can build a custom eraser the same way you build a brush: pick a tip, set hardness and stabilization, and adjust Strength for partial clearing.
For a precise, line-art friendly eraser, raise Hard toward 1.0. For blending edges, lower it.
To erase with a textured or shaped brush, switch to the Brush tool and turn on its Erase toggle instead, so the brush's tip and dynamics carry over to the erase.
Smudge and Blur Tools
The Smudge and Blur tools are Limner's two "blend" tools. They do not lay down new paint from your colour swatch. Instead they rework the colour that is already on the canvas: Smudge drags it along your stroke, and Blur softens it. Both are great for finishing work, like pulling highlights into shadow, melting hard edges, or adding depth-of-field haze.
Both tools live in the same dab engine the Brush uses, so a soft, large tip blends broadly and a small, hard tip works in tight spots.
Screenshot
a portrait with a hard-edged cheek shadow on the left and the same shadow smudged and blurred smooth on the right.
Where to find them
These tools ship in two places, and they behave identically either way:
As library brushes in the Brush picker's Blend folder. Pick one and keep
using the Brush tool; the stroke smears or softens instead of painting.
As the dedicated Smudge and Blur tools. (In v0.6.7 the tool-options bar
shows only a header for them, because the controls now live in the Blend-folder brushes. See Brush library and presets.)
Either way, the settings come from the active brush. To change size, hardness, flow, or stabilizer, edit the brush in the Brush Settings panel or pick a different Blend-folder brush.
Keyboard shortcuts
Neither Smudge nor Blur has a default keyboard shortcut. Both appear in the Keyboard Shortcuts list and can be given a key of your own in Edit ▸ Preferences ▸ Keyboard Shortcuts.
What works on, and what does not
Both tools work on normal raster layers and layer masks.
Both are blocked on vector layers. If you try, Limner shows a notice and does
nothing, because there is no pixel colour there to rework. Convert or rasterize the layer first.
Both respect the active selection, symmetry, and the perspective ruler. With a
perspective ruler and snap on, strokes rail toward the vanishing points just like a brush stroke.
A locked layer cannot be smudged or blurred.
Smudge
Smudge picks up the colour under the tip at the start of the stroke and drags it along your path, mixing in colour it passes over as it goes. The result is the classic "wet fingertip" smear.
How it behaves:
Pressure drives the smear. Press hard and your starting colour carries
farther before it blends into what is underneath, like a loaded fingertip. A light touch blends gently and locally.
Flow sets the deposit strength. Higher Flow lays the carried colour down
more strongly per dab.
The smear feeds itself, so colour keeps travelling along the whole stroke
instead of dying out after the first inch.
With symmetry on, each mirrored stroke carries its own colour, sampled from
under its own start point, rather than a shared average.
Screenshot
a single Smudge stroke pulling a band of blue down into a band of orange, showing the colour streaking across the seam.
Smudge options
The dedicated Smudge tool reads these from its brush. The defaults below are the values of the built-in Smudge brush.
Control
Range
Default
What it does
Size
1.0 to 2000.0
40.0
Diameter of the smear tip in pixels.
Hardness
0.0 to 1.0
0.5
Edge sharpness of the round tip. Lower is softer.
Flow
0.0 to 1.0
0.6
How strongly each dab deposits the carried colour.
Stabilizer
0.0 to 0.95
0.4
Smooths a shaky path so the smear curves cleanly.
Notes:
The deposit per dab combines pressure with Flow, so a light pen pressure
always smears more gently than a hard one at the same Flow.
On pen-up the final dab is laid down at a fixed strength so the stroke ends
cleanly instead of fading to nothing.
Blur
Blur softens the active layer. At the moment you press down, Limner takes a snapshot of the layer's own pixels, box-blurs it once (colour and coverage together), and then each dab paints that softened colour onto the layer under a round tip. Building up overlapping dabs deepens the softening. Because only the layer's own pixels are sampled, blurring never pulls in colour from the layers below or the white paper: edges soften into real transparency instead of being haloed with the backdrop.
How it behaves:
Flow sets the strength of the softening per dab. Higher Flow blends the
blurred colour in more heavily.
The blur amount scales with brush size by default, so a large soft brush
softens more than a tiny one. See the radius rule below.
Like Smudge, Blur respects selection, symmetry, and the perspective ruler.
Screenshot
a sharp tree line with the far edge blurred into soft atmospheric haze using a few overlapping Blur strokes.
Blur radius
The blur radius (how far each pixel spreads) is decided once at pen-down:
If the brush has an explicit blur radius set (greater than 0), that value is
rounded and clamped to the range 1 to 24.
Otherwise Limner uses the automatic rule: brush Size divided by 6, rounded,
then clamped to the range 1 to 24.
So with the default Blur brush Size of 40.0 the automatic radius works out to 7 (40 divided by 6 is about 6.67, rounded to 7), and no brush can blur with a radius wider than 24 pixels in a single pass. Stack strokes to soften further.
Blur options
The dedicated Blur tool reads these from its brush. The defaults below are the values of the built-in Blur brush.
Control
Range
Default
What it does
Size
1.0 to 2000.0
40.0
Diameter of the soft tip in pixels. Also feeds the automatic blur radius (Size / 6).
Hardness
0.0 to 1.0
0.5
Edge sharpness of the round tip. Lower blends in more gradually.
Flow
0.0 to 1.0
0.6
Strength of the softening laid down by each dab.
Stabilizer
0.0 to 0.95
0.4
Smooths a shaky path so the softened band follows a clean curve.
Tips
For a believable smear, keep Flow moderate and let pressure do the work. Full
Flow at full pressure drags colour a long way, which can look streaky.
Blur reads the canvas only at pen-down, so to soften an area you have just
edited, lift the pen and start a fresh stroke.
To soften past the 24-pixel radius cap, run several Blur strokes over the same
area instead of reaching for one huge brush.
Both tools commit on pen-up and add one stroke to the Session Stats count. See
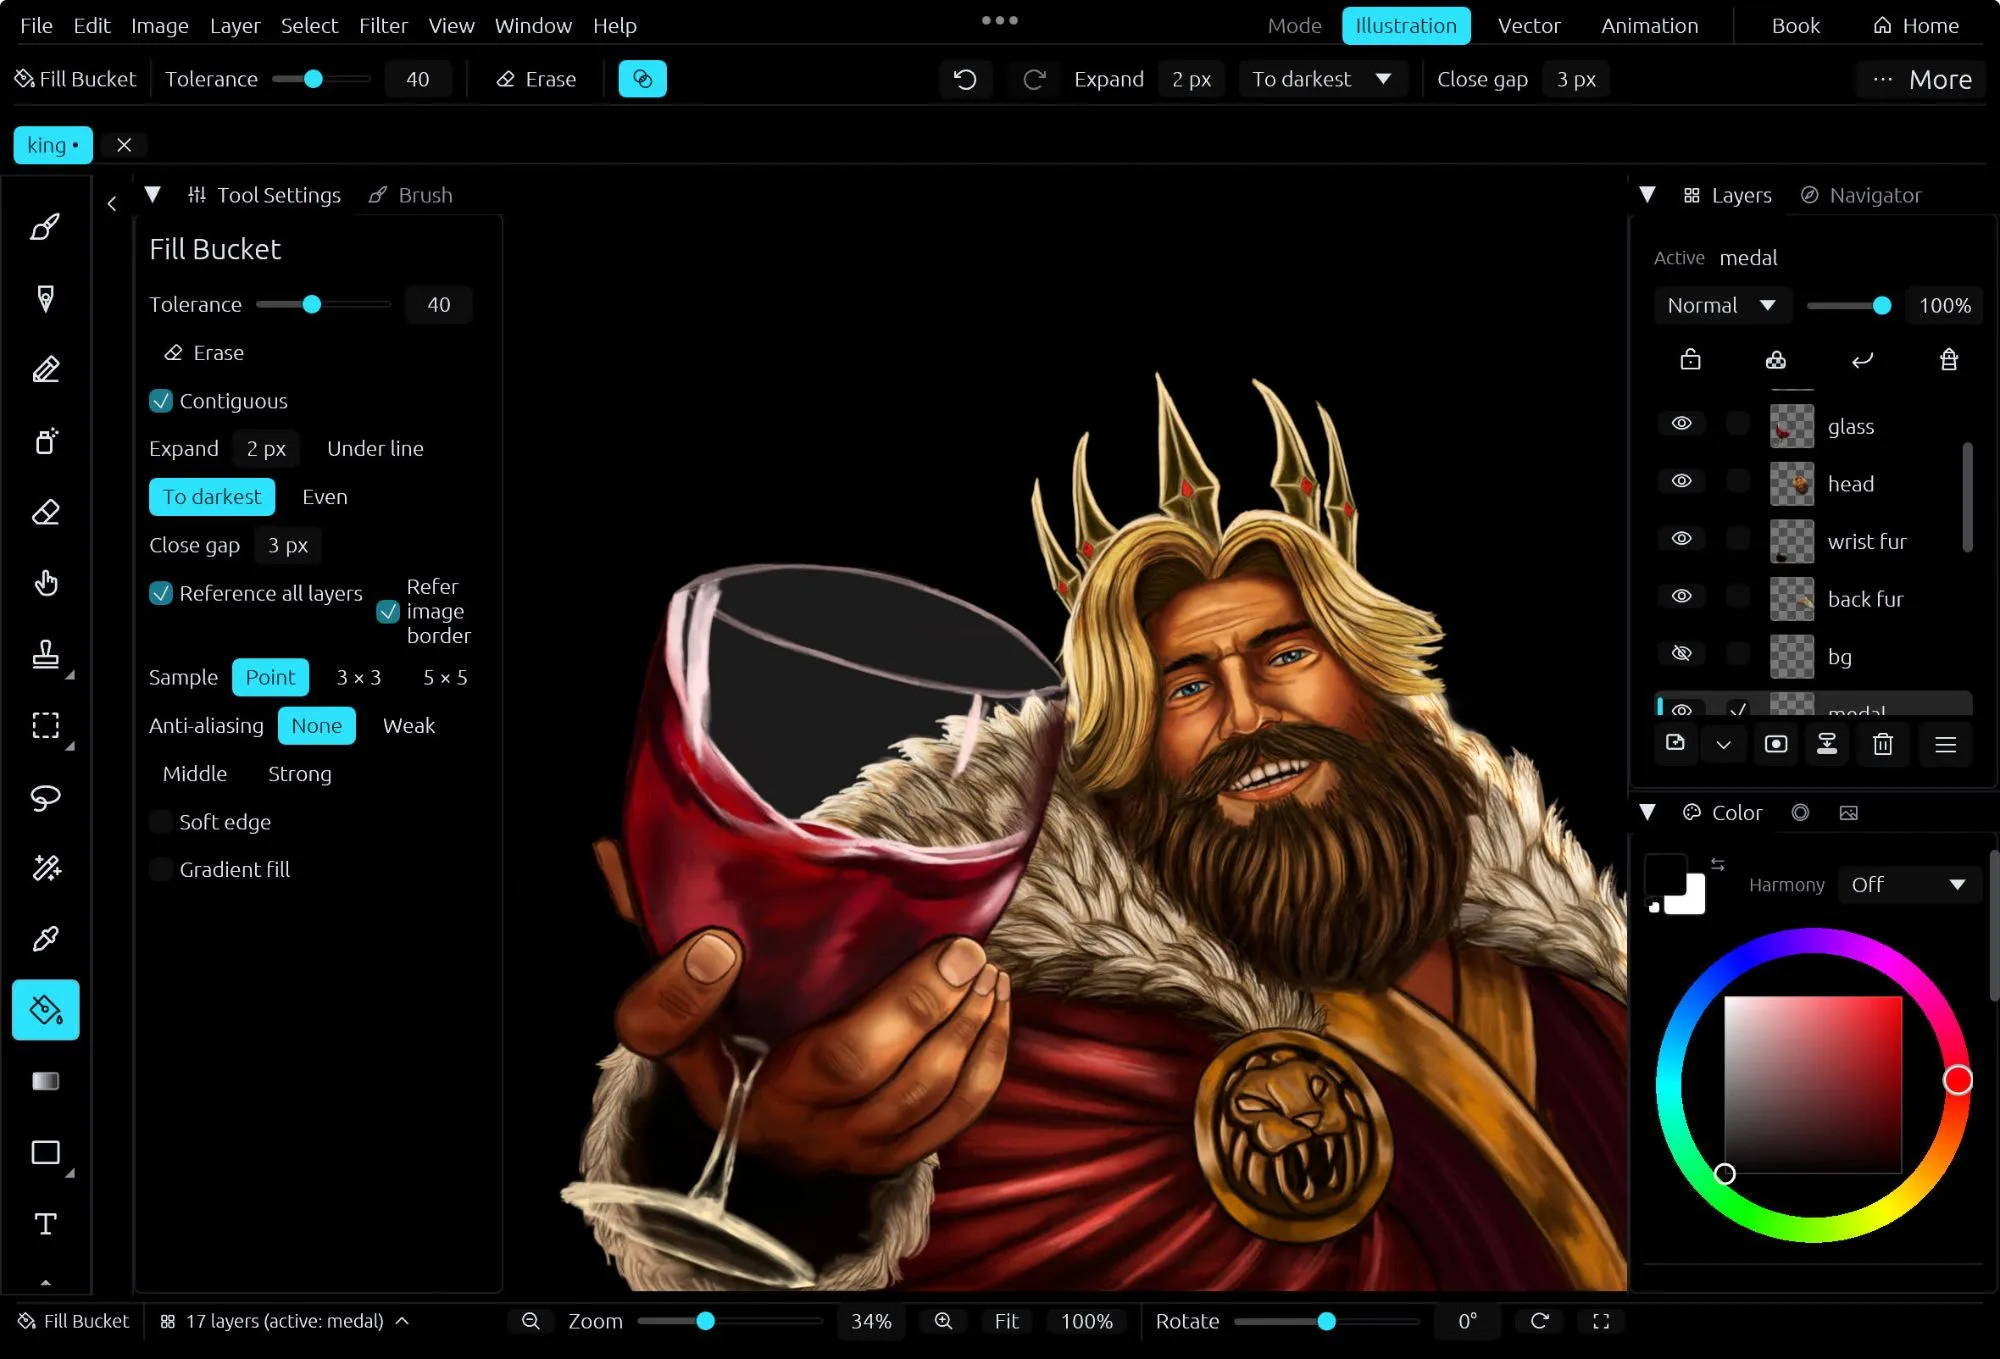
The Fill Bucket floods a region of the canvas with the active color in one click. Click inside an area and Limner finds the connected patch of similar color around the point and pours paint into it, stopping at edges where the color changes (your line art, for example). It is the fastest way to lay down flats under inked drawings or to block in solid shapes.
Default shortcut: Shift+G. Shortcuts are rebindable in Edit ▸ Preferences ▸ Keyboard Shortcuts.
Screenshot
the tool strip with the Fill Bucket selected and its options bar showing Tolerance, Contiguous, Expand, Close gap, and the reference and anti-aliasing controls.
How it works
Pick the color you want in the Color panel (see Color).
Select the Fill Bucket, then click inside the region you want to fill.
Limner samples the color under your click, grows outward to every touching pixel within the Tolerance range, and paints that area with the active color.
The fill is deferred for responsiveness: the click records the target pixel right where you pressed, and the actual flood, edge processing, and upload run once on the next frame. You still get exactly one fill per click, with identical results and a single undo step, but a click never freezes the app even on a large canvas.
By default the fill matches against the merged composite of all layers and paints onto the active layer alone (like Clip Studio Paint's default Refer other layers bucket): the fill respects line art kept on its own layer while the color lands on your flats layer. Untick Reference all layers to match against the active layer's own pixels instead.
Where it lands
Active layer: the normal case. The fill paints onto the layer you are working on.
Multiple selected layers: if more than one layer is selected, every selected non-background layer is filled, all folded into one undo step.
Layer mask: when you are editing a mask, the fill paints into the mask instead of the pixels (fill with black to hide, white to show). See Layers.
The active color you fill with is also added to the Color History strip in the Color panel.
Options
These controls appear in the options bar while the Fill Bucket is active.
Control
Range
Default
What it does
Tolerance
0.0 to 1.0
0.1
How different a neighboring pixel may be from the clicked color and still be filled. Low values fill only near-identical pixels; high values spill across softer color changes.
Contiguous
On / Off
On
On fills only the connected patch you clicked. Off fills every matching color anywhere on the layer, even across walls (non-contiguous fill).
Expand
-20 to 20 px
2
After the flood, grows the filled area by this many pixels so flats tuck neatly under line art. A negative value shrinks the fill instead.
To darkest
On / Off
On
Only shown when Expand is positive. Keeps only the grown margin that is darker than the clicked color, so the expansion tucks under anti-aliased line art instead of overrunning it into open space.
Close gap
0 to 16 px
3
Treats gaps in the line art up to this width as if they were closed, so a fill seeded inside a not-quite-sealed shape stays inside. 0 turns gap closing off.
Reference all layers
On / Off
On
Matches the fill region against every layer (the merged composite) instead of just the active layer. The paint still lands on the active layer.
Refer image border
On / Off
On
Treats the canvas edge as a line when closing gaps, so a region that opens onto the border still fills as enclosed. The fill itself always reaches flush to the edge; with Close gap at 0 this option has no effect.
Anti-aliasing
None, Weak, Middle, Strong
None
Feathers the fill boundary inward so the edge is not stair-stepped. None gives a hard binary edge; Weak, Middle, and Strong feather progressively wider (about 1, 2, and 3 pixels). The feather is inward only, so the color never bleeds past the region.
Gradient fill
On / Off
Off
Fills with the active gradient ramp (mapped left to right across the filled area) instead of a flat color. Edit the ramp with the Gradient tool.
Screenshot
a leaky line-art shape filled cleanly with Close gap raised, compared to the same shape filled with Close gap at 0 where the color leaks out.
Notes on the options
Tolerance is the single most useful dial. If a fill leaks across a soft edge, lower it. If a fill leaves a halo of unfilled pixels around your lines, raise it (or use Expand).
Expand with To darkest is the standard flatting combination: it pushes the flat color under anti-aliased ink so there is no gap, without spilling into open areas.
Reference all layers (on by default) is what makes flatting work out of the box when your line art is on one layer and you are filling on another: match against the visible drawing, but keep the color on the flats layer. Untick it to match only the active layer's own pixels. If a visible layer is flagged as a Reference layer, the fill matches against that layer's lines instead, regardless of this option.
Gradient fill reuses whatever ramp the Gradient tool is set to, so set up your ramp there first.
Symmetry
When a symmetry ruler is active, the Fill Bucket also fills from the mirrored copies of your clicked point, so a symmetric region fills symmetrically. The whole set of fills folds into a single undo step. See Construction aids for setting up symmetry rulers.
Limitations
Vector layers: the Fill Bucket is blocked on vector layers, because they hold strokes rather than filled regions (a flood would be wiped by the next re-render). Limner shows a notice if you try. Use vector fills in Vector mode instead.
Locked layers: filling does nothing on a locked layer.
See also
Color - choosing the active color and the Color History strip.
Gradient tool - editing the ramp used by Gradient fill.
Layers - filling masks and multiple selected layers.
Gradient Tool
The Gradient tool fills an area with a smooth blend between two or more colors. Pick a gradient, then drag across the canvas: the start of your drag is the beginning of the ramp and the end of your drag is the end of it. The drag direction and length set the angle and the spread.
Default shortcut: G (rebindable in Edit ▸ Preferences ▸ Keyboard Shortcuts).
Screenshot
the Gradient tool selected, mid-drag across a layer, showing the live preview.
What it does
Drag to fill with a multi-stop color and opacity ramp.
Choose from 8 built-in presets or build your own in the Gradient editor.
Pick the shape (Linear, Radial, Reflected, Conical, Diamond), reverse the ramp, and turn on dithering to hide banding.
Save your own gradients as presets and remove them later.
The preview is drawn through the real compositor, so it appears at the active layer's depth, blend mode, and selection clip while you drag. Release to commit.
Gradients track the active paint color: the default ramp blends the current color into transparent. See Color for picking and managing colors.
Note
The Gradient tool paints on raster (pixel) layers only. It is blocked on vector layers, where it shows a notice instead of painting.
Options bar
When the Gradient tool is active, the tool options bar shows a compact ramp preview plus a couple of quick controls. Click the ramp preview to open the full Gradient editor.
Control
Range
Default
What it does
Ramp preview
n/a
n/a
Shows the current gradient. Click it to open (or close) the Gradient editor.
Shape
Linear, Radial, Reflected, Conical, Diamond
Linear
How the ramp is mapped across your drag.
Reverse
on / off
off
Mirrors the ramp so the end color appears at the start of the drag.
The Dither option lives in the Gradient editor (see below).
Screenshot
the Gradient tool options bar with the ramp preview, Shape combo, and Reverse checkbox.
The Gradient editor
Click the ramp preview in the options bar to open the Gradient window. It holds the presets, the editable stop bar, the selected stop's color, opacity, and position controls, and the shape options.
Screenshot
the Gradient editor window with the preset row, the stop bar, the per-stop controls, and the Shape combo with Reverse and Dither.
Presets
The top row holds the 8 built-in presets, followed by any presets you have saved, followed by a Save button. Click a preset swatch to load its colors into the current gradient. Loading a preset replaces the stops but leaves your shape, Reverse, and Dither settings as they are.
The 8 built-in presets:
Preset
What it is
Color to clear
The active paint color blending into transparent. This is the tool's default ramp.
Black to white
Solid black to solid white.
Sunset
Deep violet through warm red and orange to a pale gold.
Sky
Deep blue through mid blue to a light haze.
Neon
Hot pink through electric violet to cyan.
Rainbow
Six-stop spectrum from red through to pink.
Gold
A metallic-style ramp: dark gold, highlight, and back to dark gold.
Fade to black
Transparent black fading to opaque black.
Hover a built-in swatch to see its name.
Adding, moving, and deleting stops
The stop bar shows the ramp with one triangular marker per stop. A gradient always keeps at least two stops and can hold up to 16.
Add a stop: click an empty spot on the bar. The new stop samples the ramp's current color at that position (so it is invisible until you recolor it).
Move a stop: drag its marker. A stop is clamped between its neighbors so the order is preserved.
Select a stop: click its marker. The selected marker carries the accent-colored outline, and its controls appear below the bar.
Delete a stop: select it, then click Delete. Delete is disabled when only two stops remain.
Screenshot
the stop bar with several markers, one selected with the accent outline.
Per-stop color, opacity, and position
With a stop selected, the controls below the bar edit just that stop.
Control
Range
Default
What it does
Color swatch
full sRGB color picker
n/a
Sets the stop's own color. Picking a color here unbinds the stop from the active paint color.
Main color
on / off
on for the default ramp's stops
When on, the stop follows the active paint color instead of a fixed color.
Delete
n/a
n/a
Removes the selected stop (a gradient keeps at least two).
Opacity
0% to 100%
per stop
The stop's opacity.
Position
0% to 100%
per stop
Where the stop sits along the ramp.
When Main color is on, the stop tracks the color picker, so the gradient updates as you change the active color. The default Color to clear ramp uses Main color on both stops, which is why it always blends the current color into transparent.
Shape, Reverse, and Dither
Below the separator at the bottom of the editor:
Control
Range
Default
What it does
Shape
Linear, Radial, Reflected, Conical, Diamond
Linear
How the ramp is mapped across your drag (see Shapes below).
Reverse
on / off
off
Mirrors the ramp so the end color appears at the start of the drag.
Dither
on / off
on
Adds fine noise so long, soft gradients do not show banding.
Shapes
The five shapes all use the same start-to-end drag:
Shape
What it does
Linear
Ramp runs along the drag line.
Radial
Rings around the start point; the drag length is the radius.
Reflected
The linear ramp mirrored on both sides of the start point.
Conical
Sweeps the ramp by angle around the start point (Photoshop's "Angle").
Diamond
Concentric diamonds around the start point.
Screenshot
the same two-color ramp rendered with each of the five shapes.
Saving and removing custom presets
Save the current gradient: click the Save button at the end of the preset row. The current gradient (its stops, shape, reverse, and dither) is added as a new preset and saved to your settings.
Remove a saved preset: right-click a saved preset swatch and choose Remove preset. Built-in presets cannot be removed.
Saved presets persist across sessions in your settings file.
Tips
Hold the current color as one stop and transparent as the other to paint a soft glow or vignette.
Turn on Dither for long, subtle ramps (skies, soft backgrounds) where 8-bit banding would otherwise show.
Use Reverse to flip a gradient without re-dragging.
Related
Color - picking and managing the active paint color the gradient can follow.
Layers - the Gradient tool paints onto the active raster layer at its blend mode and depth.
Selections - an active selection clips the gradient fill.
Rectangle, Ellipse, and Line Tools
Limner has three raster shape tools for drawing clean geometry by dragging on the canvas: Rectangle, Ellipse, and Line. They all draw onto the active layer and fold into the same undo history as a brush stroke, so anything they place can be undone or re-edited.
Rectangle and Ellipse lay down a solid figure (filled or just an outline) in the current paint colour.
Line is drawn with the active brush, so a pencil line looks like pencil and an inked line looks like ink. After you release, the line drops into an on-canvas editing state where you can nudge either end before committing.
On a vector layer, Rectangle and Ellipse behave differently: instead of pixels they create an editable closed vector stroke. See the vector mode notes below.
Screenshot
the tool strip with Rectangle, Ellipse, and Line highlighted, plus the contextual options bar.
Choosing a tool
Tool
Default shortcut
What it draws
Rectangle
U
A rectangle through the two drag corners
Ellipse
Shift+U
An ellipse inscribed in the drag rectangle
Line
(none)
A straight line drawn with the active brush
The Line tool ships without a default key. All three are rebindable in Edit ▸ Preferences ▸ Keyboard Shortcuts.
Drawing a rectangle or ellipse
Pick the Rectangle or Ellipse tool.
Set the paint colour. Both tools deposit the current paint colour at full opacity, and the colour is added to the Color History strip when you start the drag.
Drag from one corner to the opposite corner. Rectangle draws the box through those two corners. Ellipse fits an ellipse inside that box.
Release to commit onto the active layer.
A live preview follows your drag and updates once per frame, so it stays smooth even on large canvases. The figure is selection-clipped, so if you have an active selection the shape is masked to it.
Notes:
An ellipse is only drawn once it is at least about 1 pixel across in each direction. A tiny drag draws nothing.
A figure dragged entirely off-canvas draws nothing.
Rectangle and Ellipse options
These appear in the tool options bar when Rectangle or Ellipse is active.
Control
Range
Default
What it does
Filled
on / off
true (on)
When on, fills the whole figure. When off, draws only an outline. A small caption reads "(unchecked = outline)".
Size
1.0 to 200.0 (logarithmic), in canvas pixels
8.0
Outline thickness. Shown only when Filled is off.
The Size control is the same value the Line tool uses, so changing it for one affects the other.
Screenshot
the Rectangle options bar with Filled unchecked, showing the Size slider.
Drawing a line
Pick the Line tool.
Pick the brush you want the line drawn with (the line carries that brush's tip, texture, and grit), and set the paint colour.
Drag from the start point to the end point.
Release. If the line is at least 3 pixels long it enters on-canvas re-editing (below). A shorter line is discarded.
The line is rendered with the active brush at a constant width set by the Size control, rather than as a flat fill.
Constraining and railing the angle
Shift constrains the line to 15 degree steps (0, 15, 30, 45, and so on) measured from the start point.
When a perspective ruler is in use with Snap on, the Line tool instead rails toward the matching vanishing point. In that case Shift's 15 degree constraint does not apply. Rectangle, Ellipse, and Gradient stay free axis drags and are not affected by perspective railing. See Construction Aids for rulers and vanishing points.
Re-editing the line before you commit
After you release a line of 3 pixels or more, it does not commit immediately. Instead it floats as an editable preview with handles on each endpoint:
Drag either endpoint to reposition it. Hold Shift while dragging an endpoint to constrain that end to 15 degree steps.
A rotation handle sits above the line; drag it to rotate the whole line.
Enter (or tap off the line, away from the handles) commits the line onto the active layer.
Esc cancels and leaves the layer untouched.
Switching tools also commits the line.
Screenshot
a freshly drawn line in its editable state, showing the two endpoint handles and the rotation handle.
Line options
Control
Range
Default
What it does
Size
1.0 to 200.0 (logarithmic), in canvas pixels
8.0
The brush diameter the line is drawn at.
A caption in the bar reads "Drawn with the active brush; Shift constrains the angle."
On a vector layer
When the active layer is a vector layer, the shape tools change behaviour:
Rectangle and Ellipse create an editable closed vector stroke (an outline) drawn with the active brush, rather than rasterized pixels. This matches the convention that figures on vector layers are outline strokes. If Filled is on, the shape is still drawn unfilled and Limner prints a notice that vector layers hold outlines. After committing, you can reshape it with the vector editing tools.
Line still drops into the same endpoint re-edit; on a vector layer the committed line becomes an editable stroke.
For more on working with vector strokes, see Vector Mode.
Tips and gotchas
All three tools fold their result with Normal blending. They do not use a brush's per-brush ink blend mode, even when the active brush has one set.
Rectangle and Ellipse paint the current colour at full opacity. To make a softer or semi-transparent figure, lower the layer opacity after committing, or use the Brush tool instead.
The Line tool is the right choice when you want a straight stroke that still looks like your brush. The Rectangle and Ellipse outline mode gives you a crisp, even-width border in a flat colour.
These tools also respect the active selection as a clip, so you can confine a figure to a masked region.
Click anywhere on the canvas to place editable text. Limner keeps the text re-editable on its own text layer: change the words, font, size, colour, or position any time, then flatten to plain pixels only when you are ready. Default shortcut: T (rebindable in Edit ▸ Preferences ▸ Keyboard Shortcuts).
Screenshot
the Text tool selected, with a text box on the canvas and the floating "Text" panel open.
At a glance
Tool name
Text
Default shortcut
T
Works on
Raster layers (creates a re-editable text layer)
Commit result
Pixels are baked onto the text layer; the text stays re-editable until you rasterize it
How text works in Limner
When you place text, Limner creates a text layer. The layer stores the words and all their styling (font, size, alignment, colour, position, rotation), and it generates its pixels from that stored data. Because the styling is the source of truth, you can click the text again later and re-edit everything without losing crispness: the glyphs are re-rasterized at the new size, not stretched.
Fonts come from your installed system fonts. Limner scans your fonts folder on a background thread when it starts, so the very first time you reach for the Text tool the list may still be filling in. If you click before fonts finish loading, nothing happens yet (Limner is still building the list); just try again in a moment. If no system fonts are found at all, the panel shows "No system fonts were found, so text can't be placed."
Placing new text
Select the Text tool (press T or pick it from the tool strip).
Click on the canvas where you want the text. A text box appears and the floating Text panel opens.
Type into the text box at the top of the panel, then set the font, size, colour, and other options below.
Click Confirm to commit the text (or Cancel to discard it).
A new text layer is named automatically from the text you typed. The text colour of a brand new text block starts from your current brush colour, so the text matches whatever you were just painting with. See color.md for how the brush colour is chosen.
If you confirm with the text box empty (or only whitespace), nothing is placed. Limner treats an empty confirm the same as a cancel.
Editing existing text
With the Text tool active, click directly on an existing text layer's box to re-open it for editing. The panel re-loads that layer's words and styling, and you can change anything. Clicking off the box confirms the current edit; clicking on a different text layer confirms the current one and opens the next.
Switching to another tool also finishes the current edit: it is confirmed if it has text, or cancelled if it is empty.
Note
a locked text layer cannot be opened for editing. Unlock it in the Layers panel first. See ../layers.md.
Moving, scaling, and rotating on the canvas
While you are editing, the text box shows handles directly on the canvas. Drag them to reposition the block:
Move: drag inside the box.
Scale: drag any of the four corner handles. Scaling changes the font size (so the text stays crisp), not the pixel resolution. Size is clamped to the 4 px to 1024 px range while dragging the box.
Rotate: drag the rotate handle that sits just off the box.
The "Drag the on-canvas box to move, scale, or rotate." hint at the bottom of the panel is a reminder of this.
The Text panel
The Text panel is a movable, non-dimming window titled Text (default width 320 px, resizable). Edit the fields, watch the live preview update on the canvas, then Confirm or Cancel.
Control
Range
Default
What it does
Text box
n/a
empty
The multi-line text body (3 rows tall). Hint text reads "Type your text…". Press Enter for a new line.
Font
All installed system families
First family in the list
Picks the font family from your installed fonts.
Style: B
on / off
off
Bold. Falls back to the regular face if the family has no bold face.
Style: I
on / off
off
Italic. Falls back to the regular face if the family has no italic face.
Style: U
on / off
off
Underline. Draws a bar just below the baseline of each line.
Size
8.0 to 512.0 px
72.0 px
Font size in pixels (logarithmic slider). On-canvas corner scaling can drive size from 4 px up to 1024 px.
Letter spacing
-20.0 to 80.0 px
0.0 px
Extra space between glyphs (tracking). Negative values tighten the spacing.
Line spacing
0.5 to 3.0
1.0
Line-height multiplier (leading). 1.0 is the font's natural line height. Shown with a "×" suffix.
Align
Left, Center, Right, Justify
Left
Horizontal alignment of multi-line text. Four icon buttons.
Colour
sRGB colour
[20, 20, 20] (overridden to the brush colour for new text)
The text colour.
Confirm
n/a
n/a
Commits the text. Enabled only when the text box is not empty.
Cancel
n/a
n/a
Discards the edit.
While you are editing, a small floating toolbar on the canvas also offers Confirm and Cancel, so you do not have to reach back to the panel.
Alignment options
The four Align buttons map to these behaviors:
Left: every line starts at the left edge of the block.
Center: every line is centered within the block.
Right: every line ends at the right edge of the block.
Justify: inter-word spacing is stretched so every line except the last fills the block width. A last line, or any line with no spaces, stays left-aligned (the standard typographic behavior).
Committing and undo
Clicking Confirm bakes the rasterized text into the layer and stores the re-editable data, all as a single undo step. Editing existing text and confirming is also one undo step that records the change from the old text to the new.
Rasterizing a text layer
When you want to paint over the text with a brush, treat it as plain pixels, or simply lock in the look, flatten it with Layer ▸ Rasterize Text. This drops the re-editable text data so the layer becomes an ordinary raster layer (the pixels are already there, so nothing visibly changes). It is a single undo step, and Limner commits any in-progress edit first. After rasterizing, the text is no longer editable as text. The menu entry's hover reads "Flatten the active text layer to plain pixels (no longer editable)."
Note
Rasterize Text only acts on a text layer that is unlocked. If the active layer is not a text layer, or it is locked, the command does nothing. Unlock the layer in the Layers panel first if needed.
Tips and limits
The live preview on the canvas is pixel-identical to the committed result, so what you see while editing is exactly what you get.
Very large blocks have a hard cap: if a block would need to rasterize larger than 16384 px on a side, Limner skips it and draws nothing (this only happens with extreme size or pasted text).
Font discovery is Windows-first: it scans your Windows Fonts directory for every installed family. The rasterizer itself is portable, but font discovery targets Windows today.
See also
../layers.md - how layers, locking, and layer order work.
../color.md - choosing the brush colour that seeds new text.
transform-move.md - free transform and Layer Move for moving committed pixels.
Transform and Layer Move
Transform and Layer Move both lift pixels off your layers into a single free transform, where you can move, scale, rotate, and flip them on the canvas before committing. The two tools differ only in what they pick up: Transform works on the current selection, while Layer Move grabs the whole active layer.
Screenshot
a free transform in progress, showing the bounding box with its four corner handles and the rotate handle floating off the top edge, plus the floating toolbar.
Transform
The Transform tool (default shortcut Ctrl+T) lifts the selected pixels of every eligible layer into a free transform.
Transform needs an active selection. If nothing is selected, or a transform is already running, the tool does nothing. If any selected layer (other than the paper base) is locked, the whole transform is cancelled before it starts.
What it lifts
The selected, non-transparent pixels of every selected layer except the paper base and any vector layers.
The base paper layer (index 0) is always excluded.
Vector layers are skipped. They have their own transform path through the Object tool. When the only selected layer is a vector layer, Transform switches you to the Object tool with that layer selected instead.
When more than one layer is selected, the handles wrap the union of all the lifted content, and every layer is previewed and committed together.
Lifting erases the pixels from their original spot, clears the marching ants, and floats the content above the canvas so you can reposition it freely. The lift and the eventual commit fold into a single undo step.
Moving, scaling, and rotating
The free transform draws a bounding box with handles:
Move: drag anywhere inside the box.
Scale: drag any of the four corner handles.
Rotate: drag the rotate handle, which sits just off the box.
The handle grab tolerance is 14 window pixels. This is measured on screen rather than in canvas pixels, so handles stay equally easy to grab whether you are zoomed in or out.
Scale factors are clamped away from zero on each axis (a factor smaller than 0.05 snaps to 0.05), so you cannot collapse the content to nothing by accident.
Constraining aspect ratio
Hold Shift while dragging a corner to scale uniformly and keep the box proportions. You can also leave the constraint on permanently with the Lock toggle on the floating toolbar (see below); Shift acts as a live override on top of it. Uniform scaling drives both axes by the larger relative change and preserves any flip signs.
The floating toolbar
While a transform is active, a small floating toolbar appears near the box:
Control
What it does
Confirm
Bakes the transformed pixels back onto each origin layer and ends the transform.
Cancel
Discards the transform, restoring every lifted layer to its original position.
Flip H
Mirrors the floating content horizontally.
Flip V
Mirrors the floating content vertically.
Lock
Toggles the sticky aspect-ratio lock while scaling. Hover text: "Lock aspect ratio while scaling (or hold Shift)". Default off.
Aspect lock control
Control
Range
Default
What it does
Lock
on / off
off
Keeps the box proportions while you scale from a corner. Shift overrides it live.
Confirm versus Cancel
Confirm bakes the transformed pixels back onto each layer they came from. The whole lift-and-commit sequence is one undo step.
Cancel resets the transform to identity, re-composites the originals in place, and discards the change so the undo stack stays clean.
A hidden source layer still transforms and commits (so it moves along with a multi-layer selection), but it is left out of the live preview.
Layer Move
The Layer Move tool (default shortcut V) is the quick way to reposition an entire layer. It selects the whole canvas and lifts the complete active layer into the same free transform described above.
Layer Move is ignored in two cases:
The active layer is the base paper layer (index 0).
The active layer is locked.
In every other respect it behaves exactly like Transform: drag inside to move, drag a corner to scale, drag the rotate handle to rotate, hold Shift (or use the Lock toggle) to constrain aspect, and Confirm, Cancel, or Flip from the floating toolbar. Because Layer Move first selects the whole canvas, there is no need to make a selection first.
Reaching Free Transform from the menu
You can also start a transform from the menu: Edit ▸ Free Transform. This runs the same Transform action as the Ctrl+T shortcut, so it requires an active selection in the same way.
Notes
A live text edit is baked first before either tool opens its transform, so unconfirmed text is committed rather than lost.
Both default shortcuts (Ctrl+T for Transform, V for Layer Move) are rebindable in Edit ▸ Preferences ▸ Keyboard Shortcuts.
Related pages
Selections for making the selection that Transform lifts.
Layers for layer locking, the paper base, and the active layer.
Mesh Warp Tool
The Mesh Warp tool lifts the active layer onto a small grid of draggable control points so you can bend, stretch, and reshape the artwork by hand. Grab a point, pull it, and the pixels follow with a live preview. When the shape looks right, confirm it. If not, reset the grid or cancel and nothing changes.
Use it for organic reshaping where a straight scale or rotate is too rigid: curving a banner, fitting a label onto a tilted surface, adjusting a pose, or correcting perspective on hand-drawn line art.
On-screen label: "Mesh Warp" (this is the tool palette button label).
Screenshot
the active layer with the 5x5 mesh grid overlaid, one corner point pulled outward, and the floating Confirm / Cancel / Reset toolbar below the artwork.
Where it fits
For a straight move, scale, rotate, or flip, use the Transform / Move tool. Mesh Warp is for free-form deformation, not affine transforms.
For brush-driven push, pinch, bloat, and twirl with no visible grid, use the Liquefy tool. Liquefy and Mesh Warp share the same lift-and-commit workflow.
Default shortcut
Mesh Warp has no default keyboard shortcut. You can assign one in Edit ▸ Preferences ▸ Keyboard Shortcuts.
How it works
Selecting the Mesh Warp tool starts a warp session right away. There is no click-to-begin step.
Limner lifts the active layer's non-transparent pixels into a floating copy and clears them from the layer underneath. An active selection clips what gets lifted (see below); once the pixels are lifted, the selection is dropped and the grid becomes the editing surface.
A 5x5 grid of control points appears over the lifted pixels.
Drag any control point. The nearest point to your press is grabbed, and dragging it deforms the surrounding pixels with a live preview.
Use the floating toolbar to Confirm, Cancel, or Reset.
What gets lifted
If there is an active selection, only the selected pixels are lifted and the grid frames the selection bounds.
If there is no selection, the whole layer is lifted and the grid frames the bounding box of the drawn content, so the handles sit around the artwork rather than the entire canvas.
Only non-transparent pixels are lifted. If the active layer has no pixels in range, the session simply does not start (nothing happens on screen).
The 5x5 grid
The mesh is a fixed 5x5 lattice of control points (25 points total, 4 cells across by 4 cells down). The points start in a regular grid that exactly matches the lifted pixels. Dragging a point bends the pixels in the cells that touch it, leaving the rest in place. There are no size or strength settings: the grid itself is the control.
To grab a point, click within about 16 screen pixels of it. The closest point inside that range is selected, so you do not have to be pixel-perfect.
Tool options bar
Mesh Warp has no adjustable options. The tool options bar shows a one-line reminder:
Note
Drag the grid points to warp; Confirm / Cancel / Reset from the floating toolbar.
Floating toolbar (during a warp)
While a warp is in progress, a small toolbar floats below the artwork.
Control
What it does
Confirm
Bakes the deformed pixels back onto the source layer as a single undo step, then ends the session.
Cancel
Resets the grid to its starting shape, restores the original pixels, and ends the session with no change.
Reset
Snaps every control point back to its starting position so you can begin the warp again, without leaving the session.
Reset appears only in Mesh Warp. The matching toolbar in Liquefy shows Confirm and Cancel only.
Committing and undo
The whole operation (lifting the pixels, then committing the warped result) folds into one undo step. A single Undo after Confirm restores the layer to how it looked before you started.
Confirm and Cancel only touch the tiles the grid covers, so the edit stays fast and the undo entry stays small.
Reset does not end the session and does not create its own undo step. It just returns the grid to identity so you can keep working.
Limits and notes
Raster layers only. On a vector layer the tool is blocked with the on-screen notice "Mesh / Liquefy is not available on a vector layer. Rasterize the layer to use it." (vector pixels are regenerated, so a warp would be wiped). The notice offers a Rasterize shortcut.
The base paper layer (the bottom layer) cannot be warped. Pick a layer above it; on the paper layer the tool simply does nothing.
A locked layer cannot be warped. Unlock it first. See Layers for locking.
Only one warp or transform session can run at a time. Finish or cancel the current one before starting another.
Switching to another tool commits the in-progress warp. Coming back to Mesh Warp then lifts the layer again into a fresh session. (Re-clicking Mesh Warp while a warp is already running does nothing; the current session stays active.)
The Liquefy tool lets you push, pinch, bloat, and twirl the pixels of the active layer with a brush, as if the artwork were wet paint. It is perfect for nudging a silhouette, fixing a wobbly line, tweaking a facial feature, or adding a bit of organic flow. Nothing is permanent until you confirm, so you can experiment freely.
Liquefy is a close relative of the Mesh Warp tool. Both lift the layer onto an invisible control lattice and deform it, then bake the result back when you confirm. The difference: Mesh Warp gives you a coarse 5x5 grid of draggable points, while Liquefy hides the grid entirely and lets you sculpt it with a falloff brush.
When to reach for it
Reshape an outline or a blob of colour by dragging.
Slim, widen, or swell a region with Pinch and Bloat.
Add a swirl, a curl, or a sense of motion with Twirl.
Make small, painterly corrections that would be fiddly with selections.
For straight, structured deformation with visible handles (like a CSP mesh transform), use Mesh Warp instead.
How it works
Select the Liquefy tool. Limner immediately lifts the active layer's content onto a fine, invisible warp lattice and shows the floating warp toolbar. (If there is no selection, the whole layer is lifted; if a selection is active, only the selected pixels are lifted.)
Pick a Mode in the tool-options bar (Push, Pinch, Bloat, or Twirl).
Drag on the canvas. Each stroke displaces the lattice under your brush, and the layer reshapes live. A smooth falloff fades the effect to nothing at the brush edge, so the deformation blends naturally.
When you like the result, click Confirm on the floating toolbar. To throw the change away, click Cancel.
Screenshot
the Liquefy tool-options bar with the four mode buttons selected, plus the Size and Strength sliders.
Liquefy works on raster layers only. On a vector layer it does nothing and shows a notice, because a vector layer's pixels are regenerated on the next render and would wipe out the warp. It also will not act on the bottom paper layer or on a locked layer.
The four modes
Choose a mode with the segmented buttons at the left of the tool-options bar. The default mode is Push.
Mode
What it does
Push
Forward-warp. Drags pixels along the direction of your stroke. This is the workhorse mode for nudging shapes around.
Pinch
Pulls pixels in toward the centre of the brush, shrinking the area under the cursor.
Bloat
Pushes pixels out away from the brush centre, swelling the area under the cursor.
Twirl
Swirls pixels around the brush centre. Hold Alt while you drag to reverse the swirl direction.
Pen pressure modulates the effect: a lighter touch warps less, a firmer touch warps more.
Options bar
Control
Range
Default
What it does
Mode (Push / Pinch / Bloat / Twirl)
four buttons
Push
Selects which deformation each brush dab performs (see the table above).
Size
8.0 to 512.0
96.0
Brush radius in canvas pixels. The slider is logarithmic so small sizes are easy to dial in. Larger values move broader areas of the layer at once.
Strength
0.0 to 1.0
0.5
How strongly each dab displaces the pixels. Lower is gentle and precise; higher is aggressive.
A caption under the sliders reminds you: "Alt reverses Twirl · Confirm / Cancel from the toolbar".
Notes on the ranges:
The Size slider runs 8 to 512, but Limner accepts sizes up to 1024 (for example through a rebound shortcut or a settings file); the value is clamped to that wider 8 to 1024 band internally.
Strength is held to the 0.0 to 1.0 range.
Finishing a Liquefy session
The floating warp toolbar that appears while you are liquefying carries:
Confirm: bakes the deformed pixels back onto the layer as a single undo step.
Cancel: discards every change and restores the original pixels.
There is no Reset button in Liquefy. (Reset is a Mesh Warp control, because it restores the visible lattice; Liquefy has no lattice to reset.)
If you switch to another tool, switch workspace mode, or run a layer command while a warp is in progress, Limner automatically confirms it for you (the deformation is baked in). To throw the warp away instead, click Cancel before you leave the tool. Closing the document without saving discards the document and any in-progress warp with it.
Keyboard shortcut
Liquefy has no default keyboard shortcut. You can assign one in Edit ▸ Preferences ▸ Keyboard Shortcuts.
The only modifier the tool itself uses is Alt, which reverses the Twirl direction while you drag.
Tips
Start with a low Strength and build up the deformation in passes. It is easier to add more than to undo a heavy push.
Match the Size to the feature you are sculpting: a large brush for broad shape changes, a small brush for fine corrections.
Combine a selection with Liquefy to protect the rest of the layer: make a selection first, then enter the tool, and only the selected pixels are lifted and warped.
If you do not see any effect, check that you are on a raster layer above the paper base and that the layer actually has pixels where you are dragging.
The Eyedropper picks up a color from your canvas and makes it the active brush color. Click anywhere on the artwork and Limner reads the color you see at that point, then loads it ready to paint with. It is the fastest way to match an existing color exactly, whether you are continuing a stroke, building a palette, or sampling from a photo.
Screenshot
the Eyedropper selected in the tool strip, with the cursor hovering over the canvas.
How it works
Select the Eyedropper, then click a pixel on the canvas. Limner samples the composite color at that point, the blended result of every visible layer exactly as it appears on screen, and sets it as your brush color. It does not matter which layer is active; you always pick what your eye sees.
The sample is read from the up-to-date, flushed composite, so the color is always correct. If you paint a stroke and immediately pick from it, you get the true painted color, never a stale or partial value. Internally, Limner answers from a cached composite when nothing has changed since the last read, and otherwise reads back just the single clicked pixel rather than the whole canvas, so picking stays instant even on large documents.
Sampling is a single click action. There is no drag or marquee; one click sets the color and you are done.
Screenshot
a click on a painted area, with the foreground color swatch updating to match.
Options
The Eyedropper has no adjustable settings. Its tool options bar shows only a reminder:
Note
"Click to sample colour from the composite."
Control
Range
Default
What it does
(none)
n/a
n/a
The Eyedropper has no options. It always samples the visible composite color at the click point.
Hold Alt to pick without switching tools
You do not have to leave your brush to grab a color. While almost any paint tool is active, hold Alt and the cursor temporarily becomes the Eyedropper. Press to pick, and you can keep the button down and scrub across the canvas to preview colors as you move; the brush color follows the cursor until you release. The moment you let go of Alt, your previous tool is back exactly as it was, with no extra clicks.
For speed during an Alt scrub, Limner takes one snapshot of the composite when you press, then samples from that snapshot as you move, so dragging across a big canvas stays smooth.
Alt acts as the temporary eyedropper for the painting tools (Brush, Eraser, and similar). It does not do this for the selection tools, the Magic Wand, Transform, Layer Move, Mesh Warp, Liquefy, or the Eyedropper tool itself, because Alt already has another meaning for those (for example, Alt subtracts from a selection).
Picking from the Reference board
When the Eyedropper tool is active and the Reference board is open (in its dock tab or as a pop-out window), you can sample colors straight from your reference images. Click any image on the board and Limner reads the pixel under the cursor into the brush color, without selecting or moving the image, so picking a color never disturbs your board layout. Over a reference image, the cursor shows a crosshair to confirm you are in pick mode.
Screenshot
the Reference board with an imported photo, the Eyedropper crosshair over it, and the brush color updating to a sampled hue.
Cursor
Over the canvas the Eyedropper keeps the normal pointer. Unlike the Brush and Eraser, it does not hide the cursor, so you keep a visible aim point while you sample. A crosshair cursor appears only over reference images when you pick from the Reference board, to confirm you are in pick mode there.
Keyboard shortcut
Action
Default key
Select the Eyedropper tool
I
Temporary eyedropper (while a paint tool is active)
Hold Alt
The tool shortcut is rebindable in Edit ▸ Preferences ▸ Keyboard Shortcuts. The Alt hold behavior is a fixed modifier, not a separate binding.
Tool shortcuts apply in Illustration mode. In Vector mode the bare letter keys select the vector tools instead.
See also
Color: the brush color, color history, and saved palettes that the Eyedropper feeds into.
Reference panel: importing and arranging reference images you can sample from.
Brush Tool: the tool you most often pair with Alt-pick while painting.
Working with your artwork
Layers
Layers let you build an image in independent, stackable pieces: line art on top, flat colours below, a background at the bottom. Each layer keeps its own pixels, blend mode, opacity, visibility, and locks, so you can change one part without disturbing the rest. This page is both the concept guide and the reference for the Layers panel.
The Layers panel is one of the dockable panels (Window menu). For the full list of layer commands see the Layer menu. Layer masks and selections work hand in hand, so you may also want Selections. Editable line and shape layers are covered in Vector mode.
Screenshot
the Layers panel with a folder, an active raster layer, and a layer mask thumbnail.
New in 0.8.3
Toggles in one strip. The active layer’s lock, transparency-lock, clip, and reference toggles moved from the active row into the always-visible strip at the top of the panel, wrapping to fit narrow docks. Layer rows keep quiet accent badges for anything engaged.
Masks from the action bar. A mask button on the Layers action bar adds a reveal-all mask to the active layer, or opens a small menu to target, enable, apply, or delete the one it has.
The stack, top to bottom
Layers paint on top of one another from the bottom up: the bottom layer is the background, and every layer above composites over what is beneath it. In the panel the order is reversed for reading: the top row is the topmost layer, the bottom row is the background.
Exactly one layer is active at a time. The active layer is the target of new brush strokes, fills, filters, and most single-layer commands. The active row is drawn as a solid accent block with dark text; any other layers that are part of a multi-selection get a faint accent wash.
Layer types
A layer is exactly one kind, decided by what data is attached to it.
Type
What it is
How it is made
Raster layer
Ordinary pixels: the everyday painting surface.
Add Layer (or it is auto-added, see below)
Paper / background layer
The bottom layer, named Paper. It is the document background and can be a solid colour or transparent.
Created with the document
Text layer
Pixels generated from re-editable text. Stays editable until you rasterize it.
Text tool
Vector layer
Brush strokes that stay editable lines: you can move, reshape, re-width, and erase them to intersections. Carries a curve badge in the panel. Named Vector N.
New Vector Layer
Graphic layer
Vector-mode objects: retained Bezier paths. Named Graphic N.
Vector mode, Object Layers panel
About the Paper layer
The bottom layer (index 0) is special and is named Paper rather than "Layer 1". It cannot be moved, grouped, or dragged into a folder, and nothing can be placed below it. The eraser leaves it alone.
If you start a stroke while the Paper layer is active, Limner automatically inserts a fresh transparent layer above it and paints there instead, so your paint always lands somewhere it can be erased. The console notes this with "auto-added a layer above the paper".
Blend modes
The blend mode controls how a layer's pixels combine with everything beneath it. Limner ships 18 blend modes. Blending runs in gamma (sRGB) space, so results match Clip Studio Paint, Photoshop, and Procreate.
The default blend mode for a new layer is Normal.
#
Label
1
Normal
2
Multiply
3
Screen
4
Overlay
5
Darken
6
Lighten
7
Color Dodge
8
Color Burn
9
Linear Dodge (Add)
10
Linear Burn
11
Hard Light
12
Soft Light
13
Difference
14
Exclusion
15
Hue
16
Saturation
17
Color
18
Luminosity
Setting the blend mode
Panel combo box: the blend-mode dropdown in the top strip of the Layers panel sets the active layer's mode.
Cycle: press Shift+B to step to the next mode (the console prints "blend mode: <name>"). It is moved off plain B so the brush keeps B. Shortcuts are rebindable in Edit ▸ Preferences ▸ Keyboard Shortcuts.
Folders have their own blend-mode combo (see Groups, below).
Opacity
Opacity is a layer-wide multiplier applied on top of each pixel's own transparency.
Control
Range
Default
What it does
Opacity slider
0.0 to 1.0 (shown as 0% to 100%)
1.0 (100%)
Fades the whole layer, from solid down to fully transparent.
The Opacity slider sits in the top strip of the panel and reads "Opacity NNN%". You can also nudge it with the keyboard: = raises opacity and - lowers it (rebindable in Edit ▸ Preferences ▸ Keyboard Shortcuts).
Visibility
Each layer has an eye toggle on the far left of its row that shows or hides it without deleting anything. Hidden layers do not composite and are skipped by Merge Visible.
Click any row's eye to toggle that layer.
Press H to toggle the active layer's visibility.
A folder also has its own eye in the header. A layer is only visible on the canvas if both its own eye and its folder's eye are on.
Locks and the reference flag
Since 0.8.3 the four toggles (lock, transparency lock, clip, reference) sit in the always-visible active-layer strip at the top of the panel, wrapping to fit narrow docks. On layer rows, any engaged state appears as a quiet accent badge; click the layer to make it active, then use the strip. Locks and the clip flag are session state and are not saved in the file; the reference flag is saved.
Control
Panel glyph
What it does
Lock layer
padlock (closed when on, open when off)
Blocks all edits to the layer: painting, fill, shapes, filters, transform, warp, move, reorder, regroup, and merging into or with it all become no-ops. You can still toggle visibility, select, rename, change blend or opacity, and delete it.
Lock transparency
checkerboard
Restricts painting to pixels the layer already has: incoming brush coverage is multiplied by the existing alpha, so you can recolour shapes without spilling past their edges.
Clip to layer below
bend-down arrow
Makes the layer visible only where the layer directly below it has pixels (a clipping mask), non-destructively. Not available on the Paper layer.
Reference layer
crosshair
Marks this layer as the one the Fill bucket and Magic Wand read for their colour match and boundary (the paint still lands on the active layer). Only one reference layer can be set at a time, so turning one on clears any other.
Tooltips you will see on the active row:
Lock layer: "Lock layer: blocks painting, transforms, moving, and merging"
Lock transparency: "Lock transparency: paint only where the layer already has pixels"
Clip: "Clip to the layer below (mask to its shape)"
Reference: "Reference layer: Fill and Magic Wand read this layer's lines"
Layer masks
A layer mask is a non-destructive grayscale stencil attached to a layer. Where the mask is white the layer shows; where it is black the layer is hidden; gray is partial. A fresh mask is "reveal all" (everything visible) until you paint on it.
When a mask is the active edit target, your brush and eraser paint on the mask instead of the pixels: paint black to hide, white to show (the eraser hides). The panel shows the mask as a small grayscale thumbnail next to the layer thumbnail.
All mask commands live in the Layer menu. They no-op if the layer is locked.
Command
What it does
Add Layer Mask
Attaches a reveal-all mask and makes it the edit target. Console: "layer mask: added (paint black to hide, white to show; eraser hides)".
Mask Outside Selection
Builds a mask from the active selection that keeps the selected region visible and hides everything else. Needs a selection.
Mask Selection
Builds a mask that hides the selected region. Needs a selection.
Apply Layer Mask
Bakes the mask permanently into the pixels (hidden areas become transparent) and removes the mask. One undo restores both. Console: "layer mask: applied to the layer's pixels".
Enable/Disable Layer Mask
Toggles the mask's effect on or off while keeping its pixels. This is not an undo step, but it marks the document as modified (the state is saved). Console: "layer mask: enabled" / "disabled".
Delete Layer Mask
Removes the mask so its hidden pixels return. One undo step. Console: "layer mask: deleted".
The mask thumbnail in the panel
Clicking the mask thumbnail:
On the active layer, switches between editing the mask and editing the pixels.
On another layer, makes that layer active and targets its mask.
An accent ring around the thumbnail means the mask is the live edit target. A dimmed (struck-through) thumbnail means the mask is disabled. Tooltips:
Targeted: "Editing the MASK: paint black to hide, white to show; click to edit pixels again"
Default: "Layer mask: click to paint on the mask instead of the pixels"
Groups (folders)
A folder collects a run of layers so you can move, hide, and blend them as a unit. Folders are single level (a folder cannot contain another folder), and a folder's members always stay together in the stack.
A folder composites its members into their own buffer first, then blends that result as one with the folder's own blend mode and opacity, so a folder behaves like a single layer relative to the rest of the stack.
New-folder defaults:
Property
Range
Default
Name
text
Group N (next number)
Blend mode
18 modes
Normal
Opacity
0.0 to 1.0
1.0 (100%)
Visible
on / off
on
Folder header controls
Control
What it does
Caret
Expand or collapse the folder ("Expand / collapse folder").
Folder blend mode. Shown only when the folder holds the active layer.
Opacity slider
Folder opacity, 0.0 to 1.0, "Opacity NNN%". Shown only when the folder holds the active layer.
A faint accent wash on the header marks the folder that holds the active layer.
Making and dissolving folders
Group: use the folder-plus button in the action bar ("Group the selected layers into a folder"). Selected layers that are not already adjacent are first gathered together. The Paper layer is never included.
Ungroup: use the folder-minus button ("Dissolve the active layer's folder"). It is only enabled when the active layer is in a folder. The layers stay in place, now ungrouped.
Layer folders have no default keyboard shortcut. Ctrl+G and Ctrl+Shift+G are bound to Vector-mode object grouping, which is different from layer folders.
Reordering and grouping by drag
Drag any non-Paper layer row to move it. The drop position within the target row decides what happens:
Drop position
Result
Top third of a row
Place the dragged layer above that row.
Bottom third of a row
Place the dragged layer below that row.
Middle third of a row
Group with that layer (make or join a folder), like dropping one layer onto another.
Onto a folder header
Move the dragged layer into that folder.
Empty space below the last row
Pull the dragged layer out of its folder.
The Paper layer cannot be moved, and nothing can be dropped below it. A locked layer will not move. Limner draws an insertion line for a reorder and a whole-row outline when a drop would group.
Layer commands
These are the per-layer operations. Most are on the action bar at the bottom of the panel and also in the Layer menu. Default shortcuts are listed where they exist and are rebindable in Edit ▸ Preferences ▸ Keyboard Shortcuts.
Command
Shortcut
What it does
Add Layer
N
Inserts a fresh transparent layer above the active one and makes it active. Named "Layer N".
Duplicate Layer
Ctrl+J
Makes a fully independent copy of the active layer directly above it, named "<name> copy". Pixels, mask, and any text or vector data are deep-copied.
New Vector Layer
none
Adds an editable-stroke vector layer above the active one, named "Vector N".
Delete Active Layer
none
Removes the active layer. Refuses to delete the last remaining layer. Any in-progress stroke or transform is settled first.
Merge Down
none
Bakes the active layer into the layer directly below it, keeping the lower layer's blend mode and opacity, then removes the active layer. No-op on the bottom layer or if either layer is locked.
Merge Visible
none
Flattens every visible layer into the bottom-most visible one and removes the others; hidden layers are untouched. Needs at least two visible layers; no-op if any visible layer is locked.
Rasterize Text
none
Flattens the active text layer to plain pixels (no longer editable).
Rasterize Vector Layer
none
Bakes the active vector layer to plain pixels; its lines stop being editable objects. Enabled only on a vector layer.
Merging a vector layer rasterizes it (its stroke data is dropped, undoably), matching Clip Studio Paint.
Selecting layers
Action
How
Select a layer
Click its row, its thumbnail, or its name.
Add or remove from the multi-selection
Ctrl+click the row, or use the per-row checkbox ("Select layer (checked layers move / transform together)").
Select a range
Shift+click another row.
Rename
Double-click the layer name.
The multi-selection lets Move, Transform, and merge act on every checked layer at once. The active layer is always part of the selection, and the last remaining selected layer cannot be unchecked.
Panel anatomy
The Layers panel has three regions, top to bottom.
Top strip: an "Active" label with the active layer's name in bold, the blend-mode combo (all 18 modes), and the Opacity slider (0.0 to 1.0).
Layer stack: a scrollable list, top layer first, with folder headers and indented members. A folder's members are joined by a vertical line in the indent gutter.
Action bar: wrapping icon buttons. In order: Add layer, Duplicate, New vector layer, Group, Ungroup, then Merge down, Merge visible, then Delete. Buttons disable when they do not apply (for example Delete is off with only one layer, Merge down is off on the bottom layer, Merge visible needs at least two visible layers).
Each layer row, left to right: the eye toggle, the selection checkbox, the 26x26 thumbnail (over a checkerboard so transparency reads), the mask thumbnail (if a mask exists), a curve badge (if it is a vector layer), and the name.
A selection limits where your edits land. Draw one with a marquee, lasso, polygon, or the Magic Wand, then paint, fill, transform, copy, or delete only inside it. With nothing selected, every tool acts on the whole canvas.
Under the hood a selection is a coverage mask, not a crisp on/off region: edges are anti-aliased and an optional feather softens them further, so strokes and fills fade smoothly at the boundary. The marching ants you see trace the halfway point of that coverage.
Screenshot
a canvas with a rectangular selection (marching ants) and the floating selection toolbar pinned just below it.
The selection tools
All five selection tools live in the tool strip and share the same combine modes and Feather control in the tool options bar. The default keys are shown below and are all rebindable in Edit ▸ Preferences ▸ Keyboard Shortcuts.
Tool
Default key
What it does
Rect Select
M
Drag out an axis-aligned rectangle through two corners (any order).
Ellipse Select
Shift+M
Drag out the ellipse inscribed in the rectangle through two corners.
Lasso
L
Trace a freehand outline; the path fills as a polygon and commits on release.
Polygon Select
Shift+L
Click to drop straight-edge vertices; close by clicking the first point.
Magic Wand
W
Click to select a contiguous patch of similar color.
Rect Select and Ellipse Select
Press and drag to rubber-band the shape, then release to commit. While you drag, the selection refreshes live (rebuilt once per frame, so even a fast drag stays smooth). Both shapes are anti-aliased.
Lasso
Hold and drag to trace a freehand outline. The path is sampled as you move and filled as a polygon, so concave and self-crossing shapes fill correctly. Release to commit. A path needs at least three points to become a selection.
Polygon Select
Each click drops one vertex and the live preview appears once you have placed three. To close the shape, click within 25 pixels of the first vertex (with at least three vertices placed). The tool options bar shows the hint "Click vertices; click the first point to close." A polygon can hold up to 2000 vertices.
Magic Wand
Click a pixel and the wand selects the connected region of similar color. It reads the visible composite, unless a Reference layer is set and visible, in which case that layer drives the color match. When a symmetry ruler is active, the wand also floods from each mirrored copy of the seed point, so a symmetric area selects symmetrically.
The wand shares the Fill tool's Contiguous and Refer image border settings (see Fill). Only the Tolerance slider is shown on the wand's own options bar.
Control
Range
Default
What it does
Tolerance
0.0 to 1.0
0.1
How close in color a pixel must be to the clicked pixel to be included. Higher selects more.
Contiguous (shared with Fill)
on / off
on
On: only the connected patch. Off: every matching pixel across the layer.
Refer image border (shared with Fill)
on / off
on
Only affects the Fill tool's gap closing; the wand floods plain (no gap closing), so this setting does not change wand selections.
Combine modes
Every new selection combines with the one already on the canvas in one of four ways. Pick the mode with the segmented buttons in the tool options bar, or hold a modifier key to override it for a single gesture.
Mode
Modifier key
What it does
Replace
(none)
The new shape becomes the selection. This is the default.
Add
Shift
Unions the new shape with the existing selection.
Subtract
Alt or Ctrl
Cuts the new shape out of the existing selection.
Intersect
Shift+Alt
Keeps only the overlap of the new shape and the existing selection.
The tool options bar shows the same reminder: "Shift adds · Alt/Ctrl subtracts · Shift+Alt intersects".
A few things worth knowing:
The mode is locked in at the moment a gesture starts. Releasing a modifier mid-drag does not change the result.
For selection tools Alt means Subtract, not the temporary eyedropper that Alt triggers for the paint tools.
A no-drag click (or a lasso tap with no real path) deselects, but only in Replace mode. In Add, Subtract, or Intersect mode that same click does nothing, so you cannot lose your selection by accident.
Control
Range
Default
What it does
Mode
Replace / Add / Subtract / Intersect
Replace
How a new shape combines with the current selection.
Feather
Feather softens the edge of the next selection you draw. It blurs the freshly rasterized shape before it combines, fading the boundary over roughly twice the feather radius. It does not retroactively soften a selection you already have.
Control
Range
Default
What it does
Feather
0.0 to 100.0 px (slider)
0.0
Softens the next selection's edge by this many pixels.
The slider is logarithmic and reads 0 to 100 pixels; the value is clamped to a maximum of 250 pixels internally. The tooltip reads "Soften the next selection's edge by this many pixels."
The floating selection toolbar
Once you have an active selection, a small toolbar floats just below it (pinned to the selection's bottom-center). It collects the most common selection actions in one place. It only appears after a selection is finished, so it never flashes mid-drag.
Screenshot
the floating selection toolbar showing Transform, Copy, Cut, Paste, Paste New, Delete In, Delete Out, Invert, and Deselect.
Copies the selected pixels to the clipboard (Ctrl+C).
Cut
layer above the paper layer
Copies the selection to the clipboard and erases it from the layer (Ctrl+X).
Paste
always
Pastes onto the active layer in place (Ctrl+Shift+V).
Paste New
always
Pastes onto a new layer in place (Ctrl+V).
Delete In
layer above the paper layer
Erases the pixels inside the selection.
Delete Out
layer above the paper layer
Erases the pixels outside the selection.
Invert
always
Swaps selected and unselected.
Deselect
always
Clears the selection.
The Cut, Delete In, and Delete Out buttons stay disabled on the base paper layer (the bottom layer is never erased).
Copy, cut, and paste
Copy and paste move pixels through an in-app clipboard. The two paste commands differ only in where the pixels land.
Command
Default shortcut
What it does
Copy
Ctrl+C
Copies the selected pixels to the clipboard. The source is untouched and no new layer is made.
Cut
Ctrl+X
Copies the selection to the clipboard and erases it from the active layer in one undo step.
Paste (onto active layer)
Ctrl+Shift+V
Drops the clipboard onto the active layer at its original position.
Paste as new layer
Ctrl+V
Drops the clipboard onto a fresh layer named "Pasted", in place.
Notes:
Ctrl+V pastes as a new layer (the usual copy-and-paste workflow, matching Photoshop and Clip Studio Paint). Ctrl+Shift+V pastes in place onto the current layer when you want it merged in.
Copy and Cut copy only the pixels that are both inside the selection and not transparent.
Cut and pasting onto the active layer are blocked on vector layers and on the locked paper layer. Pasting onto either of those falls back to a new layer.
The Keyboard Shortcuts dialog still labels these "Copy (to new layer)" and "Cut (to new layer)". That wording is historical; the current commands do not make a layer.
Invert and Deselect
Both commands sit on the floating toolbar and in the Select menu (see Menus). Neither has a default keyboard shortcut, but both are bindable in Edit ▸ Preferences ▸ Keyboard Shortcuts.
Invert (Select ▸ Invert): flips the mask so the selected and unselected regions swap.
Deselect (Select ▸ Deselect): clears the selection and any in-progress drag.
Delete Inside and Delete Outside
These erase pixels relative to the selection, on every selected non-paper layer, folded into one undo step.
Delete Inside (Edit ▸ Delete Inside): erases the pixels inside the selection.
Both skip the locked paper layer and vector layers, and both leave the selection itself in place. They are also on the floating toolbar as Delete In and Delete Out, enabled only when the active layer sits above the paper layer. There is no default shortcut for either.
Free Transform of a selection
To scale, rotate, or move the selected pixels, start a Free Transform:
Edit ▸ Free Transform, or
the Transform button on the floating toolbar, or
the Transform tool (Ctrl+T).
This hands off to the Transform subsystem. See Transform and Move for handles, aspect lock, flip, and confirm or cancel.
Fill for the Contiguous and Refer image border settings the Magic Wand shares.
Layers for using a selection to build a layer mask.
Color
The Color panel is where you choose what you paint with. Pick a color on the HSV wheel, fine-tune it with channel sliders, type an exact hex value, build up palettes you reuse, and let harmony modes suggest colors that go together. This page is both the concept guide and the full reference for every control on the Color tab.
Screenshot
the Color tab showing the harmony selector, HSV wheel, exact/hex readout, slider strips, History row, and Palette section.
One brush color, plus a history
Limner keeps a single active brush color rather than a Photoshop-style foreground/background swatch pair. There is no swap key and no background swatch. Instead, every color you actually paint with is added to the Color History strip, so your recent colors are always one tap away. See Color History below.
In Vector mode the same picker edits the Fill or Stroke color of the selected object instead of the brush color (see Vector mode in the picker).
Layout at a glance
The Color tab is laid out top to bottom:
Target selector (Vector mode only)
Harmony selector
HSV color wheel
Harmony swatches (only when a harmony is active)
Exact / hex entry plus the RGB / HEX readout
Channel sliders (choose a color space, then drag the channels)
Color History
Palette section
The HSV color wheel
The wheel is the primary picker. It has two parts:
The outer hue ring sets the hue. Click or drag around the ring to rotate to a new hue.
The inner square sets saturation (left to right, 0 to full) and value (top to bottom, full to dark).
The region you grab (ring or square) is locked when you start a drag, so a stroke that begins on the ring stays on the ring and a drag in the square never jumps to the hue ring. A click works the same as a quick drag.
The wheel remembers the hue and saturation you set even when you drag the square all the way to black or to grey, so you do not lose your chosen hue when you darken or desaturate a color. Setting a color from somewhere else (a swatch, the hex field, a slider) reseeds the wheel from that color.
Control
Range
Default
What it does
Hue ring
0 to 360 degrees
seeded from the current color
Sets the hue.
Saturation (square, left to right)
0 to 1
seeded from the current color
Sets saturation.
Value (square, top to bottom)
1 to 0
seeded from the current color
Sets brightness. Top is brightest, bottom is black.
Color harmony
A harmony mode overlays the wheel with the partner hues of your current color and offers them as one-tap swatches. With a harmony on, the ring darkens everywhere except a lit window at the base hue and at each partner, and each partner shows as a pickable dot inside its window. Partner dots take your current color's saturation and value, so they read as variations of the same tone rather than pure bright hues. Clicking a partner dot snaps the base hue exactly to it at full saturation and value, ready to be re-toned in the square.
Choose a mode from the Harmony selector. The choice persists for the session.
Harmony option
What it shows
Off
A plain HSV picker with no partner markers.
Complementary
The opposite hue (180 degrees away), one partner.
Triadic
The two hues 120 degrees on either side, two partners.
Analogous
The two hues 30 degrees on either side, two partners. The lit area is a single continuous arc across the adjacent hues.
Control
Range
Default
What it does
Harmony selector
Off, Complementary, Triadic, Analogous
Off
Chooses the harmony overlay on the wheel.
Harmony swatches
When a harmony is active, a row of swatches appears below the wheel: first your current color (hover label "Current"), then one swatch per partner (hover label is the harmony name, for example "Triadic"). Click any of them to make it the active color.
Exact and hex entry
For precise input, the Exact button opens a popup with per-channel sliders and a hex field. Below it, a read-only readout always shows the current color as decimal RGB and as a 6-digit uppercase hex value:
RGB 128 64 32
HEX #804020
The hex readout has no alpha channel.
Control
Range
Default
What it does
Exact button
0 to 255 per channel
current color
Opens an RGB / hex popup for precise entry.
RGB / HEX readout
n/a
current color
Read-only display of the current color in decimal RGB and uppercase hex.
Channel sliders
The slider strips let you edit the color one channel at a time. Pick a color space from the Sliders selector, then drag the channels. The chosen space persists for the session.
Color space
Channels and ranges
RGB
R, G, B, each 0 to 255
HSV
H 0 to 360, S 0 to 100, V 0 to 100
HLS
H 0 to 360, L 0 to 100, S 0 to 100
CMYK
C, M, Y, K, each 0 to 100
Control
Range
Default
What it does
Sliders (space selector)
RGB, HSV, HLS, CMYK
RGB
Chooses which channels the sliders edit.
Notes:
The HSV, HLS, and CMYK sliders remember the working channels across frames, so dragging a value to a grey or black does not throw away the hue. Setting the color from the wheel, a swatch, or the hex field reseeds them.
CMYK here is a display and entry convenience only. It uses a simple conversion with no ICC color profile, so it is not a print-accurate proof.
Color History
Every color you actually paint with lands in the History strip, most recent first. Click any swatch to make it active again. Until you have painted anything, the strip shows the hint "Colours you paint with appear here."
History records a color when it is committed to paint (a brush, shape, or fill stroke), not while you scrub the picker, so dragging the wheel never floods the list. Erasing and transparent strokes do not record (there is no color to keep). The shape tools and the Fill bucket also skip history when they are editing a layer mask. Identical colors are not duplicated: an existing entry moves to the front instead. The strip holds up to 24 colors.
Control
Range
Default
What it does
History swatches
up to 24 entries, most recent first
empty
One-tap recall of colors you have painted with.
Palettes
The Palette section is for the colors you want to keep on hand: named, saved swatch sets that survive across sessions (they are stored in your settings and saved on every change).
Screenshot
the Palette header (selector plus new, rename, delete icons) above a grid of swatches and a trailing plus tile.
Managing palettes
The header row has a palette selector and three icon buttons. When you have no palettes yet, the selector reads "No palettes yet" and only the new-palette button is shown.
Control
Default
What it does
Palette selector
active palette
Switches between your saved palettes.
New palette (plus icon)
n/a
Creates a new palette named "Palette N" and makes it active. Hover: "New palette".
Rename (pencil icon)
n/a
Opens an inline editor. Press Enter or click away to commit, Esc to cancel. Empty names are ignored. Hover: "Rename palette".
Delete (trash icon)
n/a
Deletes the current palette. Hover: "Delete palette".
The rename and delete buttons appear only once at least one palette exists.
Adding and removing swatches
The swatch grid shows the active palette's colors as 22 by 22 squares, followed by a plus tile.
Single click a swatch to select that color.
Right-click a swatch for a menu: "Set to current color" replaces it with the current brush color, and "Remove" deletes it.
The trailing plus tile adds the current color to the palette. Hover: "Add current color to palette".
On a touch screen, double-tap a swatch to arm it. An X badge appears on its corner (hover: "Remove this color"); tap the badge to delete the swatch. Any press elsewhere disarms it.
Control
What it does
Swatch (single click)
Selects that color.
Swatch (right-click) ▸ Set to current color
Replaces the swatch with the current brush color.
Swatch (right-click) ▸ Remove
Removes the swatch.
Swatch (double-tap)
Arms the swatch with an X badge for touch removal.
Plus tile
Adds the current color to the active palette.
Vector mode: Fill and Stroke
In Vector mode the Color tab gains a Target row at the top with Fill and Stroke choices. The picker then edits whichever target is selected for the current object (or the default for new objects when nothing is selected). The wheel, sliders, hex field, history, and palettes all work the same; they just write to the object's Fill or Stroke color, with full opacity.
Control
What it does
Target: Fill
The picker edits the object's fill color.
Target: Stroke
The picker edits the object's stroke color.
The Eyedropper
The Eyedropper samples a color straight from your canvas. Its tool-options bar reads "Click to sample colour from the composite." It samples the composite, meaning all visible layers blended together, not just the active layer.
Default shortcut: I (rebindable in Edit ▸ Preferences ▸ Keyboard Shortcuts).
Click, or drag, to sample. Dragging scrubs the color under the cursor as you move.
While using most paint tools, hold Alt to borrow the eyedropper without switching tools: press or drag to pick a color, then release Alt to return to your tool. The decision is locked at the moment you press, so toggling Alt in the middle of a stroke cannot hijack a stroke already underway.
Alt-sampling is available for painting tools but is excluded for the selection tools (Rect Select, Ellipse Select, Lasso, Polygon Select), the Magic Wand, Transform, Layer Move, Mesh Warp, Liquefy, and the Eyedropper itself, where Alt already has another meaning (for example, Alt subtracts from a selection).
Sampling from the reference board
When the Eyedropper is active and the reference board (the image board or its pop-out) is open, clicking an image samples that image's pixel directly into the brush color instead of selecting or moving the image. The cursor shows a crosshair over the board. See the Reference panel.
Reference layer
A reference layer is a different idea from the reference board. It is a normal layer you flag so that the Fill bucket and the Magic Wand read its pixels for color matching and boundary detection instead of the active layer or the composite. This is the classic "use the lineart layer as my fill guide" workflow: keep your line work on a reference layer, fill on a separate color layer, and the fill follows the lines.
The paint still lands on the active layer. Only the color-match source changes.
Only one reference layer is honored at a time (the first visible flagged layer). Setting a new one clears any other.
The reference flag is saved in .limner and .artpaint files (format version 16 and later). Older version 15 files have no reference flag, so all layers load as normal.
Turning it on
In the Layers panel, the active layer's row has a crosshair button. It is tinted to the accent color when on and dimmed when off. Hover text: "Reference layer: Fill and Magic Wand read this layer's lines". Non-active rows show a static crosshair indicator (hover: "Reference layer (click the layer to manage)").
Control
Default
What it does
Layers row: Reference toggle (crosshair)
off
Flags the layer so Fill and Magic Wand match against it.
Related: the Fill "Reference all layers" option
The Fill tool has a separate "Reference all layers" checkbox (default off). It is not the same as a reference layer. When on, Fill matches color against the whole composite (every visible layer) rather than the active or reference layer. See Fill and Selections for how the Magic Wand uses the same sources.
Every mark the Brush tool makes comes from a brush: a preset that bundles a tip shape, pressure dynamics, spacing, texture, and dozens of other settings. Limner ships a full library of brushes, lets you organise them into folders, build your own, and trade them with other apps as Photoshop .abr files.
This page is about choosing and managing brushes. For the meaning of each individual setting, see the Brush Settings panel. For how the Brush tool itself behaves on the canvas, see the Brush tool.
Screenshot
the Brush dock with the folder rail on the left and the stroke-preview grid on the right.
The brush engine in brief
A brush is a parameter set the stamp engine reads as you draw. A few terms are worth knowing up front, because they recur throughout the picker and the settings:
Tip: the shape of one stamp. A brush either uses the built-in procedural round dab or a grayscale image you import.
Opacity: the per-stroke ceiling. Overlapping dabs build up only to this level, then stop. Applied once when the stroke commits.
Flow: the per-dab deposit. Lower flow lays paint down more gradually within a single stroke.
Spacing: the gap between stamps, measured as a fraction of the tip diameter. Limner's default of 0.08 (8 percent) reads as a continuous ribbon rather than visible dots.
The largest diameter any brush can reach is 2000 canvas pixels, the upper bound on every Size slider. Most brushes paint colour. The pure blenders in the Blend folder deposit no colour of their own; they smear or blur what is already on the canvas. The wet oils in Painting (and the wet-mix brushes in Blend) do both: they smear the canvas while they lay down the drawing colour. Picking any of these keeps the Brush tool selected; the engine simply routes the stroke through the smudge or blur path.
The three brush tabs
Brushes live across three dock tabs:
Tab
What it is for
Brush
The picker: choose a brush, search, and organise folders.
Brush Settings
Edit every setting on the active brush. See Brush Settings.
Create Brush
The guided and advanced brush-builder. Covered below.
The Brush Settings panel docks on the left by default. All three are also reachable from the Window menu.
The Brush picker
The Brush tab is styled after Procreate's Library: a slim vertical rail of folders down the left side, beside a responsive grid of stroke-preview thumbnails for the active folder. The active brush is highlighted with a faint accent wash.
Screenshot
the picker top row showing New brush, Import .abr, New folder, and the search field.
Top controls
Control
What it does
New brush
Opens the Create Brush wizard to build a brush from scratch.
Import .abr...
Imports a Photoshop .abr brush file as new tips.
New folder
Creates an empty folder. Drag brushes onto it in the rail to fill it.
Search field
Filters the whole library by name. Hint text reads "Search brushes".
Clear search
The X button beside the field, enabled only while a search is typed.
How the body adapts
The grid rearranges itself to fit the panel:
While searching, every folder collapses into one flat result grid across the whole library, headed by a count like "5 results". This jumps you straight to a brush by name.
With a single folder (for example a fresh install with only the built-ins), the rail is hidden and the grid fills the panel.
With several folders and a wide enough panel (104 px folder rail plus a usable grid, so at least 224 px total), you get the folder rail beside the grid.
With several folders but a narrow panel (under 224 px), the rail collapses into a folder dropdown above a full-width grid.
The grid itself is responsive: it fits as many columns as the width allows (around a 124 px target cell), and collapses to a single column when very narrow.
Working with folders
Folders are derived from each brush's category. The built-in "Basic" group leads, imported .abr sets follow in import order, and your own empty folders appear after that. Folder organisation is remembered by name across sessions.
Select a folder: click its row in the rail (or pick it from the dropdown). Each row shows the folder name and its brush count.
Move a brush: drag a brush's grip handle (the dotted handle at the bottom of its cell) onto a folder row in the rail. The grip is the only drag source, so a tap on the thumbnail or name reliably selects the brush instead of picking it up.
Rename a folder (your own folders only): click the pencil button, type, then press Enter or click away. Press Escape to cancel.
Delete a folder (your own folders only): click the trash button. Its brushes return to the Basic folder rather than being deleted.
A brush cell
Each cell is a wide stroke-preview thumbnail with the brush name below it. Click or tap either the thumbnail or the name to select that brush. Picking a brush while the Eraser, Smudge, or Blur path is active also switches back to the Brush tool.
Right-click a cell for its menu:
Menu item
What it does
Duplicate
Makes an editable copy of the brush.
Reset settings
Restores the brush to its initial settings.
Export as .abr...
Saves this single brush as a Photoshop .abr file.
Delete
Removes the brush. Only available for brushes you imported or created, never the built-ins.
Deleting a user brush asks for confirmation first ("Delete this brush?"). Built-in presets are protected: they show no trash button and cannot be deleted or renamed in place. To customise one, duplicate it first.
The built-in library
Limner ships 53 brushes across six folders. The built-ins are regenerated at every launch and are never written to disk, so editing one only changes a saved override (see On-disk format below). The full list:
Pencils
Pencil (HB), Pencil (2B), Pencil (Hard 2H), Mechanical Pencil, Charcoal, Sketch (light), Soft Pencil (6B). Graphite and charcoal marks that bite the paper, most with a procedural paper tooth.
Inking
G-Pen, Mapping Pen, Fineliner, Ink Brush, Dip Pen, Tapered Pen, Marker, Real G-Pen, Turnip Pen, Felt Pen, Sumi Ink Brush, Dry Ink, Light Ink. Pressure-driven line art with entry and exit tapers and post-correction for clean curves. Mapping Pen and Fineliner use aliased (crisp) edges for fine line and screentone work.
Painting
Round (soft), Round (hard), Bristle, Flat / Chisel, Oil / Impasto, Watercolor, Oil (Perceptual), Gouache, Acrylic Flat, Watercolor Wash. From clean round tips to bristle and chisel shapes. Several of the oils, gouache, and washes carry wet-mixing settings, so they smear and blend colour as you drag.
Airbrush
Airbrush (soft), Airbrush (hard), Spray, Splatter, Spray Can, Droplet, Toner Spray. Soft gradual build-up plus scatter-and-count sprays for particles and spatter.
Texture
Chalk, Pastel (soft), Crayon, Stipple, Grunge. Rough, broken marks on toothy surfaces, including a large grunge stamp.
Blend
Smudge, Soft Blend, Strong Smear, Wet Mix, Wet Blend, Bristle Smudge, Grainy Smudge, Chalk Smudge, Blur, Perceptual Wet Mix, Palette Knife. These deposit no colour of their own; they smear or blur what is already on the canvas. Blur is the one blur brush; the rest are smudges with varying amounts of paint pickup and color stretch.
Creating and editing brushes
The Create Brush wizard
Open it with New brush in the picker, or the Create Brush tab. The header reads "Create a brush", with a Guided / Advanced switch on the right. While you build, the draft IS the active painting brush, so the canvas doubles as a test pad (Ctrl+Z erases your test doodles), and a live stroke ribbon shows the brush updating with every change.
Guided mode walks five steps:
Type: pick one of eight starting archetypes. Each is a card with a real stroke preview: Plain round, Inking pen, Pencil, Paint brush, Airbrush, Spray / spatter, Chalk & charcoal, and Blender. Re-picking a type restarts the draft fresh.
Tip: choose the round tip or import an image, then set hardness (round) or invert and flip (image), and roundness.
Pen: set size, whether pressure changes the size (with a Soft / Steady / Firm response and a draggable curve), whether pressure changes the ink amount, and the stroke ends (Blunt, Tapered, or Long taper).
Character: stroke body (Smooth / Normal / Grainy / Dotted spacing), paper grain, scatter, and colour life (per-stamp colour jitter).
Name: name the brush (default "My Brush") and choose a folder. New brushes default into the "Created Brushes" folder, which appears once the first brush lands there.
Each step shows footer buttons for Cancel, Back, Next, and finally Create brush.
Advanced mode skips the wizard. Pick a starting point (any archetype, or "Current brush" to copy the selected library brush), then edit the full nine-page settings editor on the draft, name it, and create it.
Screenshot
the Create Brush wizard on the Type step, showing the eight archetype cards.
Editing an existing brush
Select a brush, then open the Brush Settings panel. Its editor has nine pages in a left rail: Basic, Tip shape, Ink, Color, Stroke, Texture, Dual brush, Taper, and Correction. A live stroke ribbon at the top regenerates on every change using the real stamp engine, so what you see is exactly what you will paint. The Basic page gathers the most-used controls (size, hardness, opacity and flow, blending mode, brush type, stabilizer) in one place; the same controls also appear on their detailed pages.
The full meaning, range, and default of every control on those nine pages is documented in Brush Settings.
Importing and exporting Photoshop .abr
Limner reads and writes the .abr brush format, so brushes travel between Limner, Photoshop, Clip Studio Paint, Krita, and GIMP.
Import
Click Import .abr... in the picker. Limner reads ABR versions 1, 2, 6, 7, and 10, and extracts the sampled (bitmap-backed) brushes; computed or purely parametric brushes are skipped. Where the file carries them, spacing, diameter, hardness, scatter, texture, dual tip, and colour dynamics are mapped onto the new brush. Imported brushes land in a folder named after the file, with category "Imported" if the file gives no name.
Export
Two routes:
One brush: right-click its cell and choose Export as .abr....
A whole folder: right-click the folder row in the rail and choose Export folder as .abr....
Exports are written as ABR version 2, the flat sampled format every major app imports. That format has no slots for dynamics, texture, or colour, so what travels is the tip bitmap, the name, and the spacing; the receiving app supplies its own dynamics, exactly as it would for any classic .abr.
On-disk format (brushes.dat)
Your imported and created brushes, plus any edits you make to the built-in presets, are saved to brushes.dat in Limner's config folder (%APPDATA%/Limner, alongside settings.toml). The current on-disk version is 17.
A few details worth knowing:
The built-in presets themselves are not stored. They are regenerated at launch, and only your edits to them ("overrides", keyed by name) are saved over the factory list.
Folder organisation is not stored in brushes.dat. It lives in the app settings and is re-applied by brush name.
The format is versioned and migrates older files forward. A file from an older version still loads; a file from a newer version than this build understands is ignored rather than risked.
The Brush Settings panel is Limner's deep per-brush editor. It is where every detail of the active brush lives: size and hardness, opacity and flow, the pressure and tilt response, taper, the stabilizer, multi-tip sets, grain and texture, scatter, the per-brush blend (Ink) mode, and wet color mixing. Edit anything here and the change applies to the active brush immediately.
For choosing, organizing, importing, and creating brushes, see Brushes. For painting with the result, see the Brush tool.
Screenshot
the Brush Settings panel with the category rail on the left and the Basic page selected, showing the live stroke ribbon at the top.
Opening the panel
Brush Settings is one of the three brush dock tabs, labeled Brush Settings. By default it docks on the left side of the window. The same editor is also embedded in the Advanced mode of the Create Brush wizard (see Brushes).
The whole panel is mouse and pen driven. There are no dedicated keyboard shortcuts in this panel itself, though the global brush-size keys still apply: ] grows the brush and [ shrinks it (rebindable in Edit ▸ Preferences ▸ Keyboard Shortcuts).
Anatomy
The panel has three parts, top to bottom:
Header. An icon plus the brush name. For your own brushes, double-click
the name to rename it in place. Built-in presets cannot be renamed (the name shows the hint "Built-in preset; duplicate it to rename"). The header also carries verbs, right-aligned:
presets return to their shipped values; your own brushes return to their last-saved state.
Delete (trash): shown only for your own brushes, not built-ins.
New (wand, accent color): opens the Create Brush wizard.
When the Eraser, Smudge, or Blur tool is active, the header instead shows "Eraser", "Smudge", or "Blur" with no library verbs, because those tools carry their own parameter set. While the Create Brush wizard has a draft going, it shows "New brush (draft)".
Live stroke ribbon. A preview rendered by the real stamp engine, with
every setting applied. It regenerates on any change, so edits read instantly. Hover text: "Live preview: the actual engine, every setting applied".
Category rail plus the selected page. A narrow rail of nine categories on
the left; the chosen category's controls on the right.
The nine category pages
The rail lists these categories in stroke-pipeline order, with the most-used controls gathered first:
The Basic page is an additive view: each control on it is the same widget that appears on its detailed page, emitting the same action, so editing on either surface stays in sync. There is no duplicated state.
All defaults below come from Brush::default() in src/brush.rs. Built-in presets override these per preset.
Basic
The everyday controls in one place: Size, Hardness, Opacity, Flow, Blending mode, Brush type, and the Stabilizer.
Control
Range
Default
What it does
Size
1.0 to 2000.0 px (logarithmic)
24.0
Tip diameter at full pressure, in canvas pixels.
Hardness
0.0 to 1.0
0.85
Edge softness of the round tip (0 = soft, 1 = crisp). Hidden when an image tip is loaded, since its softness is baked into the bitmap.
Opacity
0.0 to 1.0
1.0
Stroke opacity ceiling. Crossing your own stroke never exceeds it.
Flow
0.0 to 1.0
1.0
Per-dab paint deposit. Builds up within a stroke.
Blending mode
the 18 layer blend modes
Normal
How the finished stroke combines with what is already on the layer (see Ink, below). Greyed out for Smudge and Blur.
Brush type
Paint / Smudge / Blur
Paint
Paint deposits color; Smudge drags the colors already on the canvas; Blur paints a softened copy of what is underneath.
Stabilizer
0.0 to 0.95
0.35
Smooths hand shake along the path. Backs off automatically on fast strokes.
Opacity and Flow are independent. Flow sets the per-dab deposit, so overlapping passes build up within a single stroke; Opacity is the ceiling that buildup cannot exceed. Lower Flow paints more gradually; lower Opacity caps the whole stroke at a fixed solidity.
Hardness applies only to the round tip. When an image tip is loaded its softness comes from the bitmap, so the Basic page hides the Hardness slider (and the Tip shape page replaces it with the image-tip toggles). On the Brush tool options bar the same control is greyed out rather than hidden for a sampled-tip brush, with a hover that explains why.
The Size and Flow sliders each have a small pulse-glyph dynamics button beside them, opening the dynamics popover (see Dynamics popover). The button lights up in the accent color when any pen-driven source is active.
Tip shape
Controls the shape and orientation of the tip.
Shape source
Two choices, "Round" and "Image...":
Control
Range
Default
What it does
Shape
Round / Image
Round
Round uses the procedural round (or elliptical) tip. Image makes any PNG or JPEG the tip: transparency is the shape if present, else dark marks paint.
When an image tip is loaded, the panel reports its pixel size and shows five toggles instead of the Hardness slider:
Control
Default
What it does
Invert
off
Paint the holes (for white-on-black source images). Baked into the bitmap.
Flip H
off
Mirror the tip horizontally. Baked into the bitmap.
Flip V
off
Mirror the tip vertically. Baked into the bitmap.
Random H
off
Mirror each stamp horizontally at random.
Random V
off
Mirror each stamp vertically at random.
When the tip is Round, a Hardness slider appears here instead (same range and default as on the Basic page: 0.0 to 1.0, default 0.85).
Multi-tip set (Repeat method)
Control
Range
Default
What it does
Add tips to set
(button)
none
Add one or more tip images. Each dab then picks one at random (a multi-tip brush). You can select several files at once.
Clear set (N)
(button)
shown when extras exist
Remove all extra tips.
Repeat
Random / Cycle
Random
How the tip set is chosen per dab. Random gives a varied scatter; Cycle steps strictly in order (tip, then each extra, repeating) for a regular pattern. Shown only once there are extra tips.
Shape and orientation
Control
Range
Default
What it does
Roundness
0.05 to 1.0
1.0
1 = round; lower flattens the tip into an ellipse (calligraphic). Has a dynamics button.
Direction
Stroke / Pen tilt / Fixed
Stroke
What the tip faces. Stroke rotates the tip to follow the stroke; Pen tilt orients it by pen lean (falling back to stroke direction without tilt data); Fixed holds one orientation set by the Angle slider.
Angle
-180 to 180 degrees
0
A fixed rotation added on top of the direction (a held nib bevel).
Angle jitter
0.0 to 1.0
0.0
Random per-dab rotation (1 = plus or minus 180 degrees). Breaks texture repetition.
Edge softness of the tip rim, as a pixel band. None gives crisp aliased pixels (screentone or pixel work); Strong gives a 1.5 px feather.
Size on screen
on / off
off
Keep a constant on-screen brush size as the canvas zooms (size is read as screen pixels, not canvas pixels).
Note: the stored anti-aliasing value is a pixel band, but the control shows the four CSP-style named levels. If the stored value does not match one exactly, the control falls back to displaying "Weak".
Ink
The per-brush blend mode plus paint deposit and wet mixing. This page repeats Opacity, Flow, Blending mode, and Brush type from Basic, then adds the type-specific mixing controls.
Blending mode
The per-brush "Ink" blend mode controls how the finished stroke composites onto the active layer's existing pixels. It uses the same blend math as a per-layer blend mode but is independent of it, and it applies only to Paint brushes.
Control
Range
Default
What it does
Blending mode
the 18 layer blend modes (Normal through Luminosity)
Normal
Normal paints over; Multiply darkens, Screen lightens, and so on. Greyed out for Smudge and Blur.
Color mixing (Smudge brushes)
These wet-mixing controls appear only when the brush type is Smudge. With every value at its default the brush behaves as a classic smudge (no drawing color mixed in).
Control
Range
Default
What it does
Amount of paint
0% to 100%
0%
How much of your drawing color each dab deposits, blended into the picked-up ground. 0% = classic smudge.
Density of paint
0% to 100%
0%
Opacity of the wet deposit. 0% = the classic deposit strength.
Color stretch
0% to 100%
0%
How far the carried color stretches before it converges to the live ground. 0% = classic per-dab pickup.
Mixing
Standard / Perceptual
Standard
Color space for the mix. Standard is a linear sRGB blend; Perceptual is a pigment-like Lab blend that also unlocks Brightness.
Brightness
-100% to +100%
0%
Brightness correction on the mix. Shown only in Perceptual mode.
Blur (Blur brushes)
When the brush type is Blur, a single Intensity slider appears in place of the color-mixing controls.
Control
Range
Default
What it does
Intensity
0 to 24 px
Auto (0)
Blur radius in pixels. Below 0.5 px it reads "Auto", which uses an automatic radius of about one sixth of the brush size.
Color mixing and Blur Intensity never appear for a plain Paint brush, which has no ground to mix with.
Color
Per-dab and per-stroke color jitter. Each group has Hue, Saturation, and Brightness sliders, shown as percentages.
Per-stamp jitter
Every stamp of the tip shifts the color, so foliage, spatter, and particle brushes feel alive. Hue at 100% means anywhere on the wheel.
Control
Range
Default
What it does
Hue
0% to 100%
0%
Per-stamp hue shift (100% = plus or minus 180 degrees).
Saturation
0% to 100%
0%
Per-stamp saturation shift.
Brightness
0% to 100%
0%
Per-stamp brightness shift.
Per-stroke jitter
Each new stroke starts at a shifted color, then stays consistent for the rest of that stroke.
Control
Range
Default
What it does
Hue
0% to 100%
0%
Per-stroke hue shift.
Saturation
0% to 100%
0%
Per-stroke saturation shift.
Brightness
0% to 100%
0%
Per-stroke brightness shift.
Stroke
Spacing, overlap behavior, and spray/scatter.
Control
Range
Default
What it does
Ribbon
on / off
off
Lay the tip image stretched and tiled along the stroke (length = the tip repeated, width = across) instead of stamping it, for ribbons, chains, and tape. Spacing and scatter do not apply when on. Shown only when there is an image tip or extra tips.
Spacing
1% to 100% (logarithmic)
8%
Gap between stamps as a fraction of tip size. Low reads as a solid ribbon; high reads as dotted.
Darken overlap
on / off
off
Where stamps overlap, keep the strongest dab (flat, no buildup) instead of letting overlap darken.
Spray
Control
Range
Default
What it does
Scatter
0.0 to 1.0
0.0
Random dab offset as a fraction of tip size.
Count
1 to 16
1
Dabs per spacing step; fills a scattered stroke. Enabled only when Scatter is above 0.
Particle size
0.05 to 1.0
1.0
Size of each scattered speck, as a fraction of the brush size. Enabled only when Scatter is above 0.
Deviation
0.0 to 1.0
0.0
Clusters specks toward the stroke centre (0 = even spread). Enabled only when Scatter is above 0.
Texture
A procedural paper grain plus an optional imported texture pattern.
Control
Range
Default
What it does
Paper grain
0.0 to 1.0
0.0
Procedural canvas tooth multiplied into every dab: grit that survives overlap (pencil and chalk feel), no image needed.
Import image...
(button)
none
Pick a PNG or JPEG as the paper texture. It tiles across the canvas and composes into every stroke.
Clear (trash)
(button)
shown when loaded
Remove the texture pattern.
When a texture pattern is loaded, these controls appear:
Control
Range
Default
What it does
Scale
25% to 800% (logarithmic)
per loaded pattern
Canvas pixels per pattern texel: how large the paper grain reads.
Depth
0% to 100%
per loaded pattern
How strongly the pattern's dark points block paint.
Brightness
-1.0 to 1.0
per loaded pattern
Brightens or darkens the pattern.
Contrast
-1.0 to 1.0
per loaded pattern
Raises or lowers the pattern contrast about mid-grey.
Invert pattern
on / off
per loaded pattern
Swap which parts of the pattern receive paint.
Mode
Multiply / Subtract / Height
Multiply
Multiply: texture always shows through. Subtract: light strokes break up completely (dry chalk). Height: paint fills the texture as you build up, eventually burying it.
Rotation
0 to 360 degrees
0
Rotate the texture pattern (it stays registered to the canvas).
An imported .abr set's texture lands in this slot.
Dual brush
A second tip that masks every stamp of the main tip: texture inside the shape, like Photoshop's Dual Brush. It reuses the same grain controls as Texture, but the wording targets the second tip and the texture-only controls (Scale, Mode, Rotation) are omitted.
Control
Range
Default
What it does
Import image...
(button)
none
Pick a PNG or JPEG as the second tip. It masks every stamp of the main tip in the stamp's own frame.
Clear (trash)
(button)
shown when loaded
Remove the second tip.
Depth
0% to 100%
per loaded pattern
How strongly the second tip's dark points block paint.
Brightness
-1.0 to 1.0
per loaded pattern
Brightens or darkens the second tip.
Contrast
-1.0 to 1.0
per loaded pattern
Raises or lowers the second tip's contrast.
Invert pattern
on / off
per loaded pattern
Swap which parts of the second tip receive paint.
An imported .abr set's dual tip lands in this slot.
Taper
The entry and exit taper lengths (CSP "Starting and ending").
Control
Range
Default
What it does
Start
0 to 100 px
0
The stroke begins at a point and ramps to full size over this length.
End
0 to 100 px
0
A fast pen lift extends the stroke up to this length while it thins to a needle. Flicks end pointy; deliberate stops stay blunt.
Correction
The stabilizer plus its speed coupling and the pen-up post-correction.
Control
Range
Default
What it does
Stabilizer
0.0 to 0.95
0.35
Smooths hand shake along the path; the line always catches up to the pen at lift. (Same control as on the Basic page.)
Adjust by speed
Off / Reduce when fast / Increase when slow
Reduce when fast
How the stabilizer's strength tracks stroke speed. Reduce when fast keeps quick lines responsive; Increase when slow holds very slow lines extra steady; Off is constant.
Post correct
0.0 to 1.0
0.0
At pen-up the stroke's path is simplified and re-fitted, then redrawn along the cleaned curve, so the line snaps clean on release. 0 = off.
Curve
Spline / Bezier
Spline
Spline re-fits through the cleaned points; Bezier rounds them into a smoother, more designed curve.
Adjust by speed (post correct)
on / off
off
Scale the post-correction strength with stroke speed (faster = more).
Dynamics popover
Each dynamizable slider (Size, Flow, and Roundness) carries a small pulse-glyph button. It lights up in the accent color when any pen-driven source is active, and its hover text summarizes which sources are driving the value. Clicking it opens the dynamics popover, the per-parameter mapping of pen input to the value's strength.
Control
Range
Default
What it does
By pen pressure
on / off
per parameter
Drive the value with pen pressure, through the response curve.
A quick gamma slider, shown while the curve is still a simple gamma. 1 = linear; higher keeps light pressure low (G-pen feel); lower responds early.
Reset curve to linear
(button)
shown when the curve is point-edited
Drop the drawn points and return to a straight response.
Minimum
0% to 100%
per parameter
The value at zero pressure (0% lets it vanish). This slider owns the output floor.
Speed
0.0 to 1.0
0.0
How much stroke speed thins or lightens the value. The hover wording is per parameter (for example, fast strokes thin the size or deposit less ink).
Tilt
0.0 to 1.0
0.0
How much pen lean changes the value (for example, a flat pen paints broader).
Random
0.0 to 1.0
0.0
Per-stamp jitter on the value.
Defaults per parameter, from Brush::default():
Size dynamics: pressure on, linear curve, Minimum 10%.
Flow dynamics: pressure on, linear curve, Minimum 0%.
Roundness dynamics: all sources off.
Response curve editor
The popover's curve editor maps pressure (0 to 1) to a factor (0 to 1). The two endpoints are pinned at (0, 0) and (1, 1); the Minimum slider, not the curve, owns the output floor.
Drag an interior point to move it.
Click empty space to add a point (up to 8 points total).
Double-click a point to remove it. Dropping back to two points returns the
curve to a straight linear response.
A gamma curve converts to draggable points on its first edit, seeded from its own shape so nothing jumps.
See also
Brushes: choosing, organizing, importing, and creating brushes.
Limner's filters are non-destructive-feeling tonal and colour adjustments you preview live and then commit in one step. Every filter lives under the Filter menu and works the same way: open the dialog, watch the preview update on your canvas as you drag, then press Apply to keep the result or Cancel to throw it away.
This page covers all ten adjustments in menu order: Hue / Saturation / Lightness, Levels, Curves, Color Balance, Gradient Map, Gaussian Blur, Brightness / Contrast, Invert, Posterize, and Binarize.
See also: Menus for where these sit in the menu bar, and Layers for active layers, selections, and masks.
How filters work (read this first)
All ten filters share one dialog and one workflow, so once you know one you know them all.
The live-preview dialog
One movable, non-dimming window. The dialog is a floating window titled for the filter you opened, not a dimming modal. The artwork behind it stays at true brightness, and you can drag the window off your art to judge the preview clearly. It first appears top-centre, clear of the canvas, and remembers wherever you drag it.
Live preview on any change. The moment you move a slider or handle, the active layer updates so you see the result in place. Filters whose default already changes the image (Invert, Posterize, Binarize, Gradient Map) preview the instant you open them, before you touch anything.
Apply / Cancel. The bottom row has Apply (bold) and Cancel. Apply commits the result as a single undo step (one press of undo removes the whole adjustment). Cancel reverts the layer to exactly how it looked before you opened the dialog.
Closing also cancels. The title-bar close button and the Esc key both cancel, exactly like the Cancel button.
Painting is paused. While a filter dialog is open, drawing on the canvas is blocked so a stray stroke cannot corrupt the preview. Switching documents closes the dialog.
Screenshot
the Levels dialog floating top-centre over a photo, showing the live preview on the canvas behind it.
What a filter acts on
The active layer, clipped to the selection. Adjustments edit the active layer's own pixels, not the merged composite. If a selection is active, only pixels inside it change. Feathered or anti-aliased selection edges blend the adjustment by coverage, so the transition is smooth instead of a hard stair-step.
Layer masks. If you are editing a layer's mask (rather than its pixels), the filter acts on the mask's coverage instead of the colour. This lets you use Levels to tighten a mask edge or Gaussian Blur to feather one.
Vector layers must be rasterized first. Filters write pixels, and a vector layer's pixels are generated from its paths. Running a filter on a vector layer (when you are not editing its mask) shows a notice and refuses. Rasterize the layer first, then filter it. See Layers.
Locked layers are skipped. Preview and commit do nothing on a locked layer.
The histogram behind Levels and Curves
Both Levels and Curves draw a 256-bin histogram of the active layer's tones behind their main widget, so you can place handles and points against the real distribution of lights and darks. The histogram is the layer's luma (transparent pixels are skipped). While it is being computed, the widget shows a brief "computing histogram" placeholder.
Menu notes
Every filter and adjustment is greyed out until a document is open. Since 0.8.3 the colour and tone adjustments live under Image ▸ Adjustments while Gaussian Blur, Sharpen, and Repeat Last Filter stay in the Filter menu; both menus carry the reminder "Acts on the active layer (or the selection)."
Filters have no default keyboard shortcuts. As with all commands, you can assign your own in Edit ▸ Preferences ▸ Keyboard Shortcuts.
Items with options end in an ellipsis. Invert has no options, so it carries none.
Shifts the hue, intensity, and brightness of the layer's colours all at once. It rotates the hue wheel, scales saturation, and blends each pixel toward black or white. Useful for recolouring, warming or cooling an image, or knocking colours back. With all three sliders at 0 it does nothing.
Control
Range
Default
What it does
Hue °
-180.0 to 180.0
0.0
Rotates every colour around the hue wheel by this many degrees.
Saturation
-1.0 to 1.0
0.0
-1 fully desaturates to grey, +1 doubles saturation.
Lightness
-1.0 to 1.0
0.0
Blends toward black (negative) or toward white (positive).
Note: Lightness is asymmetric. Positive values lift colours toward white, negative values pull them toward black. Alpha is preserved.
Levels
Image ▸ Adjustments ▸ Levels
Remaps the tonal range: pick the input black and white points to set contrast, slide the midpoint to brighten or darken the midtones (gamma), and pick output black and white points to limit the final range. The main control is the histogram with five draggable handles, just like Photoshop.
The same five values are also available as precise sliders in the collapsible Numeric values section. A Log scale checkbox switches the histogram to log heights (so a single stray pixel stays on the floor instead of lifting into noise), and Reset restores the defaults.
Handles on the histogram
Control
Range
Default
What it does
Input black handle (black triangle)
0 to 1, must stay below input white
0.0
Tones at or below this become pure black.
Input white handle (white triangle)
0 to 1, must stay above input black
1.0
Tones at or above this become pure white.
Gamma midpoint handle (grey triangle)
gamma 0.1 to 9.99
1.0
Brightens or darkens the midtones without moving the endpoints.
Restores all five Levels values to their defaults.
Tips:
Double-click a handle to reset just that endpoint.
The grab radius is about 9 px, so you do not have to land exactly on the triangle.
The current transfer curve is drawn over the histogram, with an output black-to-white gradient bar below the input handles.
The dialog keeps input white above input black automatically, so the range can never collapse.
Screenshot
the Levels dialog with the histogram, five handles, the transfer curve overlay, and the expanded Numeric values section.
Curves
Image ▸ Adjustments ▸ Curves
The most flexible tonal tool. Drag a curve to map input tones to output tones with full control. Edit the composite RGB curve to adjust overall brightness and contrast, or switch to Red, Green, or Blue to shift colour balance per channel. Per-channel and master edits stack the way Photoshop's do.
The curve uses overshoot-free monotone-cubic interpolation, so adding a steep point will not introduce wiggles in the shadows or highlights.
Control
Range
Default
What it does
Channel
RGB / Red / Green / Blue
RGB
Selects which curve you are editing.
Reset channel
button
n/a
Resets the active channel's curve to the diagonal.
Reset all
button
n/a
Resets all four curves to the diagonal.
Control points
x and y from 0 to 1
endpoints (0,0) and (1,1)
Drag to reshape the curve.
Editing the curve
Add a point: click empty space on the graph (up to 16 points per channel; a click too close to an existing point is ignored).
Move a point: drag it. The two endpoints keep their fixed x (0 or 1) and only move vertically; interior points stay between their neighbours.
Remove a point: drag it off the top or bottom edge, right-click it, or double-click it. The two endpoints cannot be removed, and a curve always keeps at least two points.
The active channel's curve is drawn bright; any non-identity inactive channels are drawn faint behind it. Channel colours follow their names (RGB is grey, plus red, green, and blue).
Screenshot
the Curves editor showing an S-curve on the RGB channel over the faint luma histogram backdrop.
Color Balance
Image ▸ Adjustments ▸ Color Balance
Push colours toward warm or cool poles separately in the shadows, midtones, and highlights. Each tonal range has three bipolar sliders along the cyan to red, magenta to green, and yellow to blue axes. Positive values push toward the warm pole (red, green, or blue). The smooth tonal weighting crossfades the three ranges without banding.
Control
Range
Default
What it does
Shadows: Cyan to Red
-1.0 to 1.0
0.0
Shifts the dark tones along the cyan/red axis.
Shadows: Magenta to Green
-1.0 to 1.0
0.0
Shifts the dark tones along the magenta/green axis.
Shadows: Yellow to Blue
-1.0 to 1.0
0.0
Shifts the dark tones along the yellow/blue axis.
Midtones: Cyan to Red
-1.0 to 1.0
0.0
Shifts the midtones along the cyan/red axis.
Midtones: Magenta to Green
-1.0 to 1.0
0.0
Shifts the midtones along the magenta/green axis.
Midtones: Yellow to Blue
-1.0 to 1.0
0.0
Shifts the midtones along the yellow/blue axis.
Highlights: Cyan to Red
-1.0 to 1.0
0.0
Shifts the bright tones along the cyan/red axis.
Highlights: Magenta to Green
-1.0 to 1.0
0.0
Shifts the bright tones along the magenta/green axis.
Highlights: Yellow to Blue
-1.0 to 1.0
0.0
Shifts the bright tones along the yellow/blue axis.
Preserve lightness
on / off
on
Re-tones each pixel back to its original lightness, so the balance changes hue without brightening or darkening.
Reset
button
n/a
Restores all nine axes and the Preserve lightness default.
The on-screen axis labels read "Cyan ↔ Red", "Magenta ↔ Green", and "Yellow ↔ Blue", grouped under "Shadows", "Midtones", and "Highlights".
Screenshot
the Color Balance dialog showing the three labelled tonal-range groups and the Preserve lightness checkbox.
Gradient Map
Image ▸ Adjustments ▸ Gradient Map
Recolours the image by its tonal value: each pixel's perceptual luminance is mapped to a colour along an editable gradient, so shadows take the left-end colour and highlights take the right. The default black-to-white gradient desaturates to luminance, which is why a Gradient Map always changes the image and never reports itself as a no-op.
Control
Range
Default
What it does
Preset
B/W, Sepia, Duotone, Heat, Cyanotype
(bar stays editable)
Loads a starting gradient. Your current Reverse state is kept.
Gradient stops
position 0 to 1, up to 8 stops
black at 0, white at 1
Drag handles under the bar to move stops.
Stop colour
sRGB colour
selected stop's colour
Sets the colour of the selected stop.
Remove stop
button (enabled with more than 2 stops)
n/a
Removes the selected stop.
Reverse
on / off
off
Mirrors the mapping so highlights take the left colour.
Presets:
Preset
Gradient
B/W
black to white
Sepia
dark brown through tan to cream
Duotone
deep indigo through magenta to warm yellow
Heat
black through dark red and orange to pale yellow
Cyanotype
deep blue to pale cyan
Tips:
Click the bar to add a stop. It samples the existing gradient, so it is invisible until you drag it or recolour it.
Drag a stop handle to move it; stops stay between their neighbours.
The help line reads "Click the bar to add a stop · drag a stop to move it."
The bar always shows the raw stop layout; Reverse only flips how tones are mapped onto it, so a handle always sits under the colour it controls.
Screenshot
the Gradient Map dialog with a Duotone gradient, three stop handles, and the Reverse checkbox.
Gaussian Blur
Filter ▸ Gaussian Blur
Softens the layer with a true Gaussian blur. It blurs in premultiplied space so transparent areas do not bleed dark or coloured haloes into your artwork, and edges clamp (replicate the border pixel). The radius is the Gaussian sigma in pixels.
Control
Range
Default
What it does
Radius (px)
0.0 to 100.0
4.0
Blur amount (Gaussian sigma). Below 0.5 it does nothing.
Notes:
The live preview uses a fast downsampled proxy so a large radius on a big canvas stays interactive; the committed result always uses the exact full-resolution blur.
Blur is the one filter that moves alpha, so it can soften edges. With a feathered selection, its edge mixes alpha too.
Unlike the other filters, blur reads neighbouring rows, so even with a selection active it runs over the whole canvas and only writes inside the selection (giving a continuous blur right up to the selection edge).
Screenshot
the Gaussian Blur dialog showing the Radius slider with a softened preview behind it.
Brightness / Contrast
Image ▸ Adjustments ▸ Brightness / Contrast
A quick, familiar pair of sliders. Brightness adds an even tonal lift or drop; Contrast steepens or flattens the tones around mid-grey. At the extreme, contrast -1 collapses everything to a uniform grey.
Control
Range
Default
What it does
Brightness
-1.0 to 1.0
0.0
Shifts every tone up or down.
Contrast
-1.0 to 1.0
0.0
Steepens (positive) or flattens (negative) tones around mid-grey.
Reset
button
n/a
Restores both sliders to 0.
Invert
Image ▸ Adjustments ▸ Invert
Inverts every colour: each channel becomes 255 minus itself. Alpha is left unchanged. There are no options, so this item has no ellipsis. The dialog shows a short description plus Apply and Cancel, and previews immediately on open. Invert always changes the image, so it is never treated as a no-op.
Screenshot
the Invert dialog showing its description text and the inverted preview.
Posterize
Image ▸ Adjustments ▸ Posterize
Reduces each channel to a small number of evenly spaced tones for a banded, screen-printed look. The darkest tone stays pure black and the lightest stays pure white, so the full contrast range is kept.
Control
Range
Default
What it does
Tones
2 to 64
6
Number of output tones per channel.
Reset
button
n/a
Restores the default of 6 tones.
Binarize
Image ▸ Adjustments ▸ Binarize
Forces every pixel to pure black or pure white by a single brightness threshold. Pixels at or above the cutoff become white; below it, black. Useful for cleaning up line art or making a quick high-contrast mask. Binarize always changes the image, so it is never treated as a no-op.
Control
Range
Default
What it does
Threshold
0.0 to 1.0
0.5
Brightness cutoff: at or above becomes white, below becomes black.
Reset
button
n/a
Restores the default threshold of 0.5.
Screenshot
the Binarize dialog with the Threshold slider and a black-and-white preview.
Vector mode
Vector Mode and Tools
Vector mode is Limner's Illustrator-style workspace for drawing editable shapes. Instead of painting pixels, you build resolution-independent paths (cubic Bezier curves) with a fill and a stroke, then keep editing the points, the colors, and the line weight forever without losing quality. This page covers entering Vector mode and every tool in the Vector tool strip.
For editing existing paths in depth (anchors, handles, live corners, pathfinder booleans, transform, align), see Vector Editing. For how vector layers sit in the document, see Layers. For rulers, symmetry, and perspective aids that also work here, see Construction Aids.
Screenshot
the Vector workspace with the vector tool strip on the left, a path selected, and the Properties panel on the right.
Entering Vector mode
Vector mode is one of Limner's workspaces. The workspace switcher is the slim strip above the menu bar, labeled "Workspace", with one button per workspace.
Click the Vector segment in the Workspace switcher to enter Vector mode.
Or press Ctrl+Shift+M to switch workspaces.
The three workspaces are:
Workspace
What it is
Illustration
Raster painting: brushes, selections, filters.
Vector
Vector art: editable paths with fill and stroke.
Animation
Frame-by-frame cel animation on a timeline. See Animation Mode.
Workspace is set per document.
What changes when you switch
Switching to Vector mode reconfigures two things and leaves everything else alone:
The tool strip swaps to the fixed Vector tool set (described below). The Vector strip is not customizable, unlike the Illustration strip.
The panels swap to the Vector set: a Properties hub, Object Layers (the scene graph), Swatches, an object Gradient panel, plus the shared Layers and Color panels.
What does NOT change: switching workspaces never converts your layer stack. Your raster layers stay raster, your vector layers stay vector. Mode is just a different set of tools and panels over the same document.
The Vector tool strip
The Vector strip is fixed (not reorderable). Top to bottom:
Selection (the black arrow)
Direct Select (the white arrow)
Pen
Pencil
A shapes flyout: Rectangle, Ellipse, Line, Polygon, Star
Gradient
A path-edit flyout: Scissors, Join, Knife, Eraser (the Vector Eraser)
A combine flyout: Pathfinder and Shape Builder
A slot with more than one tool shows a small corner triangle. Click the slot to open a flyout, then pick a sub-tool from it.
Tool letter keys
In Vector mode a bare letter key picks a tool (Illustrator style). These letters are active only in Vector mode and are not part of the rebindable Keyboard Shortcuts list (those rows are for the Illustration raster tools).
Key
Tool
V
Selection
A
Direct Select
P
Pen
N
Pencil
M
Rectangle
L
Ellipse
\ (backslash)
Line
C
Scissors
G
Gradient
K
Knife
E
Eraser (Vector Eraser)
F
Pathfinder
B
Shape Builder
Polygon, Star, and Join have no letter key; pick them from the tool strip. Holding Ctrl or Alt suppresses the letter shortcuts so those modifier chords stay free.
Where the vector tools draw
The vector tools accept canvas input only on a vector (graphic) layer.
The creation tools (Pen, Pencil, and the live shapes) are forgiving: if the active layer is not a vector layer, committing your first object creates a new vector layer automatically, so the shape always has a home.
The editing tools (Selection, Direct Select, Scissors, Join, Gradient) act on path objects that already live on the active vector layer. If the active layer has no vector content, they have nothing to grab and do nothing.
The filled-shape tools (Knife, Pathfinder, Shape Builder, Eraser) reshape existing filled objects on the active vector layer. Knife and the Eraser act only on shapes that carry a visible fill; open, stroke-only paths are left to Scissors and Join.
A locked active layer blocks all of these.
Selection (the black arrow)
Letter key V. The Selection tool picks, moves, scales, and rotates whole path objects. It is the default tool in a new Vector document.
Click an object to select it. Shift-click to add more objects to the selection.
Drag empty canvas to marquee-select objects inside the box.
Drag inside the bounding box to move the selection.
Drag a corner handle to scale.
Drag the rotation handle (above the box) to rotate.
Double-click a group to enter it (group isolation), so you can work on its children. Press Esc or double-click empty canvas to step back out.
The Selection tool has no extra options bar; the header names the active tool. Your selection survives when you hand off to Direct Select and back. See Vector Editing for groups, clipping, align, and the Transform panel.
Direct Select (the white arrow)
Letter key A. Direct Select edits the inside of a path: individual anchors and their tangent handles.
Drag an anchor to move that point (both of its handles move with it).
Drag a handle tip to reshape the curve into and out of the anchor.
Drag the live-corner widget on a sharp corner to round it.
Marquee-drag to select several anchors at once.
Tangent handles only appear when they are long enough to grab on screen (about 6 screen pixels); zoom in to edit very short handles. Direct Select has no extra options bar. Full anchor and handle workflow is in Vector Editing.
Pen
Letter key P. The Pen draws and edits cubic Bezier paths.
Click to drop a corner anchor (a sharp point).
Click and drag to drop a smooth anchor with mirrored tangent handles, so the path curves through it.
Hold Alt while dragging to break handle symmetry (drag one side independently).
Close the path by clicking the first anchor. The closing click can itself be a drag to curve the final segment.
A rubber-band curve previews the next segment as you move the cursor.
Adding, deleting, and converting anchors are automatic Pen sub-behaviors, not separate tools.
The draft path commits to a finished object when you close it, press Enter, or switch tool or workspace. Press Esc to discard the draft.
An open path gets a stroke only (no fill).
A closed path gets the default fill plus the default stroke.
Smart Guides help the Pen too: with Smart Guides on, candidate points snap plumb or level to existing anchors. Holding Shift turns that into a lock with a wider pull so you stay on the straight line; with no alignment nearby, Shift falls back to constraining to 15 degree steps off the last anchor. Toggle Smart Guides in View ▸ Smart Guides (Ctrl+U in Vector mode).
The Pen has no extra options bar.
Pencil
Letter key N. The Pencil draws a freehand line that is fitted to a smooth, editable Bezier path on release.
Drag to draw. While you drag, the live preview shows your raw line. On release, Limner fits it to a clean open Bezier path you can then edit with Direct Select.
Control
Range
Default
What it does
Fidelity
0.0 to 10.0
2.5
Higher is smoother and uses fewer anchors; lower follows the stroke more closely.
Live shapes
The shape tools drag out parametric "live" shapes: the object remembers its parameters (sides, radius, corner rounding) so you can keep adjusting them after drawing. The exact parameters are also editable in the Properties panel's Shape section once the object is selected; see Vector Editing.
Rectangle
Letter key M. Drag out a rectangle. The corners can be rounded with the live-corner widget or the Shape section.
Ellipse
Letter key L. Drag out an ellipse.
Line
Letter key \ (backslash). Drag out a straight line. A line is drawn with a stroke and no fill.
Polygon
No letter key (pick from the strip). Drag out a regular polygon.
Control
Range
Default
What it does
Sides
3 to 20
5
Number of sides on the polygon.
Star
No letter key (pick from the strip). Drag out a star.
Control
Range
Default
What it does
Points
3 to 20
5
Number of points on the star.
Inner
0.1 to 0.9
0.42
Inner radius as a fraction of the outer radius (how deep the points are).
Gradient
Letter key G. The Gradient tool is an on-canvas annotator for an object's gradient fill (or stroke).
Drag across an object to place and aim the gradient axis. The start and end of the drag set the gradient's direction and extent on the picked object.
Edit the actual color stops, the gradient type (Linear or Radial), opacity, and position in the Gradient panel.
The Gradient tool places the gradient on the object you drag over; if the drag starts over an object, that object is selected and gets the gradient. There is no options bar, because placement happens directly on the canvas.
Scissors
Letter key C. Scissors cut a path at the point you click (within about 6 screen pixels of the outline).
Cutting an open path splits it into two independent objects, so each half can be selected and moved on its own.
Cutting a closed path opens it in place (it stays one object).
The cut path drops its live-shape parameters (it becomes a plain editable path). Both resulting pieces are left selected so you can edit them immediately with Direct Select. No options bar.
Join
No letter key (pick from the strip). Join connects open path endpoints into one continuous path.
With two objects selected, Join bridges their nearest open endpoints and merges them into one object.
Otherwise, Join acts on the open path under the cursor: it bridges two open ends of that path, or, if the path is a single open run, closes it by connecting its last anchor back to its first.
No options bar.
Knife
Letter key K. The Knife slices filled shapes along a cut line you draw across them.
Drag a freehand cut line across the canvas. On release, every filled shape the line fully crosses splits into separate closed objects along the cut.
Hold Shift while dragging for a straight cut at any angle (the line follows the cursor).
Hold Alt while dragging for a straight cut snapped to 15 degree steps, for clean horizontal, vertical, or diagonal cuts.
Only shapes with a visible fill are cut. Open, stroke-only paths are the Scissors tool's job, so the Knife leaves them alone. With objects selected, only the selected shapes are cut; with nothing selected, every unlocked filled shape the line divides is cut. A cut only happens where the line passes all the way through a shape; a partial slash leaves the shape whole. The new pieces are left selected so you can move or restyle them at once. The options bar shows the modifier reminder, with no other controls.
Pathfinder
Letter key F. Pathfinder is a tool for combining selected shapes with boolean and split operations. Its pointer behaves like the Selection tool (click and Shift-click to choose objects, marquee to box-select), and the operations sit on its options bar. The same operations also live in the Properties panel's Pathfinder section.
The options bar buttons (most need two or more objects selected):
Button
What it does
Unite
Merge into one shape.
Minus Front
Subtract the upper shapes from the back shape.
Intersect
Keep only the overlapping area.
Exclude
Keep the non-overlapping areas.
Minus Back
Subtract the lower shapes from the front shape.
Divide
Split into one object per overlapping region.
Outline
Split boundaries into stroked edges (no fill). Acts on one or more objects.
The bar also carries Compound (make a compound path so holes punch through, for letter-style cutouts) and Release (break a compound path back into separate objects). Compound paths use the even-odd fill rule. For the full Pathfinder and Compound Path workflow, see Vector Editing.
Shape Builder
Letter key B. Shape Builder merges or removes the atomic regions formed where two or more selected shapes overlap, in the style of Illustrator's Shape Builder.
Select two or more overlapping shapes first.
Hover a region to highlight the atomic area under the cursor.
Click or drag across regions to merge the touched ones into a single shape.
Alt-click or Alt-drag to delete the touched regions instead.
Anything you do not touch is left as it was. The merged or trimmed result is left selected. The options bar shows a short reminder, with no other controls.
Eraser (Vector Eraser)
Letter key E. The Vector Eraser subtracts a band from the filled shapes it crosses, leaving editable vector results (this is different from the raster vector-erase, which re-renders brush strokes).
Drag a round band across the canvas. A ring at the cursor previews the band width. On release, the swept band is subtracted from every filled shape it crossed, and each crossed shape is replaced in place by its remainder (or removed if fully erased).
Only shapes with a visible fill are erased; open, stroke-only paths are skipped.
With objects selected, only the selected shapes are erased; with nothing selected, every unlocked filled shape the band crosses is erased.
Control
Range
Default
What it does
Size
1 to 100 px
16
Width of the erase band.
Line-editing tools (CSP brush-vector layers)
Limner also has an older, separate "vector lines" family that re-renders brush strokes through the brush engine on CSP-style vector layers. These tools live in the Illustration workspace (under the Vector tool group in that strip), not in the Vector workspace, but they belong to the same idea of editable lines:
Object (the Operate tool, palette label "Object"): click a line to select it, Shift-click to add, drag empty space to box-select, drag the bounding box to move, scale, or rotate, and restyle the selected lines (size, opacity, recolor, redraw with the active brush) from its options bar. Its one persistent toggle is Scale width (default on), which scales a line's stroke thickness along with it when you resize.
Line Edit: edit those vector lines point by point with modes for move, add, delete, adjust width, adjust opacity, split, pinch, simplify, and connect.
These are distinct from the retained Bezier path model described above. The Object and Line Edit tools are documented with their full options in Vector Editing.
Related pages
Vector Editing: anchors and handles, fill and stroke appearance, object gradients, pathfinder booleans, path operations, grouping and clipping, align and distribute, the Transform panel, and the Object / Line Edit tools.
Layers: how vector layers sit alongside raster layers.
Construction Aids: rulers, symmetry, and perspective, which work in Vector mode too.
New in 0.8.0
Version 0.8.0 rebuilds the Vector tools around Adobe Illustrator’s muscle memory. If you know Illustrator, your hands already know these:
Modifier keys everywhere. Shift constrains a dragged shape to a square, circle, or 45° line; Alt draws from the center; Alt-dragging a selection makes a duplicate; arrow keys nudge the selection or the selected anchors 1 px (Shift for 10 px); Up and Down change a polygon’s sides or a star’s points mid-drag.
The Pen edits paths in place. Click a segment to add an anchor, click an anchor to delete it (the path stays connected and keeps its shape), Alt-click an anchor to convert it between corner and smooth, and click an open path’s endpoint to pick the path up and keep drawing. A selected path shows its anchors while the Pen is active.
Direct Select goes deeper. Drag a curve segment to reshape it (a straight edge slides rigidly); drag across empty canvas to rubber-band individual anchor points, even across several paths; Alt-click an object to select it inside its group, then Alt-click again to step up to the group itself.
Place shapes by numbers. Click any shape tool on the canvas without dragging to type exact dimensions (length and angle for the Line).
Illustrator shortcuts. Ctrl+J joins the selected paths, Ctrl+8 makes a compound path, Ctrl+Alt+8 releases it, and the bracket keys resize the Vector Eraser band.
Vector Editing and Output
This page covers everything you do after you draw a vector object: setting its fill and stroke, moving and resizing it precisely, combining shapes with booleans, grouping and clipping, aligning, and finally getting the artwork out of Limner as SVG. It applies to Vector mode (the Illustrator style editable path model). For drawing the objects in the first place (Pen, Pencil, live shapes, Direct Select, and the rest), see Vector Mode.
Most editing happens in the Properties panel (the Vector hub), with named swatches in the Swatches panel and gradient ramps in the Gradient panel. All three open from the Window menu and are docked by default in Vector mode.
Screenshot
the Vector workspace with the Properties hub open on the right, showing the Transform and Appearance sections.
Appearance: fill and stroke
Every vector object carries an appearance: a fill, a stroke, an object opacity, and a blend mode. You edit them in the Properties panel under the Appearance section (open by default).
When nothing is selected, the Appearance edits set the defaults that new shapes will inherit ("Edits below set the defaults for new shapes."). The default appearance is a solid white fill and a solid black stroke at width 1.0, with the Fill chosen as the active paint target.
Fill and stroke rows
Each of Fill and Stroke shows a visibility checkbox, the label, and a colour swatch. Click the swatch to pick a colour. If the row is currently a gradient, the swatch is replaced by a small "Gradient" hint (edit the ramp in the Gradient panel instead).
Control
Range
Default
What it does
Fill visibility
on / off
on
Show or hide the fill.
Fill colour
RGB picker
white [255, 255, 255]
Sets a solid fill colour.
Stroke visibility
on / off
on
Show or hide the stroke.
Stroke colour
RGB picker
black [0, 0, 0]
Sets a solid stroke colour.
An open path takes a stroke only (no fill); a closed path takes the default fill plus stroke.
Stroke shape
Below the colour rows, the stroke has a weight slider, line cap and join selectors, and a dash toggle.
Control
Range
Default
What it does
Stroke width
0 to 100
1.0
Stroke weight in canvas pixels.
Cap
Butt, Round, Square
Butt
How the ends of an open stroke are drawn.
Join
Miter, Round, Bevel
Miter
How stroke corners are drawn. (Miter uses a miter limit of 4.0.)
Dashed
on / off
off
Turns the stroke into a dash pattern.
The "Dashed" checkbox builds a simple dash plus gap pattern that scales with the stroke weight, so a dashed line reads correctly at any width. Turning it off makes the stroke solid again.
Stroke alignment is fixed to Center in this version (Inside and Outside are reserved in the model but not yet exposed).
Object opacity
When an object is selected, an Opacity slider appears at the bottom of the Appearance section.
Control
Range
Default
What it does
Opacity
0% to 100%
100%
Sets the whole object's opacity.
The Properties hub
The Properties panel is the single hub for editing a selected object. It is a stack of collapsing sections, top to bottom:
Transform (open by default): numeric position, size, rotate, and shear.
Appearance (open by default): fill, stroke, dash, and opacity (above).
Shape: live shape parameters, shown only when a parametric live shape (a
rectangle, ellipse, polygon, star, or line) is selected. See Vector Mode.
Arrange: Group / Ungroup and clipping masks.
Align: align and distribute.
Pathfinder: a Path block (Offset Path and Outline Stroke) above the
boolean Pathfinder buttons.
When an object is selected the panel header shows the object label as a heading. With nothing selected it reads "Nothing selected" and notes that the edits set the defaults for new shapes.
The Transform panel (numeric)
The Transform section gives you exact numeric control over the selection. With nothing selected it shows "Select an object."
Reference origin
A 3 by 3 grid of dots (labelled "Ref") picks the reference origin: the point that stays fixed while W/H, Rotate, and Shear are applied. The grid is numbered 0 to 8 row by row.
Control
Range
Default
What it does
Ref (9 point origin)
0 to 8
4 (center)
The anchor that stays put during resize, rotate, and shear.
Position and size
Control
Range
Default
What it does
X
unbounded
from bounding box
Horizontal position of the reference point.
Y
unbounded
from bounding box
Vertical position of the reference point.
W
0 to 1,000,000
from bounding box
Object width in pixels.
H
0 to 1,000,000
from bounding box
Object height in pixels.
Constrain (link)
on / off
off
Locks the W to H ratio so they scale together.
X, Y, W, and H are drag values: drag on the field or type a number. The link toggle next to W/H constrains their proportions.
Rotate and Shear (live preview)
Rotate and Shear are drag value fields that preview as you scrub about the reference point, then commit as a single undo step on release. Each resets to 0 after it applies, so the next value is applied fresh rather than cumulatively.
Control
Range
Default
What it does
Rotate
-360 to 360 degrees
0 (resets after apply)
Rotates the selection about the reference point.
Shear
-85 to 85 degrees
0 (resets after apply)
Slants the selection about the reference point.
Tip
"Rotate / Shear preview as you scrub; release to apply (about the reference point)."
Pathfinder (boolean operations)
Pathfinder combines two or more selected objects into one shape. It is now a tool as well as a Properties section: select the Pathfinder tool (its slot in the tool strip is shared with Shape Builder, or press F in Vector mode) and its operations appear on the tool-options bar at the top of the canvas. The same operations also live in the Properties panel's Pathfinder section, so you can run them from either place.
Select at least two objects, then click an operation. The operands are taken in z-order (bottom to top), and the result replaces them where the topmost operand sat.
Operation
What it does
Unite
Merge into one shape.
Minus Front
Subtract the upper shapes from the back shape.
Intersect
Keep only the overlapping area.
Exclude
Keep the non-overlapping areas (XOR).
Minus Back
Subtract the lower shapes from the front shape.
Divide
Split into one object per overlapping region.
Outline
Split boundaries into stroked edges (no fill).
Divide breaks the overlapping shapes apart at every intersection: each distinct region becomes its own separate closed object, so you can recolour or move the pieces individually. Outline discards the fills and turns each boundary segment into its own stroked edge, leaving the artwork as line work. Both Divide and Outline produce several objects rather than a single combined shape.
For Unite, Minus Front, Intersect, Exclude, and Minus Back, the result keeps the front (topmost) object's appearance, except Minus Front, which keeps the back object's appearance. The flattened boolean result is refit to smooth, corner preserving curves, so curved unions and intersections stay clean and right angles stay sharp.
Unite, Minus Front, Intersect, Exclude, Minus Back, and Divide need two or more objects; Outline acts on one or more. If the Properties section reads "Select two or more objects to combine," you do not have enough selected.
Compound Path
A compound path merges several paths into a single object whose overlaps punch see-through holes, using the even-odd fill rule. This is how you make letter-style cut-outs, like the hole in an O or the counter of an A, where an inner shape needs to show the background through it.
Both buttons sit on the Pathfinder tool-options bar (and are labelled Make Compound / Release Compound in the Properties Pathfinder section):
Button
Enabled when
What it does
Compound (Make)
2 or more objects selected
Merges the selection into one path so overlaps punch holes (even-odd).
Release
1 or more objects selected
Splits a compound path back into its separate objects.
Make the outer shape and the hole shapes, select them all, then click Compound; the overlapping inner shapes become holes. Release reverses it, returning the pieces to ordinary separate objects.
Path operations
The Path section holds Offset Path and Outline Stroke. These work on one or more selected objects.
Offset Path
Adds a concentric copy of each selected object, grown or shrunk by a distance. The originals are kept and the new copies become the selection (one undo step).
Control
Range
Default
What it does
Offset distance
-2000 to 2000 px
10.0
Positive grows outward; negative offsets inward.
Set the distance in the field, then click Offset Path.
Outline Stroke
Click Outline Stroke to convert each selected object's stroke into a filled path. This is useful when you want to edit the stroke outline as geometry, or to keep the stroke weight independent of later scaling. The conversion preserves the stroke's cap, join, and miter limit.
Note
a separate "Create Outlines" (text to path) command does not exist in this version. Type objects are not part of the Vector model, so there is nothing to convert.
Grouping and clipping
The Arrange section handles grouping and clipping masks.
Control
Enabled when
Shortcut
What it does
Group
2 or more objects selected
Ctrl+G
Combine the selection into one group.
Ungroup
a group is selected
Ctrl+Shift+G
Break the selected group back into its objects.
Make Clip
2 or more objects selected
(no shortcut)
Use the top selected object to crop the rest.
Release Clip
a clip group is selected
(no shortcut)
Release the selected clipping mask.
The Ctrl+G and Ctrl+Shift+G shortcuts are rebindable in Edit ▸ Preferences ▸ Keyboard Shortcuts.
Clipping masks
Make Clip turns the selection into a clip group: the topmost selected object becomes the clip path, and only the artwork that falls inside it shows. The clip path itself is not drawn. The topmost selected object must be a single shape, not a group, to serve as the clip path; otherwise Limner reports an error.
Release Clip clears the clip on the selected clip group, so the cropped art draws normally again.
Group isolation
To edit inside a group without ungrouping it, double-click the group to enter it (isolation mode). While isolated, the Properties panel shows an "Inside group" banner with an Exit button. Leave the group by pressing Esc, clicking Exit, or double-clicking empty canvas.
Screenshot
the Properties hub showing the "Inside group" isolation banner with its Exit button.
Align and distribute
The Align section lines objects up or spaces them evenly. Select two or more objects (alignment is relative to the selection's bounding box), then click a button.
Align
Button
What it does
Left
Align left edges.
Center
Align horizontal centers.
Right
Align right edges.
Top
Align top edges.
Middle
Align vertical centers.
Bottom
Align bottom edges.
Distribute
Button
What it does
Horizontal
Even horizontal spacing of centers.
Vertical
Even vertical spacing of centers.
If the section reads "Select two or more objects to align," you do not have enough selected.
Smart Guides
Smart Guides give you alignment hints and snapping while you move or draw vector objects. Toggle them with View ▸ Smart Guides or Ctrl+U (rebindable in Edit ▸ Preferences ▸ Keyboard Shortcuts).
When on, Smart Guides:
Snap the Pen tool to align (level or plumb) with existing anchors.
Snap a moving object into alignment with its neighbours, drawing a transient
green alignment guide while it snaps.
Snap Direct Select anchor drags to alignment.
The on screen snap distance is about 8 pixels (scaled by zoom).
Swatches panel
The Swatches panel applies colours from the active saved palette to the selected object. The hint at the top tells you whether a click sets the fill or the stroke, following the current paint target (the Fill/Stroke swap; see Color).
Click a swatch to apply that colour to the active paint target.
Click the + button to add the current colour to the palette.
Right-click a swatch and choose Remove swatch to drop it.
If there is no palette yet, the panel offers a New palette button.
Object gradients (Gradient panel)
To paint an object with a gradient instead of a flat colour, use the Gradient panel together with the Gradient tool. The panel turns the active paint target (Fill or Stroke) into a gradient and lets you edit its ramp; you place and aim the gradient on the canvas with the Gradient tool. See Vector Mode for the Gradient tool itself.
Control
Range
Default
What it does
Apply gradient
button
n/a
Converts the current solid paint to a gradient.
Type
Linear / Radial
Linear
The gradient shape.
Presets
buttons
n/a
Built-in and saved ramps, plus Save.
Stop colour
colour picker
per stop
Colour of the selected stop.
Opacity
0% to 100%
per stop
Opacity of the selected stop.
Position
0% to 100%
per stop
Position of the selected stop along the ramp.
Reverse
on / off
off
Reverses the ramp order.
On the stop bar, drag a marker to move a stop and click empty ramp space to add one. Select a stop, then click the Delete button to remove it (the ramp keeps at least two stops, so Delete is disabled when only two remain).
Object Layers panel
The Object Layers panel is the scene graph for the active graphic layer: a stack of every object you have drawn, with groups that disclose their children. It is the vector-mode counterpart to the Layers panel and docks by default in the Vector workspace. When the layer is empty it reads "No objects yet. Draw a shape with a Vector tool."
Its action bar (top of the panel):
Button
Enabled when
What it does
New layer
always
Adds a new graphic layer.
Make / Release clipping mask
a clip group is selected, or 2 or more objects are selected
Makes a clipping mask from the selection, or releases the selected clip group.
Delete selection
1 or more objects selected
Deletes the selected objects.
Each object row, left to right:
A show / hide eye toggle.
A lock / unlock toggle.
A folder icon for group rows (a group indents its children below it).
The object name. Click it to select the object; double-click to rename.
On top-level rows only, Bring forward and Send backward carets that
move the object up or down the stack.
Screenshot
the Object Layers panel with a group disclosed, showing the eye, lock, name, and reorder carets on a row.
Vector layers: the Object and Line Edit tools
These two tools belong to Limner's older "vector lines" model: brush strokes captured as editable centerlines on a CSP-style vector layer (made with Layer ▸ New Vector Layer). They live in the Illustration workspace, under the Vector tool group, not in the Vector workspace, but they are vector editing, so their full options are collected here. They are separate from the Illustrator style path objects on the rest of this page. See Vector Mode for the short introduction.
Object (Operate) options
Select a vector line, then restyle it from the options bar. Size and Opacity changes are applied when you release the slider.
Control
Range
Default
What it does
Select All
(button)
n/a
Selects every line on the layer.
Size
0.5 to 512 (logarithmic)
From the selection
Re-sets the stroke thickness of the selected lines (applied on release).
Opacity
0.0 to 1.0
From the selection
Re-sets the opacity of the selected lines (applied on release).
Colour
(button)
n/a
Recolours the selected lines to the active paint colour.
Apply Brush
(button)
n/a
Redraws the selected lines with the active brush.
Delete
(button)
n/a
Deletes the selected lines.
Scale width
On / off
On
When scaling a line, scale its stroke thickness with it (CSP's "Adjust thickness when scaling").
Line Edit options
Line Edit reshapes vector lines point by point. Pick a mode from the options bar:
Mode
What it does
Move point
Drag a control point to reshape the line.
Add point
Click the line to add a control point.
Delete point
Click a control point to remove it.
Adjust width
Drag a point right to thicken, left to thin.
Adjust opacity
Drag a point right to strengthen, left to fade.
Split line
Click the line to cut it in two.
Pinch
Grab the line and pull it into shape.
Simplify
Click a line to remove excess points.
Connect
Drag one line end onto another to join them.
Alongside the modes, the options bar carries:
Control
Range
Default
What it does
Edit all lines
On / off
Off
Apply edits across every line on the layer, not just the one under the cursor.
Magnet
On / off
Off
Snap a new line's ends to a nearby endpoint.
Range (Pinch mode)
5 to 500 px (logarithmic)
60.0
How far around the grab point the pinch reaches.
Strength (Simplify mode)
0.2 to 20 px
1.5
How aggressively Simplify removes points (the tolerance).
Snap to control points (Move mode)
On / off
On
Snap a dragged point onto another control point.
The eraser also has vector-specific modes on a vector layer: see Eraser.
SVG export (File ▸ SVG (vector))
To get vector artwork out of Limner as resolution independent geometry, choose File ▸ SVG (vector) (under the Export group of the File menu). This writes a standalone SVG 1.1 document sized to your canvas. The suggested filename is artwork.svg.
What is exported:
Each object's path geometry (lines and cubic curves), with closed paths
marked closed.
Fill colour, fill opacity (when not fully opaque), and the even-odd fill rule
where used.
Stroke colour, opacity, width, cap, join, miter limit (only when it differs
from the default 4), and dash pattern with offset.
Object opacity.
Linear and radial gradients, written into the SVG's defs.
What is not exported (these do not exist in the Vector model yet): text objects, clipping, and live effects. Raster (Illustration) layers are skipped, since they are not vector. If the document has no vector layers with objects on them, Limner reports "Nothing to export."
Note
stroke weight is baked as a plain scalar that matches Limner's own renderer, so a scaled object keeps its visible stroke weight in the exported SVG.
For the full picture of Limner's other file formats (.limner, PSD, PNG, JPEG), see File Formats.
See also
Vector Mode: drawing objects with the Pen, Pencil, live
shapes, Direct Select, Scissors, and Join.
File Formats: saving and exporting in every format.
Color: the colour picker and the Fill/Stroke paint target.
Editing operations catch up to Illustrator in 0.8.0:
An eight-handle transform box. The selection box hugs the drawn shape exactly and adds edge-midpoint handles: corners scale both axes, sides scale one. Alt scales about the center, Shift keeps the scale uniform, and Shift snaps the rotate handle to 45° steps. Flip H and Flip V in the Properties panel mirror the selection in place.
Pathfinder Trim, Merge, and Crop. The full second row joins the booleans: Trim keeps each shape’s visible area, Merge also melts same-color shapes together, and Crop clips everything to the top shape. All on the Pathfinder options bar and panel.
Cutting tools handle lines. The Knife now slices open and stroke-only paths at every crossing, not just filled shapes.
Gradients edit on canvas. Grab either end of the gradient annotator to re-aim an existing gradient without redrawing it; Shift snaps the axis to 45°.
Cleaner geometry edits. Deleting an anchor re-fits the neighboring handles so the curve keeps its drawn shape; the Pencil closes into a filled shape when a long stroke ends near its start; the selection marquee picks up everything it touches, as in Illustrator.
Animation mode
Animation Mode
Animation mode is Limner's third workspace: a frame-by-frame (cel) animation studio built around a per-layer timeline. You draw a pose, add a frame, draw the next pose, and play it back. It uses the same brushes, layers, and painting tools as Illustration mode, and adds a full-width Timeline along the bottom, onion skin, playback, and export to GIF, MP4, or a numbered PNG sequence. This page covers entering Animation mode and every part of the timeline.
For the painting tools you draw each frame with, see Brush and the Tools index. For how the layer stack works (each layer becomes its own cel track here), see Layers. For the workspace switcher and the rest of the window, see The Interface.
Screenshot
the Animation workspace with the paint tool strip on the left, the Layers and Color panels on the right, and the dope-sheet Timeline spanning the bottom of the window.
Entering Animation mode
Animation is one of Limner's three workspaces. The workspace switcher is the slim strip above the menu bar, labelled "Workspace", with one button per workspace.
Click the Animation segment in the Workspace switcher to enter Animation mode. Its tooltip reads "Frame by frame animation: draw cels on a timeline".
The Ctrl+Shift+M workspace hotkey only flips between Illustration and Vector. Animation is reached by clicking the switcher segment, and pressing the hotkey while in Animation takes you back to Illustration.
The three workspaces are:
Workspace
What it is
Illustration
Raster painting: brushes, selections, filters.
Vector
Vector art: editable paths with fill and stroke.
Animation
Frame-by-frame cel animation on a timeline.
What changes when you switch
Switching to Animation mode does two things and leaves your artwork alone:
The Timeline appears. A full-width dope-sheet panel docks along the bottom of the window, above the status bar. It is resizable; drag its top edge to make it taller or shorter.
The panels swap to the Animation set: the Layers and Color panels on the right, with the Brush picker and Brush Settings on the left. The other panels (Navigator, Timelapse, Reference, Stats) stay reachable from the Window menu.
The tool strip is the Illustration paint strip, unchanged. Animation mode reuses the raster painting tools, so everything you know from Illustration (the brush, eraser, fill, selections, filters, and the rest) draws on each frame exactly as it does there.
What does NOT change: switching workspaces never converts your layers. Mode is a different set of tools and panels over the same document.
The white paper
A blank canvas is transparent, which would make every animation frame see-through and make onion ghosts hard to read. So the first time you enter Animation mode, Limner guarantees an opaque white paper under your art: if the bottom layer is empty it fills it white, otherwise it slips a white paper layer underneath. This is a single undo step, and it happens only once.
The Timeline (dope sheet)
The Timeline is a dope sheet: a grid with one row per layer and one column per frame. It has three parts, top to bottom: a transport row, a frame-operations row, and the dope-sheet grid itself.
Screenshot
the Timeline with the transport row, the Add Frame / Delete / Export row, and the dope sheet showing keyframe thumbnails, hold bars, and the active-frame column.
The dope-sheet grid
The grid is split into a frozen name gutter on the left and a scrolling frame grid on the right.
The name gutter lists your layers in the same top-to-bottom order as the Layers panel, one row each, with an eye toggle and the layer name. Folders show as header rows with a collapse caret; layers inside a folder are indented. The active layer's row is highlighted in the accent colour. Click a layer name to make it active.
The frame grid holds the cells. It scrolls both ways for long timelines and tall stacks. The name gutter stays put while the grid scrolls sideways, so you never lose track of which row is which.
The two panes scroll vertically together, so a layer's name always lines up with its row of cells.
Zooming the timeline. For a long animation, zoom the grid out to see more frames at once, or in to work on a few frames closely: hold Ctrl and scroll over the grid, or use the magnifier buttons on the frame-operations row (click the percentage between them to reset to 100%). Zoom changes the frame-cell width only; at a tight zoom the frame numbers thin out so they stay readable, and the current frame is always numbered.
The filmstrip. The per-layer cells show each layer's own drawing. To review the whole animation as finished frames, turn on the Filmstrip toggle on the frame-operations row: a row appears above the ruler showing a composited thumbnail of every frame, all your visible layers merged into one pose. Click a filmstrip thumbnail to jump to that frame. The thumbnails update as you draw, and the toggle is off by default (building them costs a little on a very long animation).
Reading the cells
Each cell shows the state of one layer on one frame:
Cell
What it means
Thumbnail
A keyframe: a drawing starts on this frame. A blank keyframe shows a hollow box instead.
Hold bar
A flat bar across the cell: the previous drawing is held (it stays on screen until the next keyframe).
Empty
The layer has no drawing yet at this frame.
A small number at a keyframe's top-right corner is its exposure: how many frames the drawing is held before the next keyframe (shown only when it is held for more than one frame). A coloured strip along a cell's top edge is its frame colour tag. The active layer's current cell carries an accent border so you can see exactly what you are about to draw on.
The ruler
The strip across the top of the frame grid is the ruler. It numbers the frames (starting at 1), marks the current frame with an accent pill, and carries the draggable in and out markers. Frames outside the in/out range are dimmed.
Click a frame number to jump the playhead there, or drag along the ruler to scrub: the playhead follows the frame under the cursor as you move, so you can flip through the animation by hand. To select a range of frames, hold Shift and click another frame (selects from the playhead to there) or Shift-drag across the ruler; the selected columns are washed in the accent colour, and Copy and Delete then act on the whole range (see Editing frames). To reorder a whole frame column (that frame, and every layer's drawing on it, moved to another position), hold Alt and drag; a highlight shows where it will land. A plain click clears the selection.
Drawing frame by frame
The core loop is: draw a pose, add a frame, draw the next pose.
Add Frame (the button on the frame-operations row, hover "Insert a blank frame after this one and switch to it") inserts a new blank frame right after the current one and jumps to it. On the active layer the new frame is a fresh blank cel to draw the next pose on; every other layer holds its current drawing, so a static background or a layer you are not animating stays in place across the frames.
Just start drawing. When you paint on a frame that is currently holding an earlier drawing, Limner automatically gives the active layer its own keyframe there first, so each frame you draw on becomes its own distinct cel. You never have to "create a keyframe" by hand.
Delete (hover "Delete this frame") removes the current frame and shifts the later frames left, so no gap is left behind. It is greyed out when only one frame remains.
Because each layer carries its own track of cels along one shared timeline, you can animate the character on one layer while the background layer holds a single drawing, and add a new layer at any time (it starts blank and holds across the whole timeline until you draw on it).
Onion skin
Onion skin ghosts the frames around the one you are drawing, so you can see where your last pose was and where the next one is, the way you would flip paper on a lightbox.
The Onion toggle on the transport row turns ghosting on and off in one tap (hover "Onion skin: ghost the nearby frames"). It is off by default. There is also a keyboard shortcut, Alt+O by default, which you can rebind in Keyboard Shortcuts.
The gear button next to it opens the Onion skin popover, where you tune the ghosts. Every setting stays editable even while onion is off, so you can set it up before turning it on.
Control
Range
Default
What it does
Before
0 to 12
1
How many earlier frames to ghost.
After
0 to 12
1
How many later frames to ghost.
Opacity
0.05 to 1.0
0.45
Opacity of the nearest ghost. Frames further away fade out from there.
Past
RGB colour
warm red
The tint for earlier frames.
Future
RGB colour
cool blue
The tint for later frames.
Earlier frames are tinted with the Past colour and later frames with the Future colour, the usual warm-past / cool-future convention, so you can tell at a glance which way time runs.
Each ghost composites all of your visible layers together, so a character built from separate line, fill, and shadow layers ghosts as one whole pose, not just the layer you happen to be drawing on. Only the layers that actually change between frames are ghosted: a layer that holds the same drawing (a static background, or the white paper) shows no ghost, so neighbouring frames never wash the canvas in tint, and a held pose never doubles up. The ghosts sit just under the layer you are drawing on, so your live line always stays on top.
Playback and transport
The transport row across the top of the Timeline drives playback. Left to right:
Control
What it does
Key
First frame
Jumps to the first frame.
Home
Previous frame
Steps back one frame.
, (comma)
Play / Pause
Starts or pauses playback. The button shows a pause icon while playing.
Enter
Stop
Stops playback (enabled only while playing).
Next frame
Steps forward one frame.
. (period)
Last frame
Jumps to the last frame.
End
Frame rate
The project speed in frames per second.
Play mode
Loop, Ping Pong, or Once.
Control
Range
Default
What it does
Frame rate (fps)
1 to 60
12
How many frames play per second.
The play mode is a three-segment control:
Loop (the default) plays the range over and over.
Ping Pong plays forward to the end, then back to the start, and repeats.
Once plays through one time and stops.
A readout at the right end of the transport shows "Frame X / N" (the current frame, counting from 1, over the total) followed by a timecode: the current time and the total duration in minutes:seconds.tenths at the current frame rate.
Playback stays locked to the frame rate you set. On a heavy scene that is too slow to draw every frame in time, Limner drops (skips) the frames it cannot keep up with instead of playing in slow motion, so the timing you see matches the timing you will export.
Keyboard frame navigation and playback
In Animation mode, a few keys drive the playhead and transport without reaching for the buttons. They work only in Animation mode and are fixed (they are not in the rebindable Keyboard Shortcuts list). Space stays the hold-to-pan key, so Enter is what plays and pauses.
Key
Action
, (comma)
Previous frame
. (period)
Next frame
Home
First frame
End
Last frame
Enter
Play / pause
In and out range
Two markers on the ruler set the part of the timeline that plays and exports. Drag the in marker to set the start and the out marker to set the end; their grab tabs sit at the top of the ruler. You can also type the range directly: the In and Out boxes on the frame-operations row set the start and end frames numerically (drag them or click to type). Frames outside the range are dimmed.
The range bounds both playback and export. Playback loops, bounces, or plays once within the in/out points, and export writes only the frames inside the range.
By default the range covers the whole timeline, and it follows the frame count as you add or remove frames. The Export menu names the current range and frame count, for example "Frames 1 to 12 (12 total)".
Editing frames
Right-click any cell to open its frame menu (available once you have more than one frame):
Item
What it does
Duplicate frame
Inserts an editable copy of this drawing right after it, and switches to it. The copy is independent: changing it does not change the original.
Clone frame (linked)
Inserts a linked copy right after it. The two frames share one drawing, so editing either edits both, and the clone uses no extra space.
Delete frame
Removes this frame; the later frames shift left.
Color tag
Tags the frame with a colour (see below), or clears it.
The frame menu also has Copy frame and Paste frame after: the copied frame carries every layer's drawing and can be pasted anywhere in the timeline. The frame operations all have keyboard shortcuts too: Alt+C copy, Alt+V paste after, Alt+D duplicate, Alt+L clone, Alt+Delete delete.
Working with several frames at once. Select a range on the ruler (Shift-click or Shift-drag, see The ruler), and Copy and Delete act on the whole range: the menu reads "Copy 3 frames" or "Delete 3 frames", and Alt+C and Alt+Delete do the same. Paste drops all of the copied frames in order after the target frame ("Paste 3 frames after").
Re-timing a cel
Drag a keyframe sideways along its row to re-time it, moving the drawing to a different frame. A highlight shows the target column as you drag. Dropping it onto a frame that already has a drawing replaces that one.
Changing how long a drawing is held (exposure)
The exposure of a drawing is how many frames it stays on screen before the next one. To change it on one layer, hover the right edge of a held drawing until the resize cursor appears, then drag: right holds it longer, left holds it shorter, and a guide line shows where the boundary will land. This moves the next drawing on that row; it never runs past the drawing after it (that one always keeps at least one frame), and it does not change the total frame count. The last drawing on a row has no edge to drag, since its hold runs to the end of the timeline; use Add Frame or Delete to change the timeline length. The exposure badge in the corner of a keyframe updates as you drag.
Colour tags
Frames can carry a colour label to mark beats, holds, or sections. Right-click a cell, open the Color tag submenu, and pick one of six colours (red, orange, yellow, green, blue, or purple), or None to clear it. The tag shows as a coloured strip along the top edge of that frame's cells, and the tags travel with the document when you save.
2D camera
The 2D camera adds a keyframed move over the whole animation: a pan, zoom, and rotate applied to the finished frame, so you can push in, drift across, or spin the shot without redrawing anything. It is a Limner Plus feature, and it is non-destructive: it never changes your drawings, only how the finished frame is framed.
Open the camera controls from the Camera button and its gear popover on the frame-operations row. To set up a move:
Scrub to the frame where the move should start and click Add key (in the popover, or the Camera track's + button). The first key turns on Camera view so you can see the framing.
Set the framing for that key: Center X / Center Y (where the camera looks, as a percentage of the canvas, 50% being the middle), Zoom (100% frames the whole canvas, larger zooms in), and Rotation.
Scrub to a later frame, add another key, and give it a different framing. Limner interpolates the camera between the keys, so the shot moves smoothly from one to the next.
Camera view (the Camera button, and always during playback) shows the canvas through the camera, so scrubbing and playing back preview the move. Turn it off to edit the frames on the plain canvas again.
The keyframe track. Once you have a key, a Camera row appears under the ruler, with a diamond at each keyed frame. Click a column to jump there; drag a diamond to re-time its key. A filled diamond is a moving key; a hollow diamond is a Hold key. Use the track's + and trash buttons, or the popover, to add or delete the key at the current frame.
Easing. Each key controls how the camera moves from it to the next key:
Ease
Motion
Hold
Steps: the camera stays put until the next key (no motion).
Linear
A straight, even move.
Smooth
Eases in and out, so the move starts and ends gently.
The camera bakes into the export (GIF, MP4, and PNG sequence all render the move) and saves with the document.
Layer keyframes
Where the camera moves the whole shot, layer keyframes move one layer inside it: keyframe a layer's position, scale, rotation, and opacity over the timeline and Limner interpolates between the keys, so a cloud can drift, a title can fade in, or a cel can slide across the shot without redrawing it anywhere. A Limner Plus feature, and non-destructive: the layer's pixels are never changed, only how they are composited at each frame.
Open a layer's keyframe controls from the diamond button on its Timeline row (it lights up when the layer has keys):
Move the playhead to the frame where the motion starts and click Add key. The key starts as "no change", so adding it never alters the look.
Set the values for that key: Position X / Y (an offset in canvas pixels), Scale (100% = unchanged), Rotation, and Opacity (100% = the layer's own opacity). Anchor X / Y sets the point scale and rotation pivot about; it belongs to the layer, not to any one key.
Scrub to a later frame, add another key with different values, and play: the layer moves, turns, grows, or fades smoothly between them.
Keys show as small diamonds along the bottom of the layer's row: drag one to re-time it, right-click it to pick its ease (Hold / Linear / Smooth, the same three as the camera) or to delete it. Keys ripple with frame inserts, deletes, and reorders, exactly like drawings and tags.
A few things to know:
Painting is blocked on a moved frame. On a frame where a layer is shown displaced, scaled, or rotated by its keys, a stroke would land away from the pen (the pixels live at their undrawn position), so Limner blocks it and says why. Paint on a frame where the transform is "no change" (for example the first key, before the move starts), or clear the layer's keys. Opacity-only keys never block painting.
Onion skin ghosts do not follow the keys. Ghost frames show the raw drawings; preview keyframed motion by scrubbing or playing instead.
Layer keyframes bake into the export and save with the document, like the camera. The 2D camera composes on top, so a camera move over keyframed layers exports exactly as previewed.
Importing frames
You can start an animation from images you already have. Both importers are Limner Plus, and each opens a fresh Animation-mode document:
File ▸ Import GIF as Animation Frames... splits an animated GIF, one frame per GIF frame, and sets the frame rate from the GIF's timing.
File ▸ Import Image Sequence as Animation Frames... turns a folder of numbered images into frames, one frame per file, in numeric order (so frame2 comes before frame10, padded or not). PNG, JPEG, WebP, BMP, TGA, TIFF, and GIF files are read, transparency is kept, and any off-size image is scaled to match the first one. A plain image sequence carries no timing, so it starts at 12 fps; change it in the transport. Both importers keep the first 300 frames of a very long source.
Export
The Export button on the Timeline's frame-operations row writes your animation out. It is enabled once you have more than one frame, and it offers three formats (since 0.8.3 the same three exporters also appear under File ▸ Export while the Animation workspace is active):
Format
What it writes
Notes
GIF
An animated GIF.
Plays at the project frame rate.
MP4 video
An H.264 MP4.
Broadly playable; no transparency. A canvas larger than 4K is downscaled to fit the encoder.
PNG sequence
One numbered PNG per frame.
Keeps transparency. Files are named frame_0001.png, frame_0002.png, and so on, in the folder you choose.
A few things to know:
The export honours the in/out range. Only the frames inside the range are written; the Export menu names the range it will use. To export the whole animation, leave the markers at the ends.
The size is the canvas size. There is no separate export resolution; frames are written at the document's pixel dimensions. GIF and MP4 use the project frame rate.
Onion skin is turned off during export, so ghosts never bleed into the output, then restored afterwards.
The 2D camera move and layer keyframes are baked in. Each exported frame is rendered through the camera framing and the layer transforms at that frame, so the export matches what playback shows on screen.
All three formats are encoded inside the app. GIF and MP4 use the same built-in encoder as the Timelapse feature, so no extra tools or downloads are ever needed.
One export runs at a time. A status line beside the Export button shows progress ("Exporting animation...") and then the result.
How animation is saved
Animations save inside the normal Limner document (.limner). The format stores the frame count, frame rate, play mode, onion settings, the in/out range, the colour tags, the 2D-camera keyframes, the per-layer keyframes, and every cel's pixels, so reopening a file drops you straight back onto the timeline. A document that uses animation reopens in Animation mode automatically. Older files, and files with a single frame, open as before in Illustration or Vector mode. See File Formats for details.
Related pages
The Interface: the workspace switcher, panels, and the rest of the window.
Layers: the layer stack that becomes one cel track per layer here.
Brush and the Tools index: the painting tools you draw each frame with.
Timelapse: the other video export, which records your drawing process.
New in 0.8.2
This release adds motion on top of your cels, and a faster timeline to cut on:
2D camera. Keyframe a pan, zoom, and rotate over the whole shot, with Hold / Linear / Smooth easing and a live camera view; the move bakes into every export. See 2D camera. Limner Plus.
Layer keyframes. Animate a layer's position, scale, rotation, and opacity between key diamonds on its timeline row; non-destructive, and baked into exports. See Layer keyframes. Limner Plus.
Import an image sequence. File ▸ Import Image Sequence as Animation Frames... turns a folder of numbered images into ready-to-play frames, transparency kept. See Importing frames.
Scrub, zoom, and the filmstrip. Drag the ruler to scrub the playhead (reordering a frame column is now Alt+drag), zoom the frame width with Ctrl+scroll or the magnifier buttons, and flip on the Filmstrip row to see every frame's finished picture.
Range selection and exposure. Shift-select a run of frames on the ruler to copy, paste, or delete them together, drag a cel's right edge to lengthen or shorten a hold, and type the in/out range directly.
Whole-pose onion skin. Ghosts now composite every visible layer that changes, so a multi-layer character ghosts as one pose, and Alt+O toggles onion skin from the keyboard.
Steadier playback. Playback keeps real time by skipping frames it cannot render in time, a timecode readout joins the frame counter, Enter toggles play and pause, and Add Frame inserts right after the frame you are on.
New in 0.8.0
The timeline grows the frame operations beta artists asked for, and export no longer blocks the app:
Reorder frames by dragging a column in the timeline ruler, and copy and paste whole frames anywhere in the timeline.
Frame hotkeys. One Alt family drives the playhead frame: Alt+N new, Alt+D duplicate, Alt+L linked clone, Alt+C copy, Alt+V paste after, Alt+Delete delete. All rebindable in Keyboard Shortcuts.
Duplicating a frame copies every layer of that frame, and a new frame starts blank on every layer, so each drawing is fully independent.
Export without the freeze. GIF, MP4, and PNG-sequence export render one frame per screen refresh and stream to the encoder in the background; switching documents cancels cleanly.
Full undo for the timeline. Frame add, duplicate, delete, reorder, retime, and paste each undo as a single step, restoring the whole timeline.
Sharper helpers. Ctrl+Alt+click a mark on the canvas to jump to the layer that owns it; Ctrl+V pastes a copied image onto the Reference board; transparent canvas shows a dark field with a View ▸ Transparency checkerboard toggle (Animation mode always shows the checkerboard so onion skins stay readable).
Book
Book: Comics and Manga
A Book is Limner's multi-page comic, manga, or book project: an ordered list of pages held together in a single file, with a Page Manager board to add, reorder, and page through them. A Book is a NEW axis layered over the workspaces, not a fourth one. Each page is its own normal document that you draw with the usual Illustration, Vector, or Animation tools, and a page can be in a different workspace from its neighbours. On top of that, a Book adds comic-specific helpers: per-page bleed / trim / safe guides and a Panel tool for laying out frames.
For the painting tools you draw each page with, see Brush and the Tools index. For how the layer stack works on a page, see Layers. For the vector tools you can use on a page, see Vector Mode.
Screenshot
the Page Manager board for an open book, a row of page thumbnails in order with the Add Page / Save / Export toolbar across the top, and an active page outlined in the accent colour.
What a Book is
A Book sits ABOVE the per-page drawing workspaces. It is deliberately not a fourth workspace: switching Illustration / Vector / Animation changes the tools and panels for one document, while a Book is a project that owns many documents (its pages) and a board to manage them. Each page remembers its own workspace, so you can ink one page in Illustration, letter another in Vector, and animate a third, all inside the same Book.
While a Book is open you move between two surfaces:
Surface
What it shows
Page (canvas)
The active page open for drawing, with the normal tool strip and panels.
Book (Page Manager)
The thumbnail board of every page in order, with the book toolbar.
Creating and opening a Book
Books are created and opened from the File menu:
File ▸ New Book opens the New Book setup dialog (described below).
File ▸ Open Book opens an existing .limnerbook file.
File ▸ Open Recent Book lists the books you opened recently; pick one to reopen it.
You can also reach these from the Book home screen: open the Page Manager with no book loaded and it shows New Book, Open Book, and a prominent "Continue" button for the most recent book, with the rest of your recent books listed below.
The New Book setup dialog
The dialog builds a new, empty book from a page template plus a few options. Pick a Template from the list to fill in the size and binding, then adjust anything by hand.
Built-in template
Page size
DPI
Comic book (US)
1988 x 3075 px
300
Manga B5 (182 x 257 mm)
2150 x 3035 px
300
Manga A5 (148 x 210 mm)
1748 x 2480 px
300
Tankobon (128 x 182 mm)
1512 x 2150 px
300
Webtoon strip
800 x 1280 px
72
A4 (210 x 297 mm)
2480 x 3508 px
300
The remaining controls:
Control
Range / options
Default
What it does
Width
1 to 20000 px
from template
The page canvas width (bleed included on print sizes).
Height
1 to 20000 px
from template
The page canvas height.
Resolution
72, 150, 300, 350, 600, 1200 DPI
300
Page resolution, used for metadata and the size of the guide insets.
Binding
Left bound (Western), Right bound (Manga)
from template
Which side the spine sits on and the page order.
Background
colour or Transparent
white
The paper colour new pages start with, or transparent.
Right to left reading order (manga)
checkbox
from template
Reads pages and panels right to left.
Allow two-page spreads
checkbox
off
Lets you combine pairs of pages into spreads in the Page Manager.
Print bleed and safe-area guides
checkbox
on for print sizes, off for webtoon
Shows the bleed / trim / safe guides on each page.
Manga and Tankobon templates default to right binding and right-to-left order; the webtoon strip turns the print guides off. Click Create to start the book, or Cancel to back out.
The page list (Page Manager)
The Page Manager is the book's home board. Each page is a card with its thumbnail, its number and title, and a row of per-page actions. The active page is outlined in the accent colour.
Action
What it does
Open
Opens this page on the canvas to draw on it. Double-clicking the thumbnail does the same.
Duplicate
Inserts an independent copy of this page right after it.
Move earlier
Moves the page one slot toward the front.
Move later
Moves the page one slot toward the back.
Delete
Removes this page (disabled when only one page remains).
The book toolbar across the top of the board carries the book-wide commands:
Command
What it does
Add Page
Adds a new blank page using the book's page template.
Undo / Redo
Undo or redo the last page-structure change (add, duplicate, delete, reorder). Ctrl+Z and Ctrl+Y do the same.
The toolbar heading shows the book name (with a * when there are unsaved changes) and a summary line: the page count, the binding (left or right bound), and whether right-to-left order or spreads are on. Page-structure undo and redo are session-only; a reopened book starts with an empty page history.
Drawing on a page
A page is an ordinary document. Open it from the Page Manager and you draw with the same tools, layers, brushes, selections, and filters you use everywhere else. The page opens in its own remembered workspace, so each page keeps whatever Illustration / Vector / Animation lens you last left it in.
When the print guides are on (or a page sets its own bleed and safe area), Limner draws two non-destructive guide rectangles over the canvas:
The trim line (blue) marks the final cut edge of the printed page.
The safe rectangle (orange) marks the area to keep important art and text inside.
The guides are a display overlay only. They are never composited into your artwork and never affect undo, the eyedropper, or export. A webtoon or screen page has no bleed, so it shows no trim guide.
The Panel tool
While a Book is open, a comic Panel tool is appended to the tool strip in every workspace, so you can lay panels on any page without switching modes. Panels are frames: each panel CLIPS the page's raster paint to its interior, so nothing you paint spills into the gutters between frames. The clip is a non-destructive display effect, so your true pixels stay intact for undo, the eyedropper, and export.
Drag an empty area of the canvas to draw a new rectangular panel.
Click an existing panel to select it; then drag it to move or resize it.
The Panel tool options bar edits the selected panel live, or the defaults for the next panel you draw:
Control
Range / options
Default
What it does
Line width
0 to 40 px
4
Border line width (0 hides the border).
Border
colour
black
The border line colour.
Fill
checkbox + colour
off
Fills the inside of the frame; off leaves it transparent so the page art shows through.
Snap
checkbox
off
Snaps panel edges to the page guides and to other panels' edges, so touching panels align onto one line.
Delete
button
Deletes the selected panel (shown only when a panel is selected).
Panels are stored with the page document, so they travel with the file and reopen exactly as you left them.
Saving and exporting
A whole Book saves into one .limnerbook file. The file holds the book metadata (page size, resolution, binding, reading order, spreads, default bleed / safe) and the full ordered page list, with each page embedding its own complete document blob. Use Save to write it, or Save As to write a copy under a new name.
The pages themselves use Limner's normal document format (version 19), which is where each page's layers, vectors, panels, and animation live. The format is additive: documents saved by older versions of Limner still open, and a v18-or-earlier file simply loads with no panels.
Export on the book toolbar writes every page to numbered PNG files. It prompts for a base name, then writes the pages as name_001.png, name_002.png, and so on, padded so they sort in order. A tall webtoon book (no print bleed, strip-shaped pages) is also sliced vertically into platform-sized pieces, named name_001_01.png, name_001_02.png, and so on. When the export finishes, Limner reports how many files it wrote and where.
Construction aids are drawing guides that snap your strokes to clean geometry: straight lines, parallel lines, circles, mirror copies, and perspective lines that converge on vanishing points. They do not paint. They constrain whatever you paint next with the Brush, the Line and Shape tools (see Shapes), and most other stroke tools.
This page covers the four ruler kinds, guides, grid snap, symmetry, perspective, and the Smart Shape gesture.
Where the aids live
All of the aid tools share one flyout group in the left tool strip, in this order:
Linear Ruler
Parallel Ruler
Radial Ruler
Concentric Ruler
Symmetry
Perspective
There is no menu path and no default keyboard shortcut for any aid tool. You can assign shortcuts in Edit ▸ Preferences ▸ Keyboard Shortcuts.
Two things to know about how the aids behave:
Selecting an aid tool puts you in its edit mode. A drag on the canvas places or moves that aid's geometry. It never paints.
Any handle can be grabbed at any time. While any aid tool is active, pressing near a ruler point, a guide, a symmetry handle, or a vanishing point grabs the nearest one and switches to its tool automatically, so you can nudge any aid without first picking its tool. The grab range is about 12 pixels on screen.
Aid edits have their own undo. Rulers, symmetry, and perspective share a lightweight undo and redo stack (up to 64 steps). While an aid tool is active, Ctrl+Z steps back through aid edits rather than the document history. These shortcuts are rebindable in Edit ▸ Preferences ▸ Keyboard Shortcuts.
The ruler, symmetry, and perspective geometry is session state, not saved per document.
Screenshot
the left tool strip with the construction-aids flyout group open, showing the four rulers, Symmetry, and Perspective.
The Snap checkbox
When a ruler is placed or any guide exists, a Snap checkbox appears at the left of the tool-options bar, no matter which tool is active. It is on by default. Turn it off to draw freely without removing your rulers and guides, then turn it back on to resume snapping.
Control
Range
Default
What it does
Snap
on/off
on
Snap strokes to the active ruler and guides.
Rulers
A ruler resolves a single constraint at the moment your stroke begins, then projects every later point of that stroke onto the same line or circle, so the whole stroke rides one clean path. There are four kinds. Each is its own tool.
A freshly selected ruler is unplaced: nothing shows and nothing snaps until your first drag on the canvas draws it. That first draw is a single undo step, so one Ctrl+Z removes the ruler again.
Linear
A single fixed straight line. Every stroke projects onto that one line, wherever you start drawing. Drag on the canvas to set the two endpoints. Use it for one repeated edge, a horizon, or a single straight rail.
Parallel
A fixed direction. Each stroke snaps to a line through its own start point, parallel to that direction. Drag once to set the direction, then draw anywhere to lay down parallel strokes. Use it for hatching, wood grain, or any field of parallel lines.
Radial (focus)
A focus point. Each stroke snaps to the ray through the focus and the stroke's start point, so lines radiate from (or converge on) the focus. Drag to place the focus point. A stroke that begins exactly on the focus has no direction, so it does not snap. Use it for sunbursts, spokes, and one-point radial layouts.
Concentric
A center point. Each stroke is locked to the circle centered there whose radius is fixed at your stroke's start point. The radius comes from where you begin; the stroke then sweeps around that circle. Drag to place the center. A stroke that begins on the center has no radius, so it does not snap. Use it for rings, ripples, and concentric arcs.
Ruler options
These controls appear on the tool-options bar for any of the four rulers.
Control
Range
Default
What it does
Reset
action
-
Recenter the active ruler and mark it placed, so it is immediately visible at the canvas center.
Guides (N)
readout
live count
Shows how many guides currently exist.
+ H
action
-
Add a horizontal guide at the canvas mid-line.
+ V
action
-
Add a vertical guide at the canvas mid-line.
Clear
action
-
Remove all guides.
Grid snap
on/off
off
Rail strokes to the nearest View grid line of the dominant axis.
Hint shown on the bar: "Drag on the canvas to place or move the ruler, focus, or a guide."
The kind of ruler is decided by which ruler tool is active, not by a control on this bar. The Snap checkbox itself lives in the shared header (above), not in this list.
Placing and moving a ruler
For Linear and Parallel, the first drag sets the start point, then drags the end point. Later drags grab whichever endpoint is nearer.
For Radial and Concentric, only the single point (the focus or center) is placed and dragged.
Reset recenters the ruler: a horizontal line across the middle for Linear and Parallel, or the canvas center for the single-point kinds.
Screenshot
a Radial ruler placed on the canvas with several strokes radiating from the focus.
Guides
Guides are infinite horizontal or vertical lines. A stroke that begins near one snaps onto it, with the snapped line passing through your stroke's start point (only the guide's axis coordinate is forced). Guides are added from the ruler options bar with the + H and + V buttons and are owned by the ruler tools.
Control
Range
Default
What it does
Guide orientation
horizontal / vertical
per add button
Whether the guide is a horizontal or vertical line.
Maximum guides
up to 16
-
The + H and + V buttons stop adding once 16 guides exist.
A new guide is added at the canvas mid-line. A stroke snaps to the nearest guide within about 6 pixels on screen of where it starts, and only while Snap is on. You can drag a guide on the canvas to move it (the drag changes only its constrained coordinate). The Clear button removes every guide at once.
Grid snap
Grid snap is separate from rulers and guides. With Grid snap on, once a stroke has moved far enough for its direction to be clear (about 6 pixels on screen), it rails to the nearest View grid line of the dominant axis, so you can draw straight along grid lines.
Grid snap uses the View grid spacing. It works off the spacing whether or not the grid overlay is actually shown.
Symmetry
The Symmetry tool mirrors and rotates each dab of your stroke around a movable center, so a single stroke is duplicated into a symmetric pattern. It applies to brush dabs, smudge and blur, and vector strokes. Entering the Symmetry tool while symmetry is Off starts it on Vertical so there is something to see and edit.
Screenshot
a single stroke drawn under Radial symmetry showing several rotated copies around the center.
Modes
Mode
Copies
What it does
Off
1
No symmetry.
Vertical
2
Mirror left to right across the (vertical, when unrotated) axis.
Horizontal
2
Mirror top to bottom across the perpendicular axis.
Both (4-way)
4
Mirror across both axes, a 4-way kaleidoscope.
Radial (N-fold)
N (doubled if Mirror is on)
N evenly spaced rotational copies around the center.
Symmetry options
Control
Range
Default
What it does
Mode
Off / Vertical / Horizontal / Both (4-way) / Radial (N-fold)
Off (auto-starts on Vertical when you enter the tool)
The symmetry mode.
Sectors (Radial only)
2 to 24
6
How many rotational copies the Radial mode makes.
Mirror (Radial only)
on/off
off
Also mirror within each sector (kaleidoscope), doubling the copies.
Recentre
action
-
Reset the symmetry axis to the canvas center and the angle to 0.
Hint shown on the bar: "Drag on the canvas to move the centre or rotate the axis."
Moving and rotating the axis
The symmetry axis has two on-canvas handles: a center dot and a rotation handle that sits out along the axis. Drag the center dot to move the origin of the mirror or rotation. Drag the rotation handle to turn the axis to any angle. The whole move or rotate is one undo step.
The center starts at the canvas mid-point and the angle starts at 0. Recentre returns both to those defaults.
Perspective
The Perspective tool sets up vanishing points, an eye-level line, and an optional perspective grid. Strokes then snap onto the line that runs from where you start toward the best-matching vanishing point. Entering the tool while perspective is Off starts it on 2-point and arms placing the first vanishing point. Leaving the tool disarms placement so an armed click cannot hijack another tool's first stroke.
Screenshot
a 2-point perspective setup with two vanishing points on the eye-level line and the perspective grid drawn.
Modes
Mode
Vanishing points
What it does
Off
0
No perspective.
1-point
1
Frontal one-point perspective.
2-point
2
Two vanishing points on a horizon, the typical exterior setup.
3-point
3
Adds a third point for vertical convergence.
Perspective options
When the mode is Off, only the mode buttons are shown. The rest appear once you pick a mode.
Control
Range
Default
What it does
Mode
Off / 1-point / 2-point / 3-point
Off (auto-starts on 2-point when you enter the tool)
The number of vanishing points.
VP1 ... VPn (one per mode)
action
-
Arm placing that vanishing point, then press on the canvas to set it.
Snap
on/off
on
Snap strokes onto the lines toward a vanishing point.
Grid
on/off
off
Draw a denser perspective grid.
Density (Grid only)
2 to 24
8
How dense the perspective grid is.
Eye level
action
-
Reset the eye-level line to the canvas center.
Clear
action
-
Clear all vanishing points and re-arm placing the first one.
Hint shown on the bar: "Drag a vanishing point or the eye-level line to move it."
Placing vanishing points
Click a VP button to arm placement, then press on the canvas to drop that point. Placement flows on to the next unset point for the mode, so you can place them one after another. Each placement is a single undo step, and the placement gesture never paints. The eye-level line starts at the canvas mid-line (height divided by two).
Moving points and the eye level
When no placement is armed, drag a placed vanishing point to move it, or grab the eye-level line to slide it up or down. Each drag is one undo step.
How perspective snapping works
Perspective snapping is active only when Snap is on and at least one vanishing point is placed. On pointer-down it records the start point; the line direction locks once you have moved about 6 pixels on screen. The vanishing point chosen is the one whose line best aligns with your initial movement (toward or away from the point both count). Every later sample then projects onto that line.
Perspective snapping is the fallback below ruler, guide, and grid snapping: if a ruler or guide is snapping the stroke, that takes precedence.
Smart Shapes (draw and hold to snap)
Smart Shape is a gesture, not a separate tool. It works on the Brush tool only, and never for a transparent-paint (Erase) stroke. Draw a freehand shape and then hold the pointer still at the end of the stroke. If the path you drew reads as a clean primitive, the freehand is replaced by the snapped shape, rendered with your active brush, and dropped into on-canvas re-edit. If it matches nothing, your freehand stroke is kept, so you never lose an intentional squiggle.
A Smart Shape checkbox on the Brush tool-options bar turns the gesture on or off (on by default, persisted across sessions). Untick it if you prefer every stroke to stay freehand.
Setting
Value
What it does
Hold time
800 ms
How long you must dwell at the tail before the shape snaps.
Dwell radius
6 screen px
Moving farther than this re-arms the hold timer at the new spot. Measured on screen, so the feel is the same at any zoom; drawing slowly while zoomed in no longer reads as a hold.
Size floor
48 screen px
Strokes whose on-screen bounding-box diagonal is smaller than this never snap, so small hatching and detail work stays freehand.
Because the snap is checked both as you move and once per frame, a held-still mouse (which sends no move events) snaps just like a tablet pen.
What it recognizes
Smart Shape is deliberately conservative so a back-and-forth shading or fill scribble is never force-straightened. A path is rejected (left freehand) when it has fewer than 8 points, is shorter than 12 pixels, has a bounding-box diagonal under 10 canvas pixels (on top of the 48 screen-pixel size floor above), or reverses direction along its own axis more than 3 times (the scribble gate).
When a path does pass, it can snap to:
Line (a clean single-pass straight stroke)
Arc (an open bowed stroke)
Ellipse and Rectangle (axis-aligned closed shapes)
Polygon (a rotated rectangle or a convex shape of 3 to 7 corners)
Rotated ellipse
For a closed stroke, the tightest-fitting candidate wins.
Constraining and re-editing
Hold Shift as the shape snaps to constrain it: a perfect circle or square, or a line snapped to the nearest 15-degree increment.
The snapped shape floats with draggable handles, an oriented selection box, and a rotation handle. While dragging a handle, Shift constrains to a square or a 15-degree line; on the rotation handle, Shift snaps rotation to 15-degree steps.
Commit by tapping off the handles or pressing Enter. Cancel with Esc.
On a vector layer, the snapped shape commits as an editable vector stroke rather than a flat raster shape. See Vector Editing.
The same shape re-edit handles are used by the Line tool. See Shapes.
Limner reads and writes its own native project format and exchanges work with other apps through PSD, ABR, SVG, PNG, and JPEG. This page lists every format the app handles, what each one stores, and how to use the matching commands.
Screenshot
the File menu expanded, showing New, Open, Import, Save, and the Export section (Crop to, watermark, PNG, JPEG, PSD, SVG).
Quick reference
Format
Extension
Read
Write
Notes
Limner document
.limner (legacy .artpaint)
Yes
Yes
The full project: layers, masks, vectors, history, more
Limner Book
.limnerbook
Yes (Open Book)
Yes (Save)
A multi-page comic / manga / book project, one document per page
All keyboard shortcuts mentioned here are the defaults and can be changed in Edit ▸ Preferences ▸ Keyboard Shortcuts.
The native Limner format (.limner)
Limner's own project format is a single binary file that holds your entire working document. New files save as .limner by default; older .artpaint files still open and re-save in place, because both extensions share the same on-disk format (they are byte-for-byte identical). The default save name is untitled.limner.
Note
the native format is still evolving. The first time you save, Limner shows a one-time notice that the format is experimental. This is expected.
What a .limner file stores
A document file is the complete project, not just flattened pixels. The current format (version 19) saves:
Every raster layer (name, blend mode, opacity, visibility, and its painted pixels).
Layer folders (single level).
Layer masks.
Layer locks.
Reference layers.
Re-editable text layers, so you can keep editing text after reopening.
Vector-layer strokes and the brush snapshots they were drawn with.
Vector-mode graphic objects (the Bezier object scene), including live-corner radii and clip groups.
Comic panels (frame folders) on a page, added in version 19. A document with no panels stays byte-identical to a version 18 file. See the Book format below.
Animation, when the document uses it: every frame's cels, the frame rate, play mode, the in/out range, onion-skin settings, and the frame colour tags. A single-frame document stores none of this, so it stays the same size as before. See Animation Mode.
The embedded timelapse recording, so it travels with the art and can resume on reopen. See Timelapse.
Per-document session stats (active drawing time and committed stroke count). See Stats panel.
The canvas size and DPI.
A capped slice of undo/redo history (the most recent 16 undo and 16 redo entries each, paint strokes and layer add/remove only).
Older documents keep loading. A file written by an earlier version of Limner opens normally, and any file without animation (including everything saved before version 17) opens as a single frame. A document that uses animation reopens straight onto the timeline in Animation mode; a vector scene reopens in Vector mode; everything else opens in Illustration.
Pixels are stored compressed (run-length packed) on disk, so typical mostly-empty artwork saves small. Files are written atomically: Limner stages the new file beside the target and renames it into place, so the previous version is never left half-written, even when saving over the file you have open.
Saving and opening
Command
Menu path
Default shortcut
Save
File ▸ Save
Ctrl+S
Save As
File ▸ Save As
Ctrl+Shift+S
Open
File ▸ Open
Ctrl+O
Note
the shortcuts above are the defaults. Confirm and rebind them in Edit ▸ Preferences ▸ Keyboard Shortcuts.
Save writes to the document's tracked path; if nothing has changed since the last save, Limner skips the write. Save As prompts for a name and location and offers both the .limner and .artpaint extensions. If a file with the chosen name already exists, Limner shows its own overwrite confirmation in the app.
Opening a file that is already open in another tab just switches to that tab rather than opening a second copy. You can also open a document by double-clicking it in Windows (the .limner / .artpaint association launches Limner.exe with the file).
Limits and safety
Field
Range on load
Canvas width and height
1 to 16384 pixels each
DPI
any finite value greater than 0
Documents are loaded defensively: a corrupt or hostile file produces a clear error (for example "not a Limner document", "unsupported file version", "file has no layers", or "file has a corrupt layer"), shown in a dialog rather than crashing the app. A file written by a build with a different internal tile size cannot be loaded.
For the on-disk layout, the version history table, and the developer-level details, see the developer file-formats page.
The Book format (.limnerbook)
A Book is a multi-page comic, manga, or book project. It is not a separate drawing mode: each page is an ordinary Limner document (it can be Illustration, Vector, or Animation), and the Book wraps an ordered list of those pages with its own page metadata. The whole project saves as a single .limnerbook file, with one full per-page document embedded inside it.
Creating, opening, and saving
Command
Menu path
What it does
New Book
File ▸ New Book
Starts a new, empty Book project.
Open Book
File ▸ Open Book
Opens an existing .limnerbook file.
Open Recent Book
File ▸ Open Recent Book
Lists your recently opened or saved Books, most recent first.
When a Book is open you save it with the normal Save and Save As commands, which write the .limnerbook file (Save prompts for a name and location the first time). The default save name is untitled.limnerbook. Once a Book is open, a comic Panel tool appears in the tool strip; panels you draw on a page clip that page's artwork to the panel frame, so nothing spills into the gutters. See Menus for the File-menu commands.
What a .limnerbook file stores
The ordered list of pages, each one a complete embedded Limner document (the same per-page bytes a stand-alone .limner file holds, version 19).
The Book's page order and per-page identity, so pages keep their place when you reorder or page through them.
Book-level metadata (such as the binding direction for left-to-right or manga right-to-left reading).
Because each page is a full document, every page keeps its own layers, masks, vectors, text, and comic panels. Older Books still open in newer builds, and an older per-page document inside a Book loads the same way a stand-alone older .limner file does.
PSD (Photoshop)
Limner imports and exports layered Photoshop documents, so you can move work to and from Photoshop, Clip Studio Paint, Krita, and other apps.
Export PSD
File ▸ PSD (in the File menu's Export section) writes a layered, uncompressed Photoshop file:
One PSD layer per Limner layer, with the layer's name, blend mode, opacity, and visibility preserved.
Full-canvas RGBA channels per layer, plus the flattened merged image.
The document DPI.
Notes and limits:
Channels are written uncompressed, so PSD files are large but exact.
PSD always exports the full canvas. The crop presets below apply only to PNG and JPEG.
Layer names are stored up to 255 bytes.
Export is refused if the document is too large for the PSD section limits ("document too large for PSD export; reduce canvas size or layer count") or has more than 32767 layers ("too many layers for PSD export; the format allows at most 32767").
Import PSD
File ▸ Import PSD opens a Photoshop file as a new Limner document. Each PSD layer becomes a Limner layer, keeping its name, blend mode, opacity, and visibility.
Supported and unsupported:
Supported: 8-bit RGB documents, both raw and RLE (PackBits) channel compression. Documents with no layers fall back to the merged image (named "Background").
Not supported: PSB (large-document) files, non-8-bit and non-RGB documents, and ZIP-compressed channels. Each of these produces a clear error message.
Imported documents are capped at 8192 by 8192 pixels.
If the file has no DPI, Limner uses 96.
PSD layer groups flatten to a single-level stack on import, and the imported document starts with fresh history (it is not tied to a .limner path until you save).
ABR (Photoshop brushes)
Limner imports and exports .abr brush sets. Importing brings sampled (bitmap) brush tips in as new brushes; exporting writes a widely compatible ABR version 2 file. These commands live in the Brush picker, not the File menu. See Brushes for the full workflow, the import folder naming, and the dynamics that do and do not travel in the ABR format.
SVG (vector export)
File ▸ SVG (vector), in the File menu's Export section, writes a standalone SVG 1.1 document from your Vector-mode graphic layers, so vector artwork leaves Limner as true resolution-independent geometry rather than a rasterized image.
What it covers:
Paths, fills, and strokes (width, cap, join, miter, and dash).
Object opacity and fill rule.
Linear and radial gradients.
What it does not cover (these are not in the vector model yet): raster (Illustration) layers, text objects, clipping, and live effects.
If no vector layer has any objects on it, Limner shows a "Nothing to export" notice instead of writing an empty file. The default save name is artwork.svg. For more on building vector artwork, see Vector editing.
PNG and JPEG (still image export)
Both export the flattened canvas. Pick the command from the File menu's Export section.
Format
Menu path
Default name
Transparency
PNG
File ▸ PNG
artwork.png
Kept (RGBA)
JPEG
File ▸ JPEG
artwork.jpg
Flattened over white
JPEG has no alpha channel, so transparent areas are composited over opaque white before encoding. PNG keeps the alpha channel. PNG also embeds the document DPI (a pHYs chunk), so print software reads the intended physical size. JPEG export does not write resolution metadata.
Control
Range
Default
What it does
JPEG quality
1 to 100
92
Fixed encoder quality (artwork-grade, not adjustable in the UI)
Crop and aspect presets
The File ▸ Crop to: submenu (in the File menu's Export section) sets a centre-crop applied to PNG and JPEG exports (PSD always exports the full canvas). The chosen aspect persists between exports.
Preset
On-screen label
Aspect (width : height)
Result
Native
Native
none
No crop, full canvas
Portrait
9:16 (vertical)
9:16
Tall crop for TikTok, Reels, Shorts
Square
1:1 (square)
1:1
Square crop for an Instagram feed
Landscape
16:9 (wide)
16:9
Wide crop for YouTube
Limner takes the largest rectangle of the chosen ratio that fits the canvas, centred, with even dimensions and offsets. A canvas under 2 pixels on an edge exports uncropped.
Watermark
You can stamp an optional signature or logo onto PNG and JPEG exports. The toggle and settings live in the File menu's Export section.
File ▸ Add watermark turns the stamp on or off. The toggle is stored separately from the settings, so turning it off never discards your configured image or placement.
File ▸ Watermark settings opens the configuration window.
If "Add watermark" is on but no image has been chosen, the export stops and tells you to pick one ("no watermark image chosen"). A watermark you asked for is never silently dropped: if the chosen image fails to load, the export aborts instead of writing an unwatermarked file. The watermark is sized against the final exported dimensions (after any crop).
Control
Range
Default
What it does
Add watermark
on / off
off
Enables the watermark stamp on PNG/JPEG
Watermark image
a PNG or JPEG file
none
The signature or logo to stamp
Corner
Top left, Top right, Bottom left, Bottom right, Center
Bottom right
Where the stamp sits (margin is ignored for Center)
Scale
1 to 50 (% of export width)
15
Watermark width as a percent of the exported image width
Opacity
0 to 1
1.0
Watermark transparency multiplier
Margin
0 to 512 px
24
Gap between the stamp and the image edges
Import Image as Layer
File ▸ Import Image as Layer brings a PNG or JPEG into the current document as a new layer above the active one. The image is centred on the canvas at its native scale (clipped if it is larger than the canvas, the way Photoshop and Clip Studio Paint behave), and it lands in a single undo step, named after the file. This command requires a document to be open.
Drag and drop
Drop a file onto the Limner window to open or import it. Dropping several files at once handles each one in turn. Limner routes by file type:
File type
What happens
.limner, .artpaint
Opens as a document
.psd
Imports as a new document
.abr
Imports as brushes
.png, .jpg, .jpeg, .webp, .bmp, .gif, .tif, .tiff
Adds as a new layer if a document is open, otherwise opens as a new document
anything else
Shows a short notice listing the accepted types
The image set accepted by drag and drop is wider than the File ▸ Import Image as Layer dialog, which offers PNG and JPEG only. When an image is dropped with no document open, Limner creates a white-paper document sized to the image (capped at 8192 by 8192 pixels) and lays the image in at 1:1.
Screenshot
an image file being dragged onto the canvas, ready to drop as a new layer.
Crash-recovery autosave
While you work, Limner periodically writes a crash-recovery snapshot of each modified document in the same format as a normal save. These are cleared on a clean exit. If the app closed unexpectedly, the next launch offers to Restore or Discard the recovered work.
See also
Timelapse: record and export a video of your process, embedded in the document.
Limner can record your whole painting session and play it back as a sped-up video. One recorded frame plays back per stroke (or per timed sample), so a few hours of work becomes a short, satisfying clip you can post or keep. The recording is saved inside the document, so you can stop, close Limner, reopen the file days later, and pick up the same timelapse right where you left off.
There is no menu entry and no keyboard shortcut for the timelapse. Everything is driven from the Timelapse panel (a dock tab) and from the two short prompts described below.
How recording works
Limner captures the canvas (the flattened composite of all layers) and encodes it to an H.264 .mp4 with an encoder built into the app. There is nothing to install and no companion files: encoding works the same on any GPU.
Capture is non-blocking. Frames are read back from the GPU and handed to a dedicated encoder thread, so painting never stalls on encoding. If the encoder ever falls behind on a very large canvas, the occasional frame is dropped rather than freezing your brush. The on-screen frame count stays accurate because dropped frames are not counted.
Playback is fixed at 30 frames per second. At "1x" speed the panel shows the duration as frames / 30.
A timelapse is made of one or more segments (one self-contained .mp4 per recording session or save). Exporting joins them into a single continuous video.
Capture resolution
Recording happens at the canvas's native size by default, capped only by the resolution preset you choose. The long edge is capped to the preset's limit (aspect preserved), and the short edge to 2160 (the built-in encoder accepts up to 3840x2160 landscape or 2160x3840 portrait), so a square canvas records at up to 2160x2160. A canvas smaller than the caps records at its real size and is never upscaled. 4K is the maximum on purpose: recording above 4K balloons memory with no real benefit.
You can see the exact size and codec that will be used in the small hint line under the Resolution control, for example → 1920×1080 · H.264, or → 2160×2160 · H.264 (from 6000×6000) when a large canvas is downscaled to fit.
Frames live inside the document
The encoded segments are embedded in the saved .limner file (this also applies to legacy .artpaint files from format version 5 onward). That is why the panel footnote reads "Frames saved inside the .limner file." A save while recording rolls the active segment over seamlessly, so the recording survives the save and keeps going. When you reopen a file that already holds a timelapse, Limner offers to continue it. See file-formats.md for the document format details.
The recording prompts
Limner shows a short modal in two situations. Both embed the full setup controls (see below) so you can configure everything before recording starts.
Record a timelapse? appears once right after you create a new canvas. The body reads: "Limner records this session as a timelapse, saved inside the .limner file so you can keep recording every time you reopen it." Buttons: Record to start, or Not now to dismiss.
Continue this timelapse? appears when you open a file that already has a timelapse. It tells you how many frames are stored and that recording picks up where you left off and the whole thing exports as one video. Buttons: Continue to resume, or Not now.
Pressing Esc or clicking outside the modal also dismisses it.
The Timelapse panel
Open it as the Timelapse dock tab (record icon). The panel shows one of two states.
While recording
A red Recording label.
A line showing Frames: {n} ({n/30}s of video at 1x).
Two buttons:
Button
What it does
Save copy...
Saves the recording up to this moment and keeps recording. It seals the current segment, restarts a fresh one immediately (so the gap is essentially zero), then prompts for an export destination.
Stop & save...
Stops recording, seals the final segment, releases the readback buffers, then prompts for an export destination.
Both buttons force a final capture of the latest edit first, so your last change always lands in the video.
When not recording
If saved frames exist, a strong label: Saved timelapse: {n} frames ({n/30}s at 1x).
The shared setup controls (Resolution, Quality, Capture, Watermark, and the export length options once frames exist).
A Record button, or Continue recording when saved frames already exist.
An Export video... button (shown only when saved frames exist) that saves the whole timelapse so far as one .mp4.
The footnote: "Frames saved inside the .limner file."
Setup controls
These appear both in the panel (when not recording) and in the prompt modals.
Resolution
The recording size preset. This is greyed out (locked) when you continue an existing timelapse, because every segment must share one size to join cleanly.
Control
Range
Default
What it does
Resolution
4K (max) / 1080p / 720p
4K (max)
Caps the recording's long edge: 4K (max) at 3840 px, 1080p at 1920 px, 720p at 1280 px. Smaller canvases record at native size; nothing is upscaled.
Quality
A single quality slider. The slider runs from lower quality on the left to higher quality on the right. Higher quality produces a larger file. (Internally this maps to the encoder's constant-quality value, which the panel presents inverted so the slider reads naturally.)
Control
Range
Default
What it does
Quality
12 to 32
25 (the encoder default of 19, shown inverted)
Sets the encode quality. Higher on the slider means better quality and a bigger file.
Capture (cadence)
When a frame is grabbed during recording.
Option
What it does
Per edit
Default. One frame per committed edit (a stroke, fill, transform, filter, and so on). Skips idle pauses and captures the clean, committed result.
Timed
One frame every N seconds while the canvas is actually changing. Samples the in-progress stroke, and still skips idle time. Good for long continuous blends and for keeping very stroke-heavy work from producing an over-long video.
Per edit + timed
Both at once.
Every (s)
Shown only when Capture is set to Timed or Per edit + timed.
Control
Range
Default
What it does
Every (s)
0.2 to 10.0 (logarithmic slider)
1.0
The interval between timed samples, in seconds. Timed captures only fire when the canvas has actually changed, so an idle canvas does not pad the video.
The value is clamped to 0.2 to 10.0 on apply.
Watermark
The watermark controls are built into the Timelapse panel so you can set up your stamp before recording. This is the same watermark setting shared with the still PNG/JPEG export (File ▸ Export), and it is saved in your app settings.
Add watermark checkbox: stamps your watermark image onto the exported video. Off by default.
Watermark settings (a collapsing section) holds the full controls and a live placement preview. Click a corner (or the middle) of the preview frame to move the stamp to the nearest anchor.
Control
Range
Default
What it does
Choose image...
PNG or JPEG file
No image chosen
Picks the signature or logo image to stamp.
Position
Top left / Top right / Bottom left / Bottom right / Center
Bottom right
Which anchor the stamp sits at.
Size (% of image width)
1.0 to 50.0
15.0
Stamp width as a percentage of the output frame width (aspect preserved, clamped to stay inside the frame).
Opacity
0 to 100 %
100 %
How visible the stamp is. 100% is fully opaque; lower values fade it out.
Margin
0 to 512 px
24
Gap between the stamp and the frame edge.
The video stamp is laid out against the final exported frame (after any aspect crop), using the same rules as the still export so the two match. If the watermark is enabled but the image is missing or fails to load, the whole export is aborted with an error, on purpose: a watermark you asked for is never silently dropped from a video.
Screenshot
the Timelapse panel with the Watermark settings section expanded, showing the live placement preview.
Exporting
When saved frames exist, the export-length controls appear in the setup area, and the Export video... button (or Save copy / Stop & save) prompts you for a destination. The default file name is timelapse.mp4 and the only output format is MP4 video. If the target file already exists, Limner asks you to confirm overwriting it.
The export runs on a background thread, so the app stays responsive. An "Exporting..." indicator shows while it runs. If the export fails, a "Timelapse export failed" dialog appears and the timelapse stays embedded in the document so you can try again.
Export length
Option
What it does
Raw (fast)
Default. Stream-copies the segments unchanged (no re-encode). The length is locked to frames / 30. This is the fast export path.
Speed ×
Re-encodes at a speed multiplier (greater than 1 is faster, less than 1 is slower).
× speed
Shown only when Export length is set to Speed ×.
Control
Range
Default
What it does
× speed
0.25 to 60.0 (logarithmic slider)
4.0
Playback speed multiplier. The value is clamped to 0.05 to 200.0 on apply, so typed or extreme values still stay in a safe range.
Aspect (social crop)
Center-crops the video to a target shape for social platforms. Any crop forces a re-encode.
Option
What it does
Native
Default. No crop; keeps the recording's aspect.
9:16 (vertical)
Crops to 9:16 for TikTok, Reels, and Shorts.
1:1 (square)
Crops to 1:1 for the Instagram feed.
16:9 (wide)
Crops to 16:9 for YouTube.
The crop is the largest centered, even-dimensioned rectangle of the chosen ratio.
Hold end (s)
Control
Range
Default
What it does
Hold end (s)
0.0 to 8.0
0.0 (none)
Holds the final frame for this many seconds as an end-card. The value is clamped to 0.0 to 10.0 on apply.
Length estimate
A small hint below the controls estimates the output length and shows whether the export will be a fast stream-copy or a re-encode, for example ≈ 12.5s · stream-copy (fast) or ≈ 3.1s · re-encode. A fast stream-copy is only possible when timing is Raw (fast), aspect is Native, there is no end-card hold, and the watermark is off. Anything else forces a re-encode.
Screenshot
the export-length controls (Export length, Aspect, Hold end) with the estimate line.
The built-in encoder
Limner encodes video inside the app: no ffmpeg.exe, no separate downloads, and identical behaviour on every GPU. Encoding runs on its own CPU thread so painting never waits on it. Every fresh recording is H.264 in an .mp4, the most widely playable combination there is.
A timelapse recorded by an old version above a 4096 px long edge used HEVC; those legacy timelapses still export (joined as-is), but recording cannot continue onto them and the re-encode options (speed, crop, end-card, watermark) are unavailable for them. Export such a timelapse with Raw timing, then start a fresh recording.
If recording or export ever fails, Limner shows a Timelapse couldn't start or Timelapse export failed dialog with the reason. The timelapse stays embedded in the document, so nothing is lost and you can try again. See troubleshooting.md for more.
Notes
All four export options (length, speed, aspect, end-card hold) are per-session settings: they are not saved to your preferences and reset to their defaults on a fresh launch. The watermark setting, by contrast, is saved.
A canvas size change mid-recording does not break the video: the recording size is locked for the whole session, so a resized canvas is letterboxed or resampled into that locked size.
Preferences and Keyboard Shortcuts
Limner remembers how you left it. Window size, your last tool and brush, the colour you were painting with, your custom theme, your swatch palettes, and your keyboard shortcuts all persist between sessions, so the app comes back ready to work. This page covers where those settings live, every preference Limner stores, the theme and pen-pressure controls, the View toggles, and the complete default keymap.
For the menus that expose these settings, see Menus. For where each control sits on screen, see The Interface.
Where settings are stored
Limner keeps all per-user files in one config folder:
Windows: %APPDATA%/Limner
Other platforms: $XDG_CONFIG_HOME/Limner or ~/.config/Limner
The settings file itself is settings.toml. The same folder also holds brushes.dat (your brush library), the autosave/ snapshots, crash.log, and a known-good backup settings.toml.bak.
Settings are written on a clean shutdown. Two kinds of data are saved more eagerly, because they are curated work that must survive a crash: your swatch palettes and your gradient presets are saved on every edit.
If settings.toml ever becomes unreadable (for example after a bad hand edit), Limner recovers from settings.toml.bak rather than resetting you to defaults. Every field is optional, so a settings file written by an older build still loads cleanly: anything missing falls back to its default.
Screenshot
the %APPDATA%/Limner folder in Windows Explorer showing settings.toml, settings.toml.bak, brushes.dat, and the autosave folder.
Migration from the old name
The first time you launch Limner, if a config folder from the previous artpaint name exists, its contents are copied into the new Limner folder once. The old folder is left untouched, so nothing is ever lost. The copy is staged and then renamed into place, so a half-finished migration can never look complete.
What Limner remembers
The table below lists the persisted settings and their defaults exactly as the app uses them. "None = ..." describes how a value missing from the file is treated.
Setting
Default
What it does
Window width / height
Last size
Restores the window to its previous size.
Last tool
Last used
Reselects the Illustration-mode tool you had active.
Last active mode
Illustration
Restores the workspace mode (Illustration, Vector, or Animation) from last shutdown.
Last Vector tool
Last used
Reselects the Vector-mode tool, so it survives a mode switch after reload.
Last brush index
Last used
Reselects the brush preset you had chosen.
Per-brush sizes
(empty)
Each brush keeps its own stamp diameter in canvas pixels, keyed by name.
Eraser / Smudge / Blur params
Built-in defaults
Each of these tools keeps its own size, hardness, flow, and stabilization.
Last colour
Last used
Restores the active sRGB paint colour.
Recent files
(empty)
Up to 8 most recently opened or saved documents, most recent first. Shown in File ▸ Open Recent.
Last open folder
(none)
The folder you last opened a document from, so the Open dialog returns there. None = until the first open.
Dock layout
Default layout
Remembers which panels live where (splits and sizes). None = the default layout.
Theme
Dark
The visual skin (Dark or Light). None = the default dark skin.
Custom theme
(none)
Your own base + accent skin, overriding the Dark/Light preset while set. None = use the Dark/Light theme.
Brush-size cursor
On
Show the brush-size cursor ring on the canvas. None = on.
Canvas scrollbars
Off
Show horizontal and vertical canvas scrollbars. None = off.
Smart Guides
On
Vector-mode alignment guides and snapping. None = on.
Tool strip layout
Default groups
Your custom left tool-strip arrangement. None = the default groups.
Keyboard shortcuts
Built-in defaults
Only the bindings that differ from default are stored (see below).
Pen pressure curve
1.0 (linear)
The global pressure response exponent from calibration. None = uncalibrated.
Swatch palettes
(empty)
Your saved colour palettes (the Color tab).
Active swatch palette
First
Which saved palette the Color tab shows.
Watermark
(not configured)
The export signature/logo overlay configuration.
Watermark enabled
Off
Whether PNG/JPEG exports stamp the watermark.
Gradient tool state
Active colour to transparent, linear
The gradient tool's ramp and shape at last use.
Gradient presets
(empty)
Your saved gradient presets.
Auto update check
On
Whether the launch-time update check runs at all. None = on.
Last update check
(never)
Timestamp that throttles the update check to once a day.
Skipped update version
(none)
A release version you chose "Skip this version" for.
Windows Ink notice seen
Not seen
Tracks the one-time pen-pressure startup notice.
Experimental format notice seen
Not seen
Tracks the one-time .artpaint heads-up shown after a save.
A few extra entries track brush organisation: user-created brush folders (in display order) and your custom brush-to-folder assignments, so a re-imported brush re-lands where you dragged it.
Screenshot
the View and Help menus showing the persisted toggles (theme, scrollbars, auto update check).
Recent files
Limner keeps the 8 most recently opened or saved documents, most recent first, with duplicates removed. They are listed in File ▸ Open Recent, where each entry shows the file name (full path on hover) and clicking one opens it; a Clear Recent item at the bottom empties the list. The same list also drives the launch behaviour: if you start Limner with no file on the command line and no autosave to recover, it offers to reopen your last project. Double-clicking a .limner (or legacy .artpaint) file in Windows opens that document directly instead.
Limner also remembers the folder you last opened a document from, so the Open dialog returns there next time. (Save As and the export dialogs start from the current document's own folder instead.)
Theming
Limner ships two complete skins and lets you build your own. The theme controls live in the View menu.
Dark and Light
The View menu shows a single toggle that flips between the two preset skins. When you are on the dark skin it reads Light theme; when you are on the light skin it reads Dark theme. It switches between the dark glass skin and the bright Aero light skin. The default is Dark.
Customize Theme
Edit ▸ Preferences ▸ Customize Theme opens a small editor where two colours drive the entire skin. Everything updates live as you adjust them.
Control
Range
Default
What it does
Base
sRGB colour
Current panel colour
The chrome base: panels and bars.
Accent
sRGB colour
Current accent colour
Selection and focus highlights.
Text
sRGB colour, optional
Off (auto)
Pick the text colour yourself. Unchecked = automatic contrast against the base.
Tool icons
sRGB colour, optional
Off (follows Text)
A standalone colour for the tool-strip icon glyphs. Unchecked = follows Text.
The editor offers three buttons:
Apply keeps the custom theme. It persists across sessions, overriding the Dark/Light preset.
Reset drops the custom theme and returns you to the Dark/Light preset.
Cancel closes the editor and reverts any live preview.
A tip in the editor reminds you to keep the base near-neutral, because a saturated surround skews how you judge colour. Edit ▸ Preferences ▸ Reset Theme also drops any custom theme and returns to the Dark/Light preset.
Screenshot
the Customize Theme window with the base and accent swatches and the optional Text / Tool icons checkboxes.
Pen pressure calibration
Edit ▸ Preferences ▸ Pen Pressure opens the Pen Pressure Calibration dialog. It tunes one global pressure response curve to your hand, shared by every brush and applied before each brush's own pressure curves.
How it works: scribble naturally on the canvas with your usual pressure, a few comfortable strokes. Nothing is painted while the dialog is open. A live bar shows the raw pressure for the current sample, and a counter shows how many samples have arrived. Once you have at least 50 samples, Limner fits a curve so your typical (median) press maps to a medium stroke and shows the suggested value, along with a plain-language note such as "You press lightly: the response will be boosted."
The dialog has three buttons:
Apply uses the fitted curve for all pen input. It is enabled only after 50 samples.
Reset to linear removes any calibration, so you get raw tablet pressure.
Cancel closes the dialog without changing anything.
The calibrated curve is stored as a single pressure exponent (the saved default is 1.0, meaning linear / uncalibrated). On load the exponent is clamped to the range 0.25 to 4.0, so a hand-edited or out-of-range value is pulled back into that range.
Screenshot
the Pen Pressure Calibration dialog showing the live pressure bar, the sample count, and the suggested curve.
If Limner is not receiving pressure at all, a one-time startup notice explains how to enable Windows Ink in your tablet driver. See Troubleshooting for more.
View toggles
The View menu collects the display options. It stays open while you click items, so you can toggle several at once.
Control
Range
Default
What it does
Grid
On / Off
Off
Show the canvas grid overlay.
Grid spacing (px)
8 to 512
(slider)
Spacing of the grid lines, in canvas pixels.
Smart Guides
On / Off
On
Vector mode: alignment guides and snapping while you move or draw objects. Also Ctrl+U.
Brush-size cursor
On / Off
On
Show a ring at the cursor sized to the active brush.
Crosshair in brush tip
On / Off
On
Add a small centre crosshair inside the brush-size ring.
Canvas scrollbars
On / Off
Off
Show horizontal and vertical scrollbars around the canvas.
Show frame time
On / Off
Off
Overlay the recent average and worst frame time, for performance reports. Session-only.
Show vector paths
On / Off
Off
Show the active vector layer's centerlines with any tool. They always show for the Object and Line Edit tools.
Flip Canvas Horizontally
On / Off
Off
Mirror the view left to right. Non-destructive: the artwork is unchanged.
Flip Canvas Vertically
On / Off
Off
Mirror the view top to bottom. Non-destructive: the artwork is unchanged.
The View menu also holds Zoom buttons (minus, plus, and Fit) plus a zoom readout, and a note that the rotate controls live in the bottom bar.
Default keyboard shortcuts
These are the built-in defaults. Every command is rebindable in Edit ▸ Preferences ▸ Keyboard Shortcuts.
General
Command
Default chord
Undo
Ctrl+Z
Redo
Ctrl+Shift+Z
Save
Ctrl+S
Save As
Ctrl+Shift+S
Open
Ctrl+O
Export PNG
Ctrl+E
Fit to view
Ctrl+0
Copy (to new layer)
Ctrl+C
Cut (to new layer)
Ctrl+X
Paste (onto active layer)
Ctrl+Shift+V
Paste as new layer
Ctrl+V
Memory readout (debug)
` (backquote)
Note the paste pair: Ctrl+V pastes as a new layer (the usual copy/paste workflow, matching Photoshop and Clip Studio Paint), while Ctrl+Shift+V pastes onto the active layer in place.
Layers
Command
Default chord
New layer
N
Duplicate layer
Ctrl+J
Cycle blend mode
Shift+B
Layer opacity +
=
Layer opacity -
- (minus)
Toggle layer visibility
H
Cycle blend mode sits on Shift+B (not plain B) so that the Brush tool can take the universal B hotkey.
Brush
Command
Default chord
Brush size +
]
Brush size -
[
Vector and workspace
Command
Default chord
Group objects (Vector)
Ctrl+G
Ungroup objects (Vector)
Ctrl+Shift+G
Switch workspace (Illustration / Vector)
Ctrl+Shift+M
Smart Guides (Vector)
Ctrl+U
The workspace hotkey toggles between Illustration and Vector only; pressing it in Animation mode returns to Illustration. Enter Animation by clicking its segment in the Workspace switcher.
Tool hotkeys
These select an Illustration-mode tool. They default to the familiar Photoshop / Clip Studio letters so the tools are usable without hunting the strip. They are inert in Vector mode, which routes bare letters through its own tool selection.
Tool
Default chord
Brush
B
Eraser
E
Eyedropper
I
Gradient
G
Fill Bucket
Shift+G
Rect Select
M
Ellipse Select
Shift+M
Lasso
L
Polygon Select
Shift+L
Magic Wand
W
Layer Move
V
Text
T
Rectangle
U
Ellipse
Shift+U
Transform
Ctrl+T
A few letterless tools (Smudge, Blur, and Line) ship unbound. Every one of them is rebindable from the Keyboard Shortcuts dialog.
Fixed keys (not rebindable)
A handful of keys are wired directly and do not appear in the Keyboard Shortcuts dialog.
Animation frame navigation and playback works only in Animation mode (see Animation Mode); in the other workspaces these keys are free for their usual roles.
Key
Action
, (comma)
Previous frame
. (period)
Next frame
Home
First frame
End
Last frame
Enter
Play / pause
Caps Lock toggles the brush cursor between the size ring and a precise crosshair (Photoshop's Caps Lock behaviour), for the brush-style tools. See Interface ▸ Cursors.
Other fixed behaviours (also covered in Menus): Alt-hold eyedropper, Space-drag pan, Space+Ctrl-drag zoom, the wheel zoom, and the Shift / Alt / Ctrl selection modifiers.
The Keyboard Shortcuts dialog
Edit ▸ Preferences ▸ Keyboard Shortcuts opens the rebinding dialog. It lists every command in two columns: the command name and its current chord. An unbound command shows a "-".
Rebinding
Click a shortcut button, then press the new key combination. The button reads "Press a key..." while it waits. Press Esc to cancel a capture. Bare modifier keys (Ctrl, Shift, Alt, and the like) are not valid chords on their own, and only keys in Limner's curated key table can be bound (letters, digits, function keys, common punctuation, arrows, and a few others).
Conflict displacement
If you assign a chord that another command already uses, the new binding wins: the chord is cleared from the other command (which becomes unbound), and the dialog reports which command was displaced. You can then give that command a fresh chord, or leave it unbound.
Reset and persistence
The dialog has Reset to defaults (restore every built-in binding) and Close. Only the bindings that differ from the defaults are saved to settings.toml. This is deliberate: commands you never touched keep tracking any new defaults a future build introduces. A binding you explicitly cleared is stored as an empty value, so it stays cleared on reload. An unparseable saved chord is ignored and the default is kept.
Screenshot
the Keyboard Shortcuts dialog with the two-column grid and one row mid-capture showing "Press a key...".
See also
Menus for the menu entries that open these dialogs.
The Interface for where the View toggles and panels sit on screen.
Updating Limner for the auto-update behavior controlled by the Help menu.
Panels
Panels Reference
Panels are the dockable windows around the canvas. Open or close any panel from the Window menu, drag a tab to reorder it, drag it out to float it, or drop it on a window edge to dock it there. Window ▸ Reset Workspace Layout restores the default arrangement. See The Interface for docking in detail.
The default Illustration layout docks the Layers and Navigator panels on the right with Color, Timelapse, and Reference below them, and the Brush Settings and Brush picker on the left. Vector mode shows its own panel set (Properties, Object Layers, Swatches, Gradient, and the shared Color panel).
Panels in this manual
Panel
What it does
Documented on
Layers
The layer stack: visibility, opacity, blend mode, locks, masks, groups
In Vector mode the dock shows Properties (the object hub), Object Layers (the scene graph), Swatches, Gradient, and the shared Color panel. These are covered in Vector Editing and Output.
Reference Panel
The Reference panel is a board for the images you want to draw from. Drop in photo references, model sheets, color studies, or anything else, then arrange them freely on an infinite board, zoom in on a detail, and keep them all in view while you paint. It works like a PureRef-style pinboard built into Limner.
The board is a drawing aid, not part of your artwork. Nothing on it is saved into your image, and reference images never appear in exports.
Open it from Window ▸ Reference (the panel list shows the panels for the current workspace). The board lives in the Reference dock tab by default, and you can pop it out into its own window (see Pop-out window).
Screenshot
the Reference dock tab with three images arranged on the board, one selected with its accent outline, scale handle, and close button.
The toolbar
A row of buttons runs across the top of the panel. On a narrow dock the buttons wrap onto a second line so the zoom controls stay reachable.
Control
What it does
Dock
Brings the board back into the main window. Shown only when the board is popped out.
Add images...
Opens a file picker so you can add one or more reference images to the board.
Fit
Zooms and pans so every image on the board is in view at once.
Clear
Removes every image from the board.
Pop-out (the open-window icon)
Opens the board in a separate window you can move to another screen. Shown only when the board is docked. Hover text notes that dragging the Reference tab past the window edge does the same thing.
The zoom row
To the right of the toolbar (after a separator) is a three-button zoom cluster sized for touch. These zoom about the center of the view, since an on-screen button has no cursor to anchor on.
Control
What it does
Zoom out (the minus magnifier)
Zooms the board out one step (each step is 1.25x).
Zoom readout (for example "100%")
Shows the current zoom. Click it to reset zoom to 100%.
Zoom in (the plus magnifier)
Zooms the board in one step (each step is 1.25x).
The zoom range across every zoom path (wheel, pinch, the toolbar buttons, and Fit) is 0.05x to 8.0x.
Adding and removing images
Add: click "Add images..." and choose one or more files. New images are placed near the center of the current view.
Remove one: select an image, then click the small close button (the dark disc with an x) at its top-right corner. You can also select it and press Delete while the pointer is over the board.
Remove all: click "Clear".
The 24-image cap
A board holds at most 24 images. Each image keeps a GPU texture (up to 2048 by 2048 pixels), so the cap keeps the board from quietly eating video memory on lighter hardware. When the board is full, a small note reads "Board is full (24 images max)", and an import that would go over the cap stops adding images and tells you how many files were left off.
Working on the board
The board is an open space you pan and zoom freely. Click an image to select it; the selected image gets an accent outline, a scale handle at its bottom-right, and a close button at its top-right. Selecting or grabbing an image also raises it to the front, so it draws on top of any images it overlaps.
Action
Result
Drag empty space
Pans the board.
Drag an image
Moves it (and brings it to the front).
Drag the bottom-right handle
Scales the selected image.
Click the top-right close button
Removes that image.
Scroll the wheel
Zooms about the pointer.
Pinch, or Ctrl + wheel
Zooms about the pinch center (or, with Ctrl + wheel, about the pointer).
Click an image
Selects it and brings it to the front.
Click empty space
Deselects.
Delete key (pointer over the board)
Removes the selected image.
When the board is empty it shows a centered hint: "Add reference images, then drag to arrange." and "Pinch or scroll to zoom, drag empty space to pan."
Picking colors off a reference
While the Eyedropper tool is active, clicking an image on the board picks that pixel's color into your paint color instead of selecting or moving the image, so sampling a color never disturbs your layout. The cursor shows a crosshair when you hover an image with the Eyedropper active. This works on both the docked board and the pop-out window. See Eyedropper.
Pop-out window
Click the pop-out button (or drag the Reference tab past the window edge) to open the board in its own operating-system window. This is handy for putting your references on a second monitor while the main window stays full of canvas.
The pop-out window:
Opens at about 900 by 700 points and is resizable.
Is titled "Reference".
Shows the exact same board. The board state is shared, not duplicated, so the docked tab and the pop-out always agree on which images are present and on the current pan and zoom. Only one of them draws the board at a time.
While the board is popped out, the Reference dock tab shows a placeholder: "The reference board is open in its own window." with a "Bring it back" button. Click that button, or the "Dock" button in the pop-out's own toolbar, to return the board to the main window.
The Eyedropper color-picking described above works in the pop-out window too.
The Navigator gives you a small, live map of your whole canvas so you always know where you are, even at high zoom. The minimap is the real composite of your artwork (the same pixels you see on the canvas), so it updates the instant you paint. A bright outline shows the part of the canvas your window is currently looking at, and you can click or drag on the map to jump the view anywhere. A zoom row underneath lets you zoom out, snap back to 100 percent, and zoom in.
Screenshot
the Navigator panel showing a scaled view of the full canvas with the cyan viewport outline, and the zoom row below it.
Where to find it
The Navigator is a dockable panel labelled "Navigator" (compass icon). In the default Illustration workspace it sits in the top-right dock alongside Layers. If it is closed, reopen it from Window ▸ Navigator. See The interface for how docking, floating, and resetting panels work.
The minimap
The top of the panel is a scaled image of the entire canvas, fit to the panel width with a thin border. It keeps the canvas aspect ratio, and its height is clamped (to a 260 px maximum) so a very tall canvas cannot swallow the whole panel.
It is the live composite, sampled natively from the GPU (no readback), so it costs nothing extra to keep current and refreshes with every stroke.
The cyan outline traces the four corners of your current viewport (the area visible in the canvas window). Because it follows the real viewport, the outline tilts when you rotate the canvas and can grow larger than the canvas itself when you zoom far out. It stays clipped to the minimap so it never spills past the panel edge.
Jump the view
Click or drag anywhere on the minimap to recenter the canvas on that point. This is the fastest way to move around a large image: click near a corner to jump there, or hold and drag to pan the view continuously while you watch the outline follow your cursor.
The zoom row
Below the minimap is a single row of three controls.
Control
Range
Default
What it does
Zoom out
n/a
n/a
Zooms the canvas out one step (the same as the minus button under View ▸ Zoom).
Percent readout
n/a
shows the live zoom
Displays the current zoom as a percentage. 100 % is the fit-to-view size (the auto-letterboxed size the canvas opens at), not 1:1 pixels. Click it to reset to 100 % and re-center the canvas.
Zoom in
n/a
n/a
Zooms the canvas in one step (the same as the plus button under View ▸ Zoom).
The percent readout doubles as a button: its hover tip reads "Reset to 100 % and re-centre", so a single click both returns to the 100 % fit-to-view zoom and clears any pan so the canvas is centered again. This is the same as the Fit button under View ▸ Zoom (Ctrl+0).
Empty state
When no document is open, the panel shows a faint "No document open." message instead of a minimap. Open or create a document and the live map appears.
See also
The interface for docking, floating, and the rest of the panel system.
The matching zoom and rotation controls live in the status bar and under View ▸ Zoom. All default keyboard shortcuts are rebindable in Edit ▸ Preferences ▸ Keyboard Shortcuts.
Stats Panel
The Stats panel is a small, read-only readout of how much work has gone into the current document: how long you have actively been drawing, how many strokes you have committed, how many layers you have, and the canvas dimensions. It is handy for tracking a piece over a long session, for timed studies, or just for curiosity.
The Stats panel is not part of the default workspace. Open it from Window ▸ Stats. (See The interface for how panels dock, float, and reset.)
Screenshot
the Stats panel docked, showing the four rows with sample values.
What it shows
The panel is display only. You cannot edit any value here; the numbers update on their own as you draw. The time readout reticks about once per second while the panel is visible, so it stays current instead of freezing between strokes.
Row
Example value
What it means
Active drawing time
3h 24m 12s
Time spent actually drawing on the canvas (see below). Leading zero units are dropped, so you may see "24m 12s" or "12s", and a fresh document shows "0s".
Strokes
1,234
Number of committed paint strokes. Thousands are comma separated for readability.
Layers
7
How many layers are in the active document right now.
Canvas
2048 x 1536 px @ 300 DPI
The canvas width and height in pixels, then the document resolution in DPI (rounded to a whole number).
How "Active drawing time" is counted
The timer is not a wall clock. It advances only while pointer input is actually arriving on the canvas, and it pauses the moment that input stops. Time spent in menus, panels, or away from the app is never counted. The panel says this in plain words at the bottom:
Note
Time counts only while you are drawing on the canvas.
Short pauses between strokes still count. Lifting the pen between hatch lines or glancing at a reference for a moment is treated as part of the work, so the clock does not stutter every time you briefly stop. Long idle gaps do not accumulate.
The drawing clock does not bridge across documents. When you switch documents, the timer for the new document picks up from its own stored total rather than carrying over the gap.
What counts as a "Stroke"
The Strokes counter tracks committed paint strokes only. Each finished brush, eraser, smudge, or blur gesture adds one, as does a freehand line captured on a vector layer (a mirrored or symmetric gesture still counts as the single gesture it was).
The counter deliberately does not include:
Shapes (Line, Rectangle, Ellipse, or a Smart Shape)
Fills (the bucket or gradient)
Text
Transforms and moves
Selections
So the number reflects hands-on painting, not every possible edit.
The counters travel with the document
Both the drawing time and the stroke count are saved inside the document, so they resume the next time you open the file. They are stored in the native .limner format (and continue to load and save in legacy .artpaint files saved at or after the version that introduced these counters). Files saved before that feature open with the counters starting at zero. See File formats for details on what each format preserves.
Starting a new document, or opening one without saved stats, begins both counters at zero.
Tips
Use Active drawing time for timed studies or to log effort per piece; it ignores time you spend tweaking settings or stepping away.
The Layers and Canvas rows are a quick sanity check before exporting: confirm the resolution and layer count match what you expect.
If the time readout looks frozen, make sure the panel is actually open and visible; it only reticks while it is on screen.
Related
The interface - opening, docking, and resetting panels, including Window ▸ Stats.
Layers - the layer stack that feeds the Layers count.
File formats - what .limner and other formats save, including the session counters.
Help
Troubleshooting and FAQ
Quick answers to the questions that come up most often, plus what the various one-time notices and recovery prompts actually mean. Everything here is grounded in how Limner behaves, so if a message looks alarming, this is the page that tells you whether it is.
Limner checks for a newer version once a day on launch, quietly and in the background. The check is a single download of a small text file (the manifest) from the public releases page. No information about you is sent, only the version lookup. If a newer version exists, a small accent-coloured chip appears in the status bar that reads "Update available" (click it for details). Nothing downloads or installs until you ask.
When you choose to update, Limner downloads the signed installer and verifies it two ways before it is ever run:
The download must match the exact checksum (SHA-256) listed in the manifest.
The installer must carry a valid Windows code signature from the verified
publisher, "Parker Vincent".
If either check fails, the file is deleted and never run. Once both pass, you get an "Update ready" prompt. Installing closes Limner so the installer can replace the running program, then reopens it for you.
Checking for updates manually
Use Help ▸ Check for updates... to check right now. A manual check ignores the once-a-day throttle and any version you previously skipped, and it always tells you the result (even "You are up to date").
Turning the daily check off
Use the Edit ▸ Preferences ▸ Check for updates automatically checkbox to turn the launch-time check on or off. The hover text reads "Once a day on launch. No data is sent beyond the version check." When it is off, Limner never checks on its own; you can still check by hand from the same menu.
Control
Range
Default
What it does
Check for updates automatically
On / Off
On
Runs the version check once per launch, at most once every 24 hours
Skip this version
In the update prompt, "Skip this version" silences the automatic check for that one version only. A manual "Check for updates..." will still surface it.
Windows SmartScreen on first install
The installer is signed by a verified publisher, so SmartScreen should accept it quietly. On a brand-new release that few people have downloaded yet, Windows may still show a "Windows protected your PC" screen the first time. If it does, click "More info" and confirm the publisher reads "Parker Vincent", then choose "Run anyway". The signature is the same one Limner checks before running any update.
Updates on non-Windows systems
The auto-updater ships a Windows installer and verifies a Windows code signature, so it is Windows-only. On other systems the update feature is inactive.
Screenshot
the status-bar "Update available" chip and the update prompt.
Timelapse recording or export failed
Limner encodes timelapse video with an encoder built into the app, so there is nothing to install and no companion files. If recording cannot start or an export fails, a dialog titled "Timelapse couldn't start" or "Timelapse export failed" explains the reason. Common causes:
A legacy oversized timelapse. A timelapse recorded by an old version at more than 4096 px on an edge (HEVC) cannot be continued or re-encoded by the built-in encoder. Export it with Raw timing (no speed change, crop, end-card, or watermark), then start a fresh recording.
Disk or file problems. The encoder writes segments to your temp folder and the export to the destination you chose; a full disk or a locked destination file surfaces here.
An export failure never loses the recording: the timelapse is still saved inside your .limner file, so you can fix the cause and try again.
For everything else about recording, see Timelapse.
"Saved; a note on the format" (experimental format)
The first time you save a .limner file, Limner shows a one-time heads-up titled "Saved; a note on the format":
Note
The .limner save format is still experimental and may change between pre-alpha builds, so a file saved now might not open in a later version. For anything you want to keep, also export a PNG (Ctrl+E) or a PSD.
This is informational, not an error. Your file saved correctly. The point is that the editable .limner document is still evolving, so for finished work it is worth also exporting a flat image you can rely on long-term. The notice appears once, then never again.
"Could not open file" (a file from a newer build)
If you try to open a .limner or .artpaint document and see a dialog titled "Could not open file", the message ends with:
Note
The file may be damaged, or it may have been saved by a newer version of Limner.
Older files always open in newer builds. The reverse is not guaranteed: a file saved by a newer build of Limner can use a document format this build does not understand yet, and Limner will refuse it rather than risk reading it wrong.
What to do
Update Limner to the latest version (see Updates above), then open
the file again.
If the file is genuinely damaged, open the most recent good copy instead, or
A .limner and a .artpaint file are identical in format; the extension does not affect whether a file opens.
Pen pressure and Windows Ink
On first launch, pen-tablet users see a one-time notice titled "Pen pressure & Windows Ink":
Note
Drawing with a pen tablet? Turn on "Windows Ink" in your tablet driver (the Wacom / Huion / XP-Pen control panel) so Limner receives pressure. It reads the pen through the Windows Pointer (WM_POINTER) API, which Windows Ink feeds. A mouse works fine without it.
If your pen strokes come out at a constant width with no pressure response, this is almost always the cause. Open your tablet driver's control panel and enable the "Windows Ink" option, then restart your drawing. A mouse needs no setup. The notice appears once and is dismissed with "Got it".
If pressure still feels wrong after enabling Windows Ink, you can shape the response curve with the pen pressure calibration tool (Edit ▸ Preferences ▸ Pen Pressure). See Preferences and shortcuts for details.
Screenshot
the "Pen pressure & Windows Ink" first-launch notice.
Autosave and crash recovery
Limner keeps a background safety net so a crash or a power loss does not wipe out unsaved work.
How autosave works
Every open document with unsaved changes is snapshotted to a recovery file about every 2 minutes. The snapshot is written in the background while you keep drawing, and it waits for a brief pause in your editing so it never causes a hitch. Autosave never changes your file on disk and never clears the "modified" state: it is a safety copy, not a substitute for saving with Ctrl+S. (Default shortcuts like Ctrl+S and Ctrl+E are rebindable in Edit ▸ Preferences ▸ Keyboard Shortcuts.)
How often unsaved documents are snapshotted for crash recovery
The interval is mainly a verification knob, but it can also be set as an environment variable if you want more frequent backups.
The recovery prompt
A clean exit deletes the autosave snapshots. So if Limner finds leftover snapshots on the next launch, it knows the last session did not close cleanly and shows a prompt titled "Recover unsaved work?":
Note
Limner didn't close cleanly last time, but an automatic backup of your work was saved.
The prompt lists the affected documents. Choose "Restore" (or "Restore all" when several documents were open) to reopen them; each comes back in its own tab, pointed at its original file so the next Ctrl+S saves to the right place, and re-marked as modified so you remember to save. Choose "Discard backup" (or "Discard backups") to throw the snapshots away. Pressing Esc or clicking outside keeps the backups on disk and re-offers them on the next launch.
Screenshot
the "Recover unsaved work?" prompt listing recovered documents.
Where recovery files live
Autosave snapshots are stored in:
%APPDATA%\Limner\autosave\
Each snapshot is a tab{id}.artpaint file with a small tab{id}.meta sidecar that records the original document's path.
Where settings and brushes are stored
All of Limner's per-user data lives in one folder:
%APPDATA%\Limner\
File or folder
What it holds
settings.toml
All your preferences, palettes, presets, and shortcut changes
settings.toml.bak
A known-good backup of the settings, written on every save
brushes.dat
Your brush library, including imported and customized brushes
autosave\
Crash-recovery snapshots (see above)
updates\
The staged installer during an update
If you want a clean reset, closing Limner and removing settings.toml returns all preferences to their defaults on the next launch. Removing brushes.dat resets the brush library. Back these up first if you have customized them.
A corrupt settings file repairs itself
If settings.toml ever becomes unreadable, Limner does not silently wipe your work. It first tries the settings.toml.bak backup, and only if that also fails does it fall back to built-in defaults. This is deliberate, so a single bad value cannot quietly discard your curated palettes and presets.
Moving from an older "artpaint" install
The program was formerly named differently, and stored its data in %APPDATA%\artpaint. The first time you launch the renamed build, it copies that old folder into %APPDATA%\Limner automatically, leaving the original untouched. You should not need to do anything.
"Why is this menu item greyed out?"
Some actions only make sense in a particular context, so Limner disables them until that context exists. The common cases:
Needs a document open. Saving, exporting, importing an image as a layer,
and most editing commands require an open canvas. Create or open a document first (File ▸ New or File ▸ Open).
Needs a selection. Operations that act on a selected region stay disabled
until you have an active selection. Make one with a selection tool first.
Needs vector content. SVG export reports "Nothing to export" when no
Vector-mode layer holds any objects.
Mode-specific tools. Some tools belong to a specific workspace
(Illustration or Vector). Switch workspaces if a tool looks unavailable. See Vector mode.
If something stays greyed out and you cannot tell why, check that you have a document open and, where relevant, an active selection. Those two conditions cover most cases.
Quick reference
Symptom
Likely cause
Fix
Pen has no pressure
Windows Ink is off in the tablet driver
Enable Windows Ink in the driver control panel, then restart your stroke
Timelapse will not record
Legacy oversized (HEVC) timelapse, or a temp-folder problem
Export the old timelapse with Raw timing and start a fresh recording; check disk space
A .limner file will not open
Saved by a newer build, or damaged
Update Limner, then reopen the file
Lost work after a crash
Limner did not close cleanly
Choose "Restore" in the recovery prompt on next launch
Preferences look wrong
Settings file changed or corrupted
Limner recovers from settings.toml.bak, or delete settings.toml to reset